SPARK – Cars & Auto Parts Automotive BigCommerce Theme: Stencil & Google AMP Ready - Documentation
- Created: 29/10/2018
- By: themevale
- Email: support@halothemes.com
-
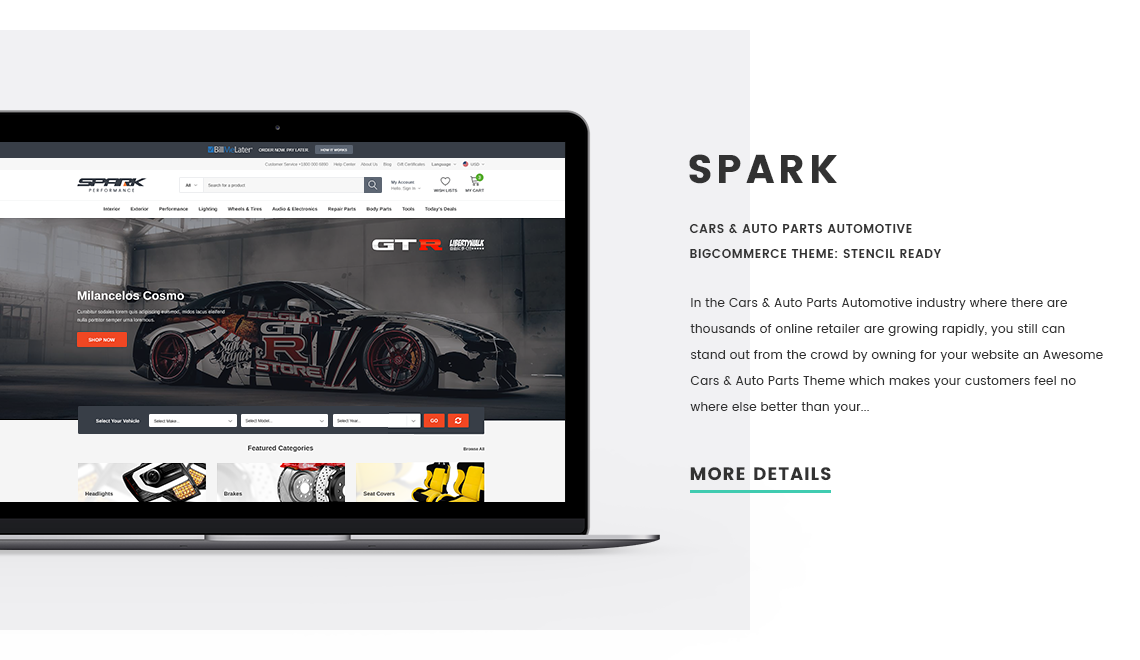
In the Cars & Auto Parts Automotive industry where there are thousands of online retailer are growing rapidly, you still can stand out from the crowd by owning for your website an Awesome Cars & Auto Parts Theme which makes your customers feel no where else better than your.
How to make it differently and better than competitive? Come to SPARK - Cars & Auto Parts Automotive BigCommerce Theme (Stencil Ready) to have your answer.
Look at overall of SPARK bigcommerce theme, you will be attracted at the first sight with unique design. Homepage focuses you on featured category block, product category blocks as well as promotion banners where you can showcase all of main product lines, top deal products. Your customers just have a glance and easy to find what they need immediately.
Moreover, lots of powerful features built on the Stencil framework such as: Advanced Mega Menu, Fixed Header, Multi Level Category Filter (Paid Add-on), Image Gallery with Video + Zoom Effect, Catalog Category Search, Recent Sales Popup Notifications, Ask An Expert Form, Popup for Login and Register, Newsletter Popup, Multiple View layouts: Grid 2, 3 & List, Advanced Brand & FAQs Page Layouts, Google AMP Support, Bootstrap 4.x and many more premium features you can have with SPARK make store on a high rank.
Are you also looking for a Responsive and Mobile-First template? The more Easy shopping your store brings - The more success you get. Let check it out SPARK theme on your devices and feel how it good. This is a super perfect Responsive BigCommerce Theme on different devices.
Just like other amazing themes we have been making, not only Automotive, you also can have a good combination for other stores such as Supermarket, Electronic, Tools, Powersport, Motocycle,… Let’s be the first person to have wonderful experiences with SPARK!
Full Theme Features
- Supported Theme Editor
- Included Google’s Rich Product Snippets for Better SEO
- Responsive Web Design (Uses CSS 3 / HTML 5 + Bootstrap 4 and Google Web Fonts)
- Sticky Header
- Dropdown Menu
- Advanced Mega Menu
- Multi-level Category Filters (V.2)
- Frontpage Slideshow
- Dropdown Shopping Cart
- Quick Add To Cart (Ajax)
- Quick Search Product
- Quick View Product
- Product Comparison Table
- GRID & LIST Product Display Mode
- SALE Product Label
- Custom Product Label
- Search with Catergory
- Galery images/videos Popup
- Recently Sales Popup Notifications
- Custom Brands Page Layout by using Alphabet
- Custom FAQs Page Layout
- Custom Form - ASK AN EXPERT
- Newsletter Popup
- Product Images Size
- Product Detail Swap
- Frontpage Brand Slider
- Extra space for Promotion Text, Banners, Store Information, Links
- Custom Contact Page with Google Maps and Store Information
- Best Responsive For All Device
- The Markup Validation Service By W3C
Installation
Preparing Theme Package
When you unzip the file Spark-Premium-Package.zip (for Premium package) or Spark-Standard-Package.zip (for Standard package) successfully, you will see the following packages:
+ Documentation (Theme User Guide) folder – Please open the index.html file to start reading our Theme User Guide.
+ Images Demo folder
+ Spark Premium-1.0.0.zip (for Premium package) or Spark Standard-1.0.0.zip (for Standard package) (Theme source to upload to Bigcommerce)
+ PSD Files folder

Uploading theme
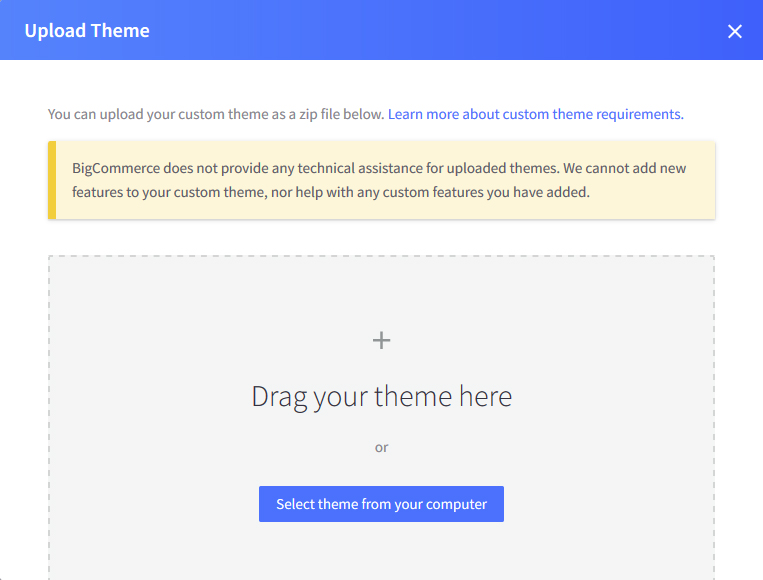
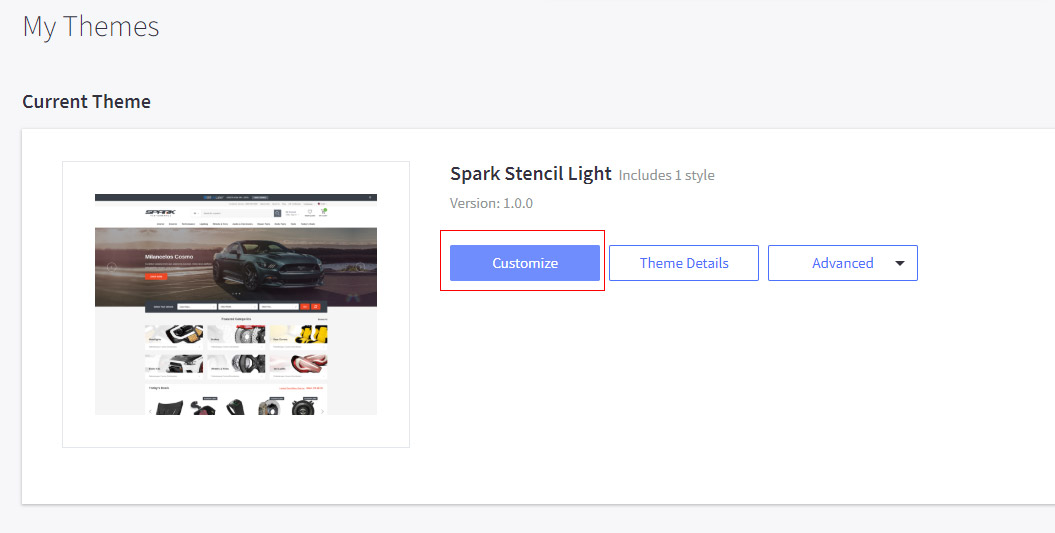
1. Go to Storefront › My Themes.
2. Click the Upload Theme button by the My Themes heading below the Current Theme.

3. Drag the ZIP file (Spark-premium-1.0.0.zip) for Premium package or (Spark-standard-1.0.0) for Standard package into the Upload Theme pop-up window, or you can Select theme from your computer.
4. Once the ZIP file has uploaded, a theme card will appear under My Themes showing theme processing progress. Click Cancel if you want to halt processing and start over.
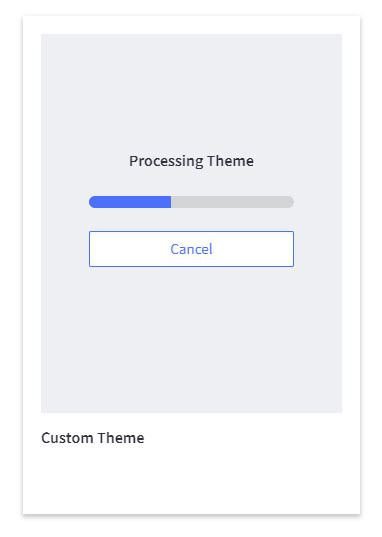
5. After processing, a new custom theme card will appear under My Themes

Uploading Spark Images Demo
You can find all the images demo in the theme package (Images Demo folder).
1. Go to Storefront › Image Manager, then click Upload Images.

2. In the popup that appears, click Choose File (or Browse) and select an image from your computer.
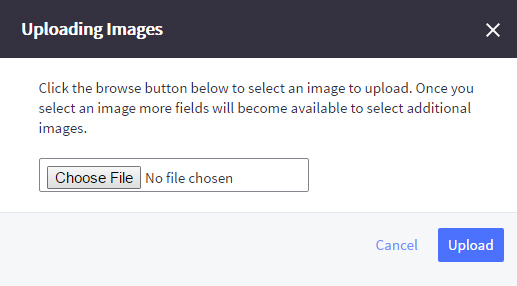
3. Repeat Step 2 for each additional image you want to upload. When you are finished, click Upload.
Pro Tip! - If you have a large number of images, you can upload them all to the Image Manager quickly using WebDAV. In WebDAV, put the images in the product_images/uploaded_images folder.
Could you please refer this Instruction Video for Installation theme for your reference. Here is link for your instruction videoEditing Stencil Theme Files (Must Read)
The Stencil Theme Editor offers you the option of direct browser access to the code that makes up your theme, without having to install Stencil CLI (command-line interface). This is ideal for making minor adjustments to your theme that cannot be done directly within Theme Editor, or for adding scripts to integrate apps.
These instructions cover the basic steps to access Stencil-based themes template files and edit their HTML/CSS using the in-browser editor. For information about customizing Blueprint themes, see Accessing and Customizing Template Files (Blueprint).
This is an advanced feature, and requires knowledge of HTML/CSS and Handlebars. For major design adjustments, or new theme development, we recommend that you or your developer use Stencil CLI, which provides access to all theme files.
Before making large changes we suggest downloading your current theme.
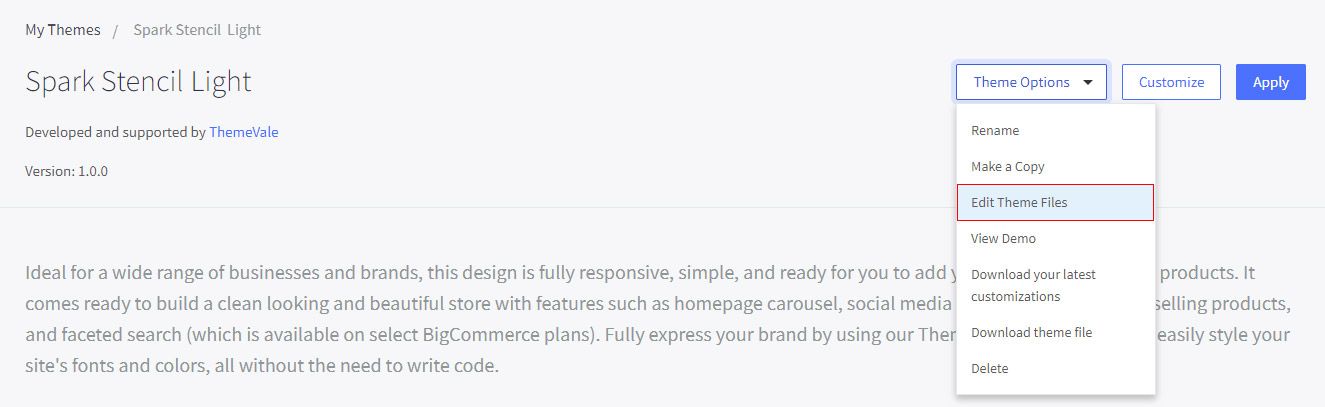
Accessing Edit Theme Files
To access the HTML/CSS files in Theme Editor, you first have to make a copy of your theme.
1. Go to Storefront › My Themes and click on the thumbnail image of the theme.
2. From the Theme Options drop down menu, select Make a Copy.

Why do I have to make a copy? Creating a copy of your theme allows you to make changes to your Storefront without disrupting your live store. You can use the Preview button to see how changes will affect your store.
3. You will be prompted to name the theme copy. Type in a Theme Name, then click Save a Copy.

It may take a few seconds for the theme to be copied.

4. Click on the thumbnail image of your copied theme, from the Theme Options drop down menu, select Edit Theme Files.
Editing Theme Files
When you click the Edit Theme Files, it replaces the preview panel with the theme’s underlying code. The tab’s left-hand side shows you the theme’s files, in a tree of nested folders. Files and directories that should only be edited by the original theme developer are hidden from this view. To edit those files, you will need to use Stencil CLI.
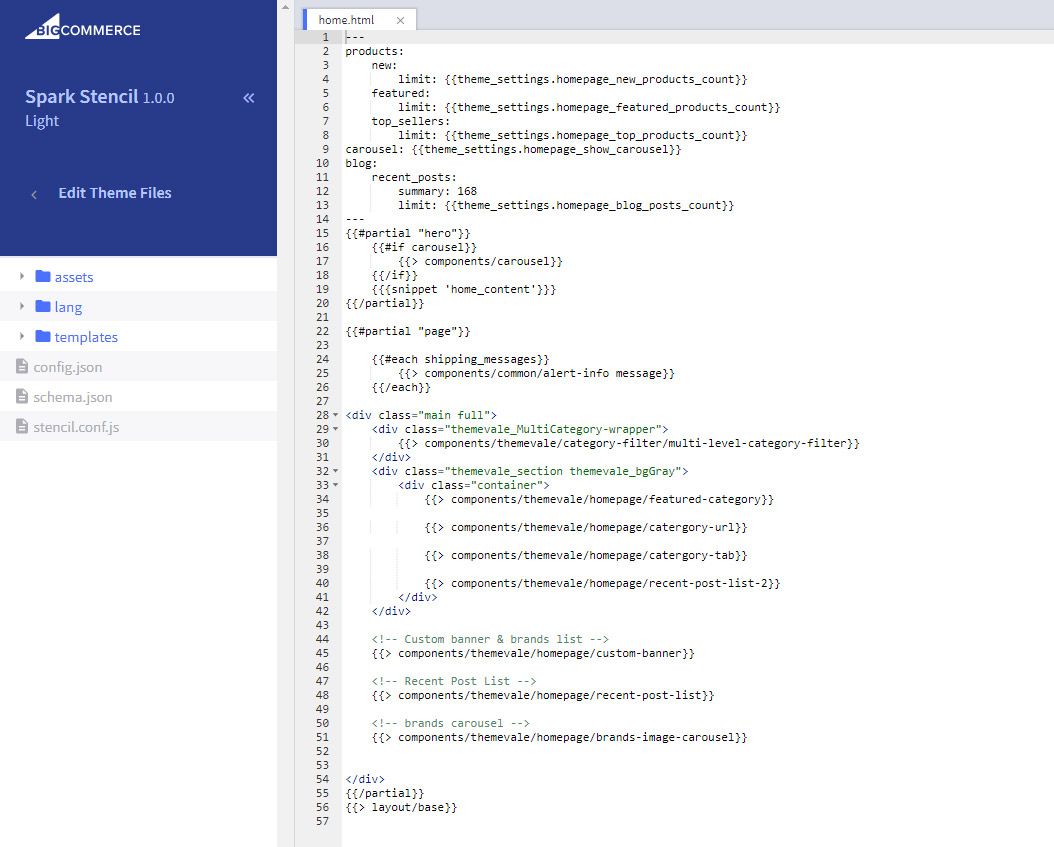
- Theme Files — these are the folders and files that make up your theme. Click on a blue folder to open it. Click on a blue .html or .scss file to edit it. Greyed-out files can be altered only using Stencil CLI, although some greyed-out files can be viewed here.
- Code Panel — this is where you edit the code of the selected file
- Preview — will display a preview of your store, based on your last save
- Save File — will save the file currently open and recompile the theme
- Save All Files — will save all open files and recompile the theme
The file editor color-codes elements within your source HTML, for easy identification and will auto-suggest HTML as you type. It also includes the ability to Undo and Redo edits. The file editor allows for a mix of HTML, Handlebars statements, SCSS, and JavaScript tags in your theme’s template files.
Can I add JavaScript files? You can add JavaScript < script > tags to the html, but you cannot add or edit JavaScript files with the File Editor. To add or edit JavaScript files, you must use the Stencil CLI.
Saving Theme Files
When you click the Save File or Save All Files button, it will recompile and repackage the theme files with your changes. You can then preview the revised theme and (if you choose) apply it to your store. Saving and compiling might take a few minutes to complete, depending on the complexity and number of the changes.
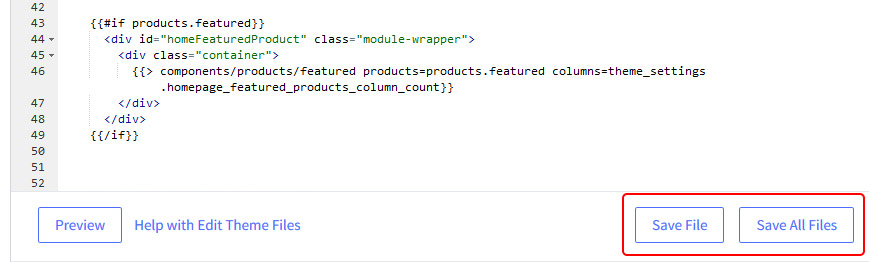
Once saved, you can preview the theme by clicking the Preview button.
Applying New Theme to Storefront
1. When you are happy with your changes, click Save to repackage the edited theme.
2. Navigate to Storefront › My Themes, then scroll down to the list of your themes.
3. Click on the Theme you copied and edited.
4. Click Apply and go through the prompts.

Check your storefront to see your changes in action.
Something go wrong? After applying the new theme, if things are not working, you can go back to the original theme. Click on the thumbnail of the original theme and click the Apply button. Then you can troubleshoot your edited theme without disrupting your business.
Limitations
The following features are not available with Edit Theme Files:
- Editing assets like font files, .SVG files, or other image files
- Editing a theme’s config.json or schema.json configuration files (although you can view their contents)
- Have up to 10 files open, simultaneously, in the File Editor.
- Editing any JavaScript files
- Concurrent editing is not supported. For a given store, only one instance of the editor should be opened at any time.
Setting Up Header Content
What We'll Cover
Make sure you have read on the Editing Stencil Theme Files.
Top Bar Promotion

Go to Storefront -> My Theme -> Customize.
In the Stencil Theme Editor -> go to Header ->Banner Promotion
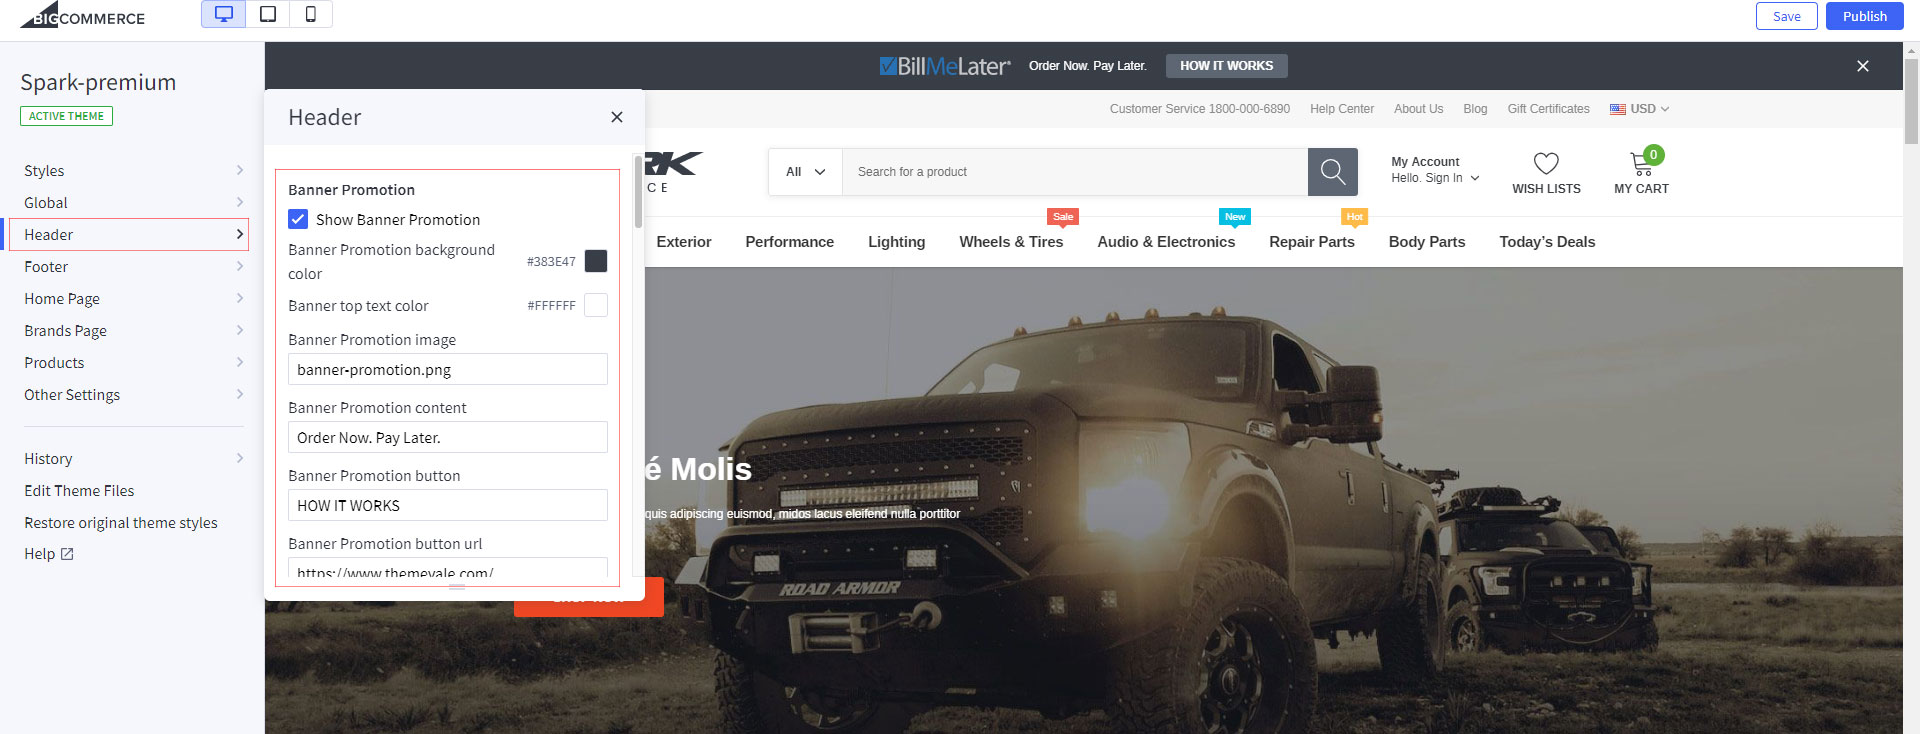
When you are happy with your changes, don't forget click Save to repackage the edited theme.
Header Layout
Spark has 03 header layouts:

How to choose and change Header Layout?
Go to Storefront -> My Theme -> Customize.
In the Stencil Theme Editor -> go to Header -> Choose one header layout
Please ONLY choose ONE layout of header for your site

After you choose 1 header layout, Theme Editor setting of that header will be shown under it:

When you are happy with your changes, don't forget click Save to repackage the edited theme.
How to Edit Header elements?

Go to Storefront -> My Theme -> Customize.
In the Stencil Theme Editor -> go to Header -> Header Top Bar / Header Middle / Header Bottom
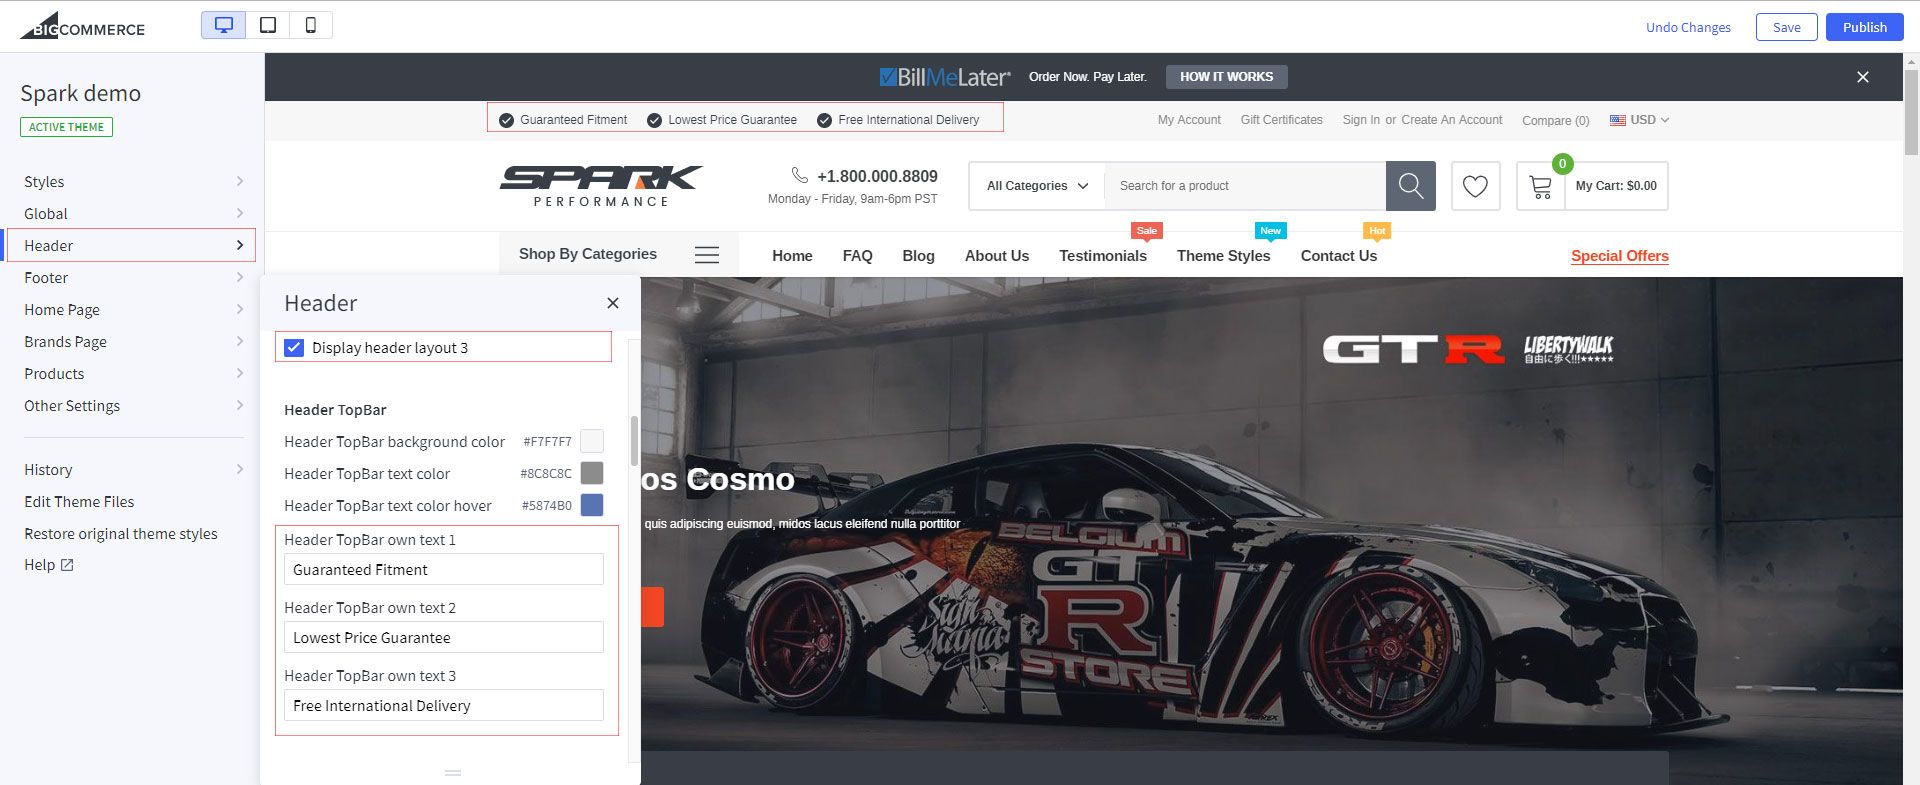
When you are happy with your changes, don't forget click Save and publish to repackage the edited theme.
Show social icons
Go to Storefront -> Social media links.
Please choose social you want.
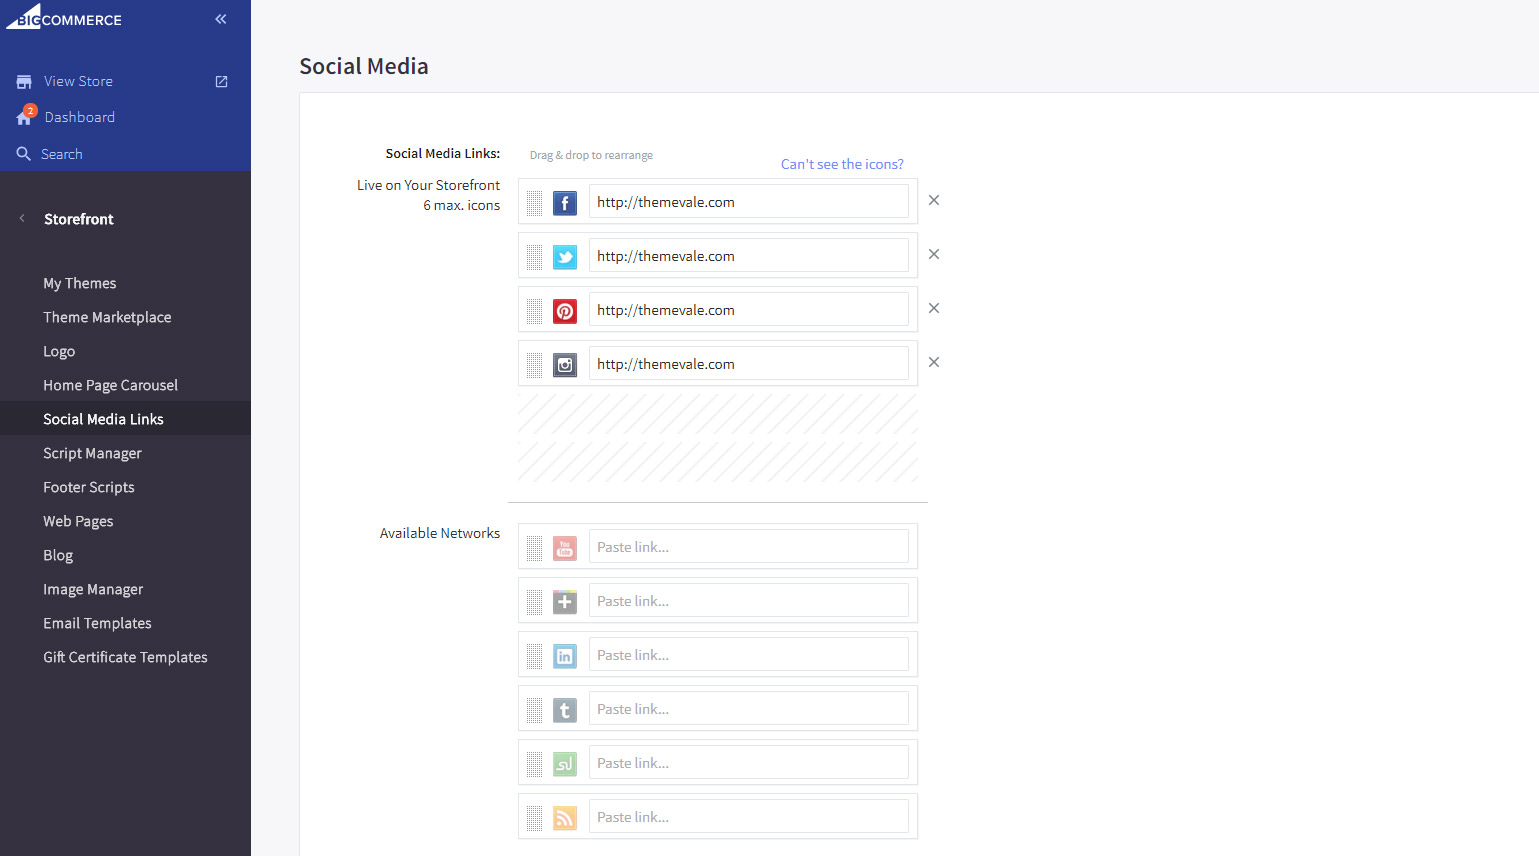
When you are happy with your changes, don't forget click Save to repackage the edited theme.
Store Logo
![]()
In the Admin panel -> go to Storefront -> Logo
![]()
Optimized logo size on Spark theme: 250px x 50px
Also, here is an article of BigCommerce for your reference: https://support.bigcommerce.com/articles/Public/Uploading-a-Custom-Logo/
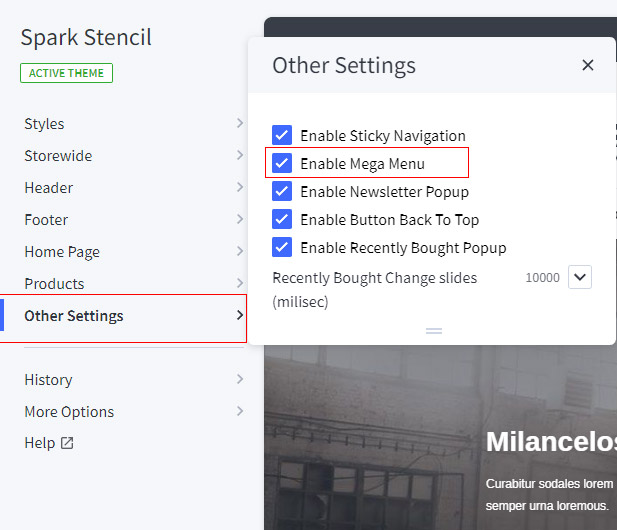
Setting Dropdown Menu/Mega Menu
In the Stencil Theme Editor, look into the options showing on the Other Setting
Find out selector "Enable Mega menu"
How to edit Dropdown Menu/Mega Menu
Go to Storefront -> My Theme -> Customize.
In the Stencil Theme Editor -> go to Header -> Dropdown menu/ Mega menu
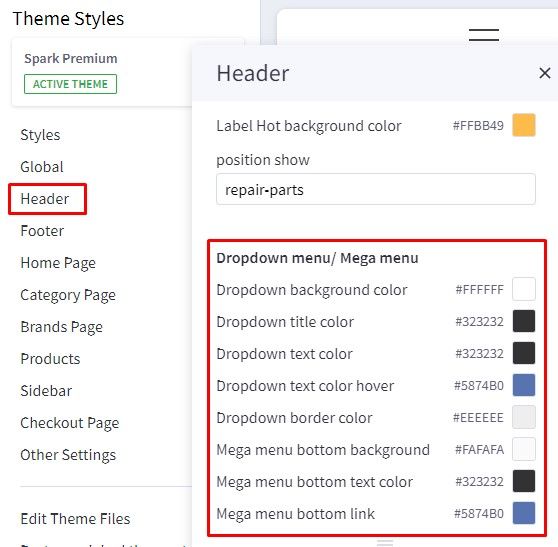
Add menu label: Sale, Hot, New

How to setting layout?
Go to Storefront -> My Theme -> Customize.
In the Stencil Theme Editor -> go to header / Choose Label Sale or Label New or Label Hot
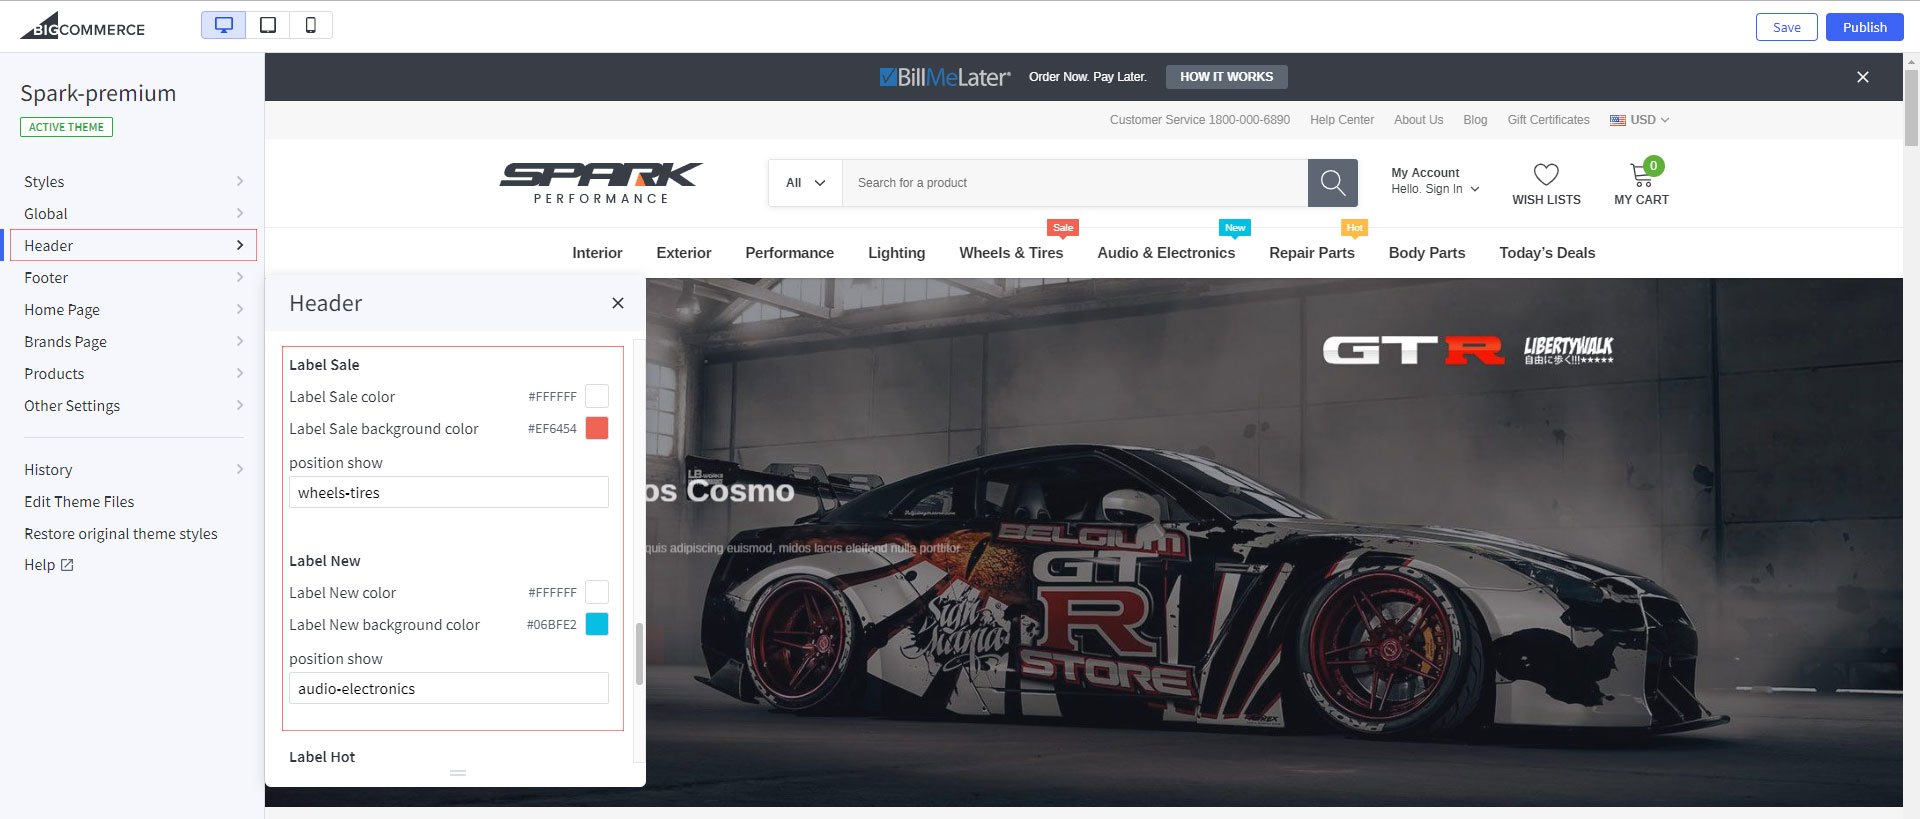
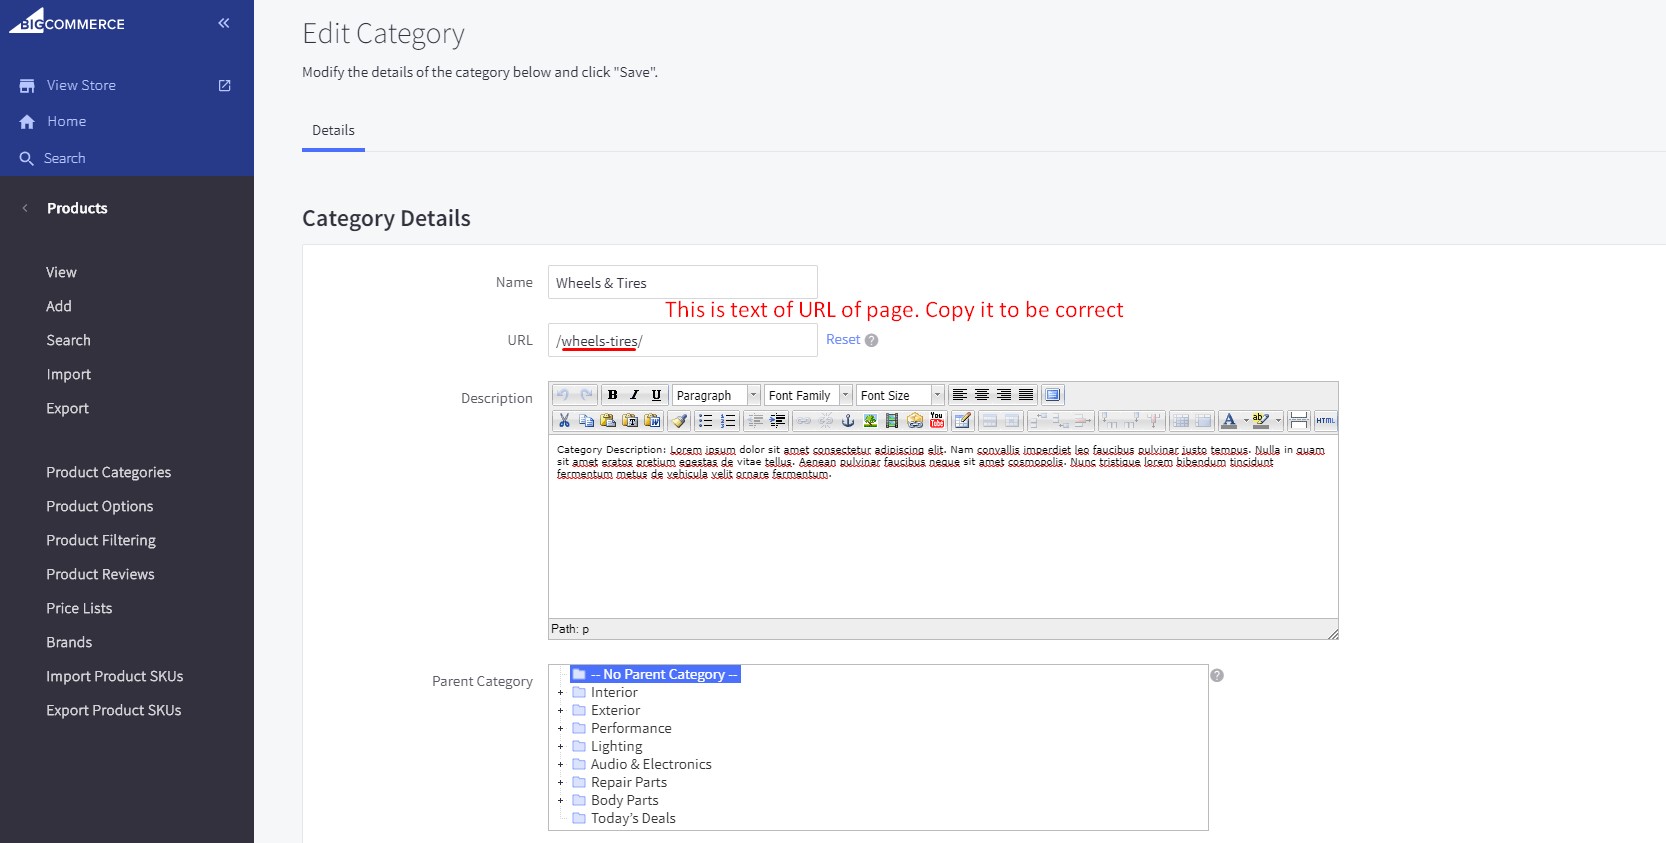
Form Input position show: Please enter text of url of page - NOT name of page
When you are happy with your changes, don't forget click Save to repackage the edited theme.
Setting Up Megamenu
Spark has 3 styles of mega menu. Our theme has Advanced Megamenu which almost all of other themes don't offer. Due to the limitation in editor of Bigcommerce at this time, we cannot write it in Theme Editor, you need to setup in theme file, just need to understand the structure and go to the correct file, you can easily to make change. In case you cannot make change, our support team is available to support you, email us at: support@halothemes.com.
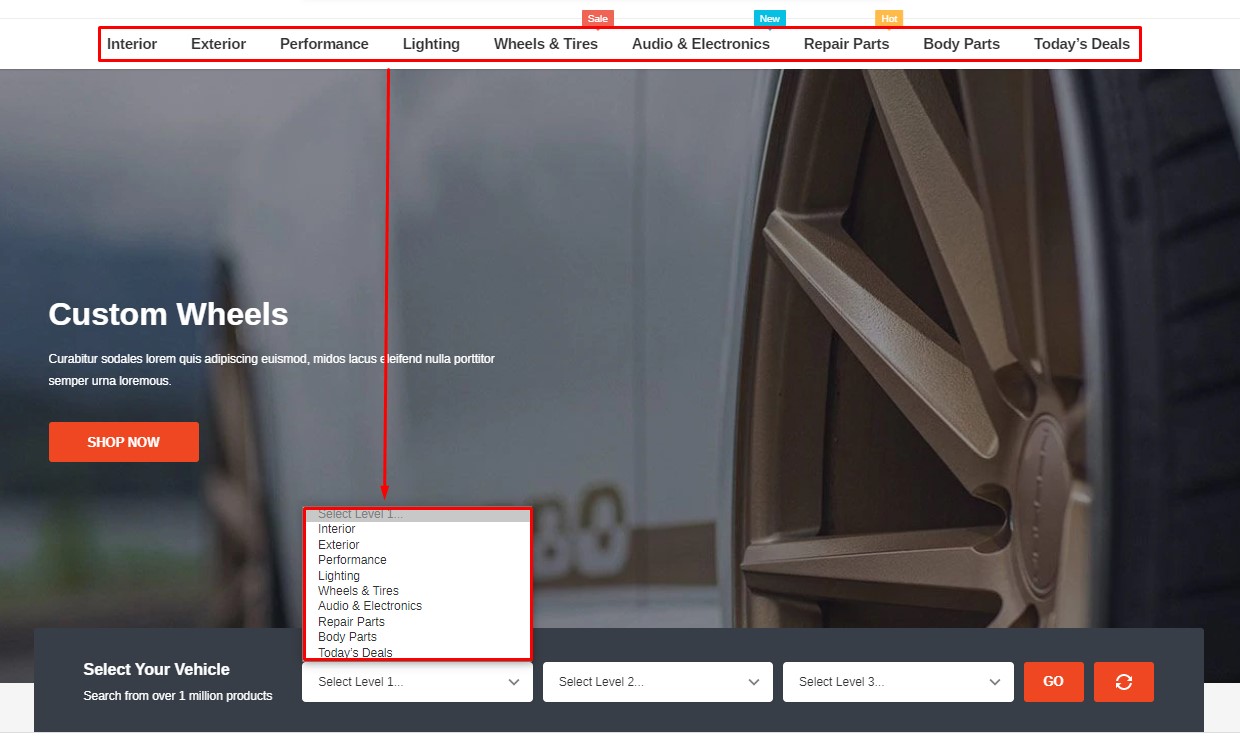
First of all, you need to know the Numerical order of the category items to determine the position of each category on menu:

In the Stencil Theme Editor -> go to edit theme file -> templates/components/themevale/ megamenu.html file.
In the megamenu.html file, you can see the javascript code as below:
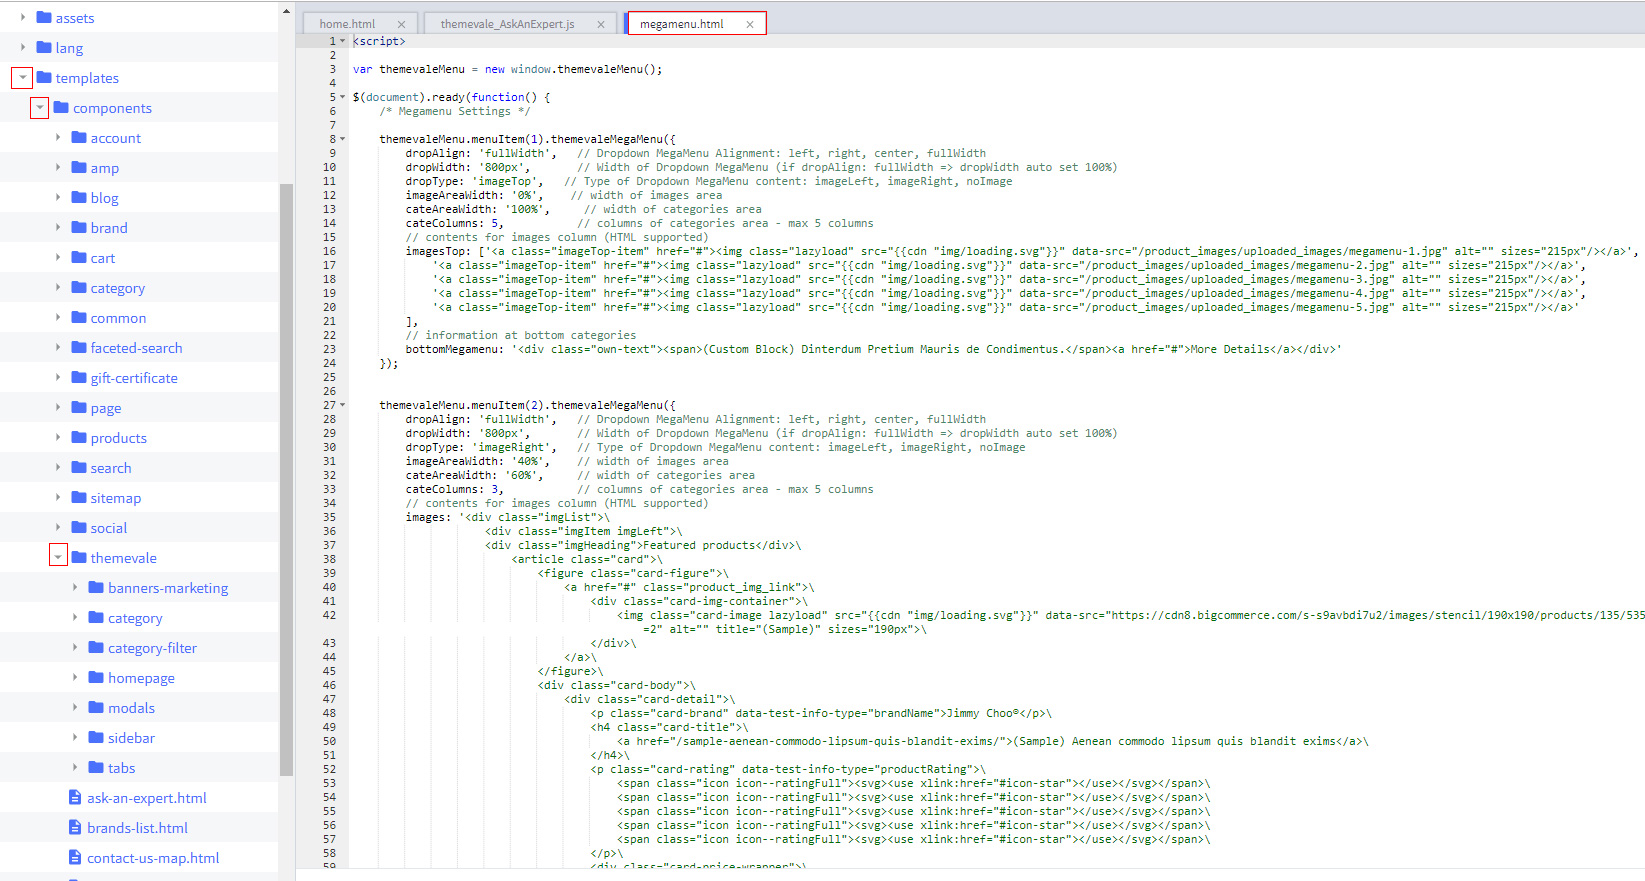
Explain the megamenu options:
- menuItem(1).ThemevaleMegaMenu - Enable Megamenu style for menu item number 1 (Category: INTERIOR)
- dropAlign - Dropdown MegaMenu Alignment: left, right, center, fullWidth
- dropWidth - Width of Dropdown MegaMenu (if dropAlign: fullWidth => dropWidth auto set 100%)
- dropType - Type of Dropdown MegaMenu content: imageLeft, imageRight, default, noImage
- imageAreaWidth - Width of images area
- cateAreaWidth - Width of categories area
- cateColumns - columns of categories area - max 5 columns
- images - Contents for images column (HTML supported)
- bottomCates - You can add your information at bottom categories area
- disabled - set true if you don't want Enable Megamenu style for this item - Default value is false
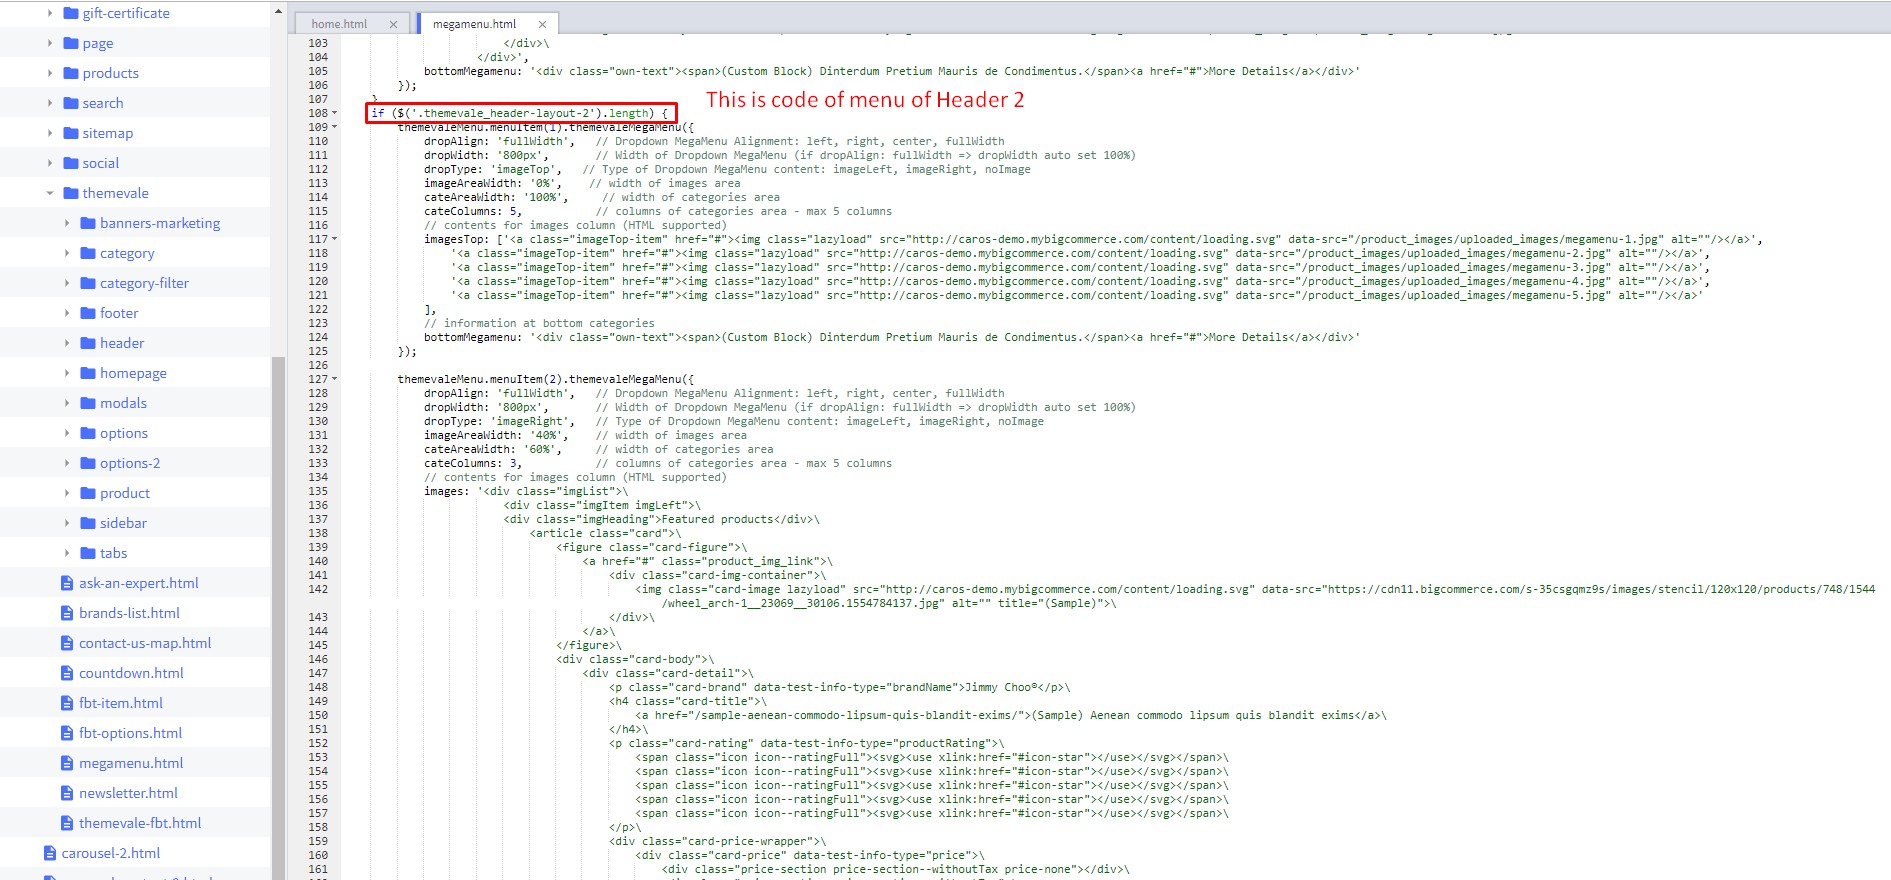
Because Spark has 3 header layouts, In this file: megamenu.html you will see the code of 3 header layouts. Please only edit in the mega menu code of the Header layout you are applying for your site


We already wrote available html structure of our mega menu style, all you need is fill in the number of category position on menu into mega menu style you want, If you need to have mega menu style for many categories, you can copy the whole code of that style and paste it in file, then fill the number of category position on menu.
If you have any difficulty with understanding the structure, you can contact our support team: support@halothemes.com, we will help you setup this
Sample Options Megamenu Style 1
fullWidth alignment, 5-columns categories with banner images, 1 bottom categories
Recommended banners Size: 215x70px.
themevaleMenu.menuItem(1).themevaleMegaMenu({
dropAlign: 'fullWidth', // Dropdown MegaMenu Alignment: left, right, center, fullWidth
dropWidth: '800px', // Width of Dropdown MegaMenu (if dropAlign: fullWidth => dropWidth auto set 100%)
dropType: 'imageTop', // Type of Dropdown MegaMenu content: imageLeft, imageRight, noImage
imageAreaWidth: '0%', // width of images area
cateAreaWidth: '100%', // width of categories area
cateColumns: 5, // columns of categories area - max 5 columns
// contents for images column (HTML supported)
imagesTop: ['<a class="imageTop-item" href="#"><img class="lazyload" src="{{cdn "img/loading.svg"}}" data-src="/product_images/uploaded_images/megamenu-1.jpg" alt="" sizes="215px"/></a>',
'<a class="imageTop-item" href="#"><img class="lazyload" src="{{cdn "img/loading.svg"}}" data-src="/product_images/uploaded_images/megamenu-2.jpg" alt="" sizes="215px"/></a>',
'<a class="imageTop-item" href="#"><img class="lazyload" src="{{cdn "img/loading.svg"}}" data-src="/product_images/uploaded_images/megamenu-3.jpg" alt="" sizes="215px"/></a>',
'<a class="imageTop-item" href="#"><img class="lazyload" src="{{cdn "img/loading.svg"}}" data-src="/product_images/uploaded_images/megamenu-4.jpg" alt="" sizes="215px"/></a>',
'<a class="imageTop-item" href="#"><img class="lazyload" src="{{cdn "img/loading.svg"}}" data-src="/product_images/uploaded_images/megamenu-5.jpg" alt="" sizes="215px"/></a>'
],
// information at bottom categories
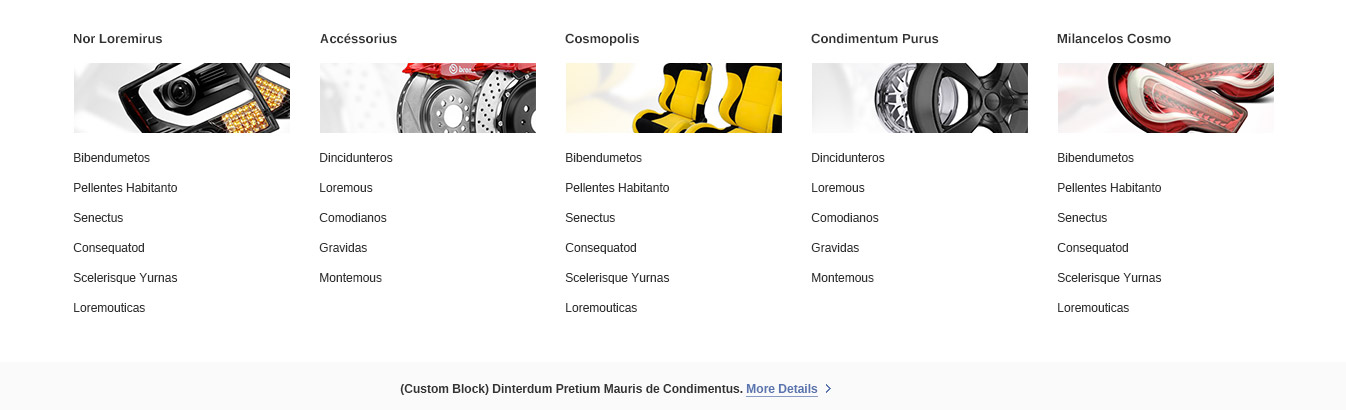
bottomMegamenu: '<div class="own-text"><span>(Custom Block) Dinterdum Pretium Mauris de Condimentus.</span><a href="#">More Details</a></div>'
});
Or use button below to generate the code with your mega menu style 1. Please click the Copy code on the popup after you changed text of the blocks.

Paste the code that you've just copied into /templates/components/themevale/header/megamenu.html file
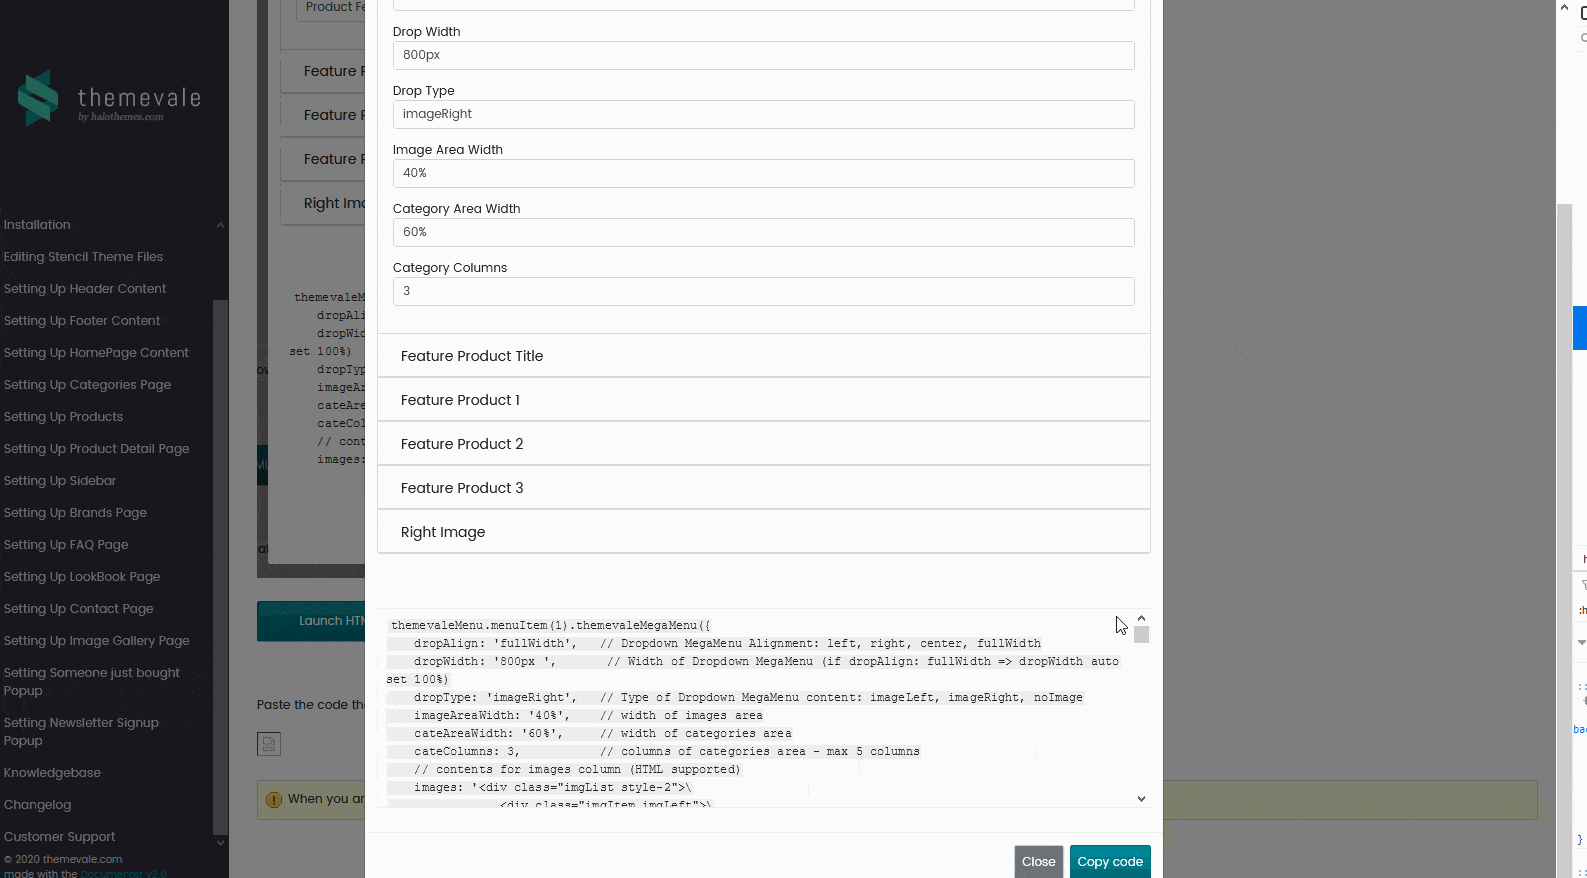
When you are happy with your changes, don't forget click Save.
Sample Options Megamenu Style 2
fullWidth alignment, 3-columns categories, 1 featured product, 1 Right banner image
Recommended banner Size: 215x390px
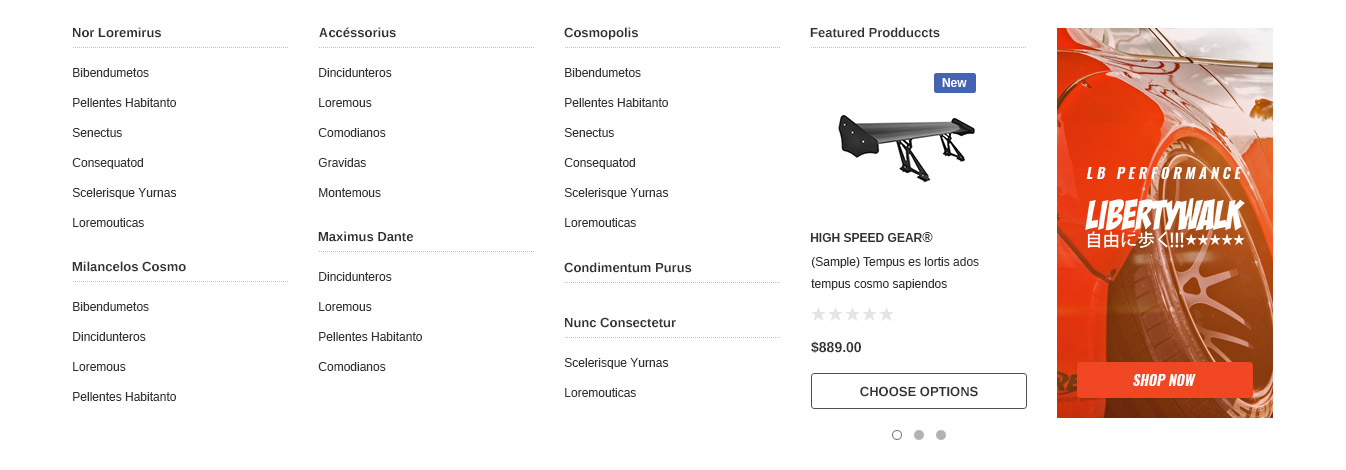
themevaleMenu.menuItem(2).themevaleMegaMenu({
    dropAlign: 'fullWidth',   // Dropdown MegaMenu Alignment: left, right, center, fullWidth
    dropWidth: '800px',       // Width of Dropdown MegaMenu (if dropAlign: fullWidth => dropWidth auto set 100%)
    dropType: 'imageRight',   // Type of Dropdown MegaMenu content: imageLeft, imageRight, noImage
    imageAreaWidth: '40%',    // width of images area
    cateAreaWidth: '60%',     // width of categories area
    cateColumns: 3,           // columns of categories area - max 5 columns
    // contents for images column (HTML supported)
    images: '<div class="imgList">\
                <div class="imgItem imgLeft">\
                <div class="imgHeading">Featured products</div>\
                    <article class="card">\
                        <figure class="card-figure">\
                            <a href="#" class="product_img_link">\
                                <div class="card-img-container">\
                                    <img class="card-image lazyload" src="{{cdn "img/loading.svg"}}" data-src="https://cdn8.bigcommerce.com/s-s9avbdi7u2/images/stencil/190x190/products/135/535/wheel_arch-8__91216.1538447320.jpg?c=2" alt="" title="(Sample)" sizes="190px">\
                                </div>\
                            </a>\
                        </figure>\
                        <div class="card-body">\
                            <div class="card-detail">\
                                <p class="card-brand" data-test-info-type="brandName">Jimmy Choo®</p>\
                                <h4 class="card-title">\
                                    <a href="/sample-aenean-commodo-lipsum-quis-blandit-exims/">(Sample) Aenean commodo lipsum quis blandit exims</a>\
                                </h4>\
                                <p class="card-rating" data-test-info-type="productRating">\
                                    <span class="icon icon--ratingFull"><svg><use xlink:href="#icon-star"></use></svg></span>\
                                    <span class="icon icon--ratingFull"><svg><use xlink:href="#icon-star"></use></svg></span>\
                                    <span class="icon icon--ratingFull"><svg><use xlink:href="#icon-star"></use></svg></span>\
                                    <span class="icon icon--ratingFull"><svg><use xlink:href="#icon-star"></use></svg></span>\
                                    <span class="icon icon--ratingFull"><svg><use xlink:href="#icon-star"></use></svg></span>\
                                </p>\
                                <div class="card-price-wrapper">\
                                    <div class="card-price" data-test-info-type="price">\
                                        <div class="price-section price-section--withoutTax price-none"></div>\
                                        <div class="price-section price-section--withoutTax">\
                                            <span data-product-price-without-tax="" class="price price--withoutTax">$380.00 - $400.00</span>\
                                        </div>\
                                    </div>\
                                </div>\
                                <figcaption class="card-figcaption">\
                                    <a href="/sample-aenean-commodo-lipsum-quis-blandit-exims/" class="button button--transparent card-figcaption-button">Choose Options</a>\
                                </figcaption>\
                            </div>\
                        </div>\
                    </article>\
                </div>\
                <div class="imgItem imgRight">\
                    <a href="#"><img class="lazyload" src="{{cdn "img/loading.svg"}}" data-src="/product_images/uploaded_images/megamenu-6.jpg" alt="" sizes="205px"/></a>\
                </div>\
            </div>',
});
Or use button below to generate the code with your mega menu style 2. Please click the Copy code on the popup after you changed text of the blocks.
Paste the code that you've just copied into /templates/components/themevale/header/megamenu.html file
When you are happy with your changes, don't forget click Save.
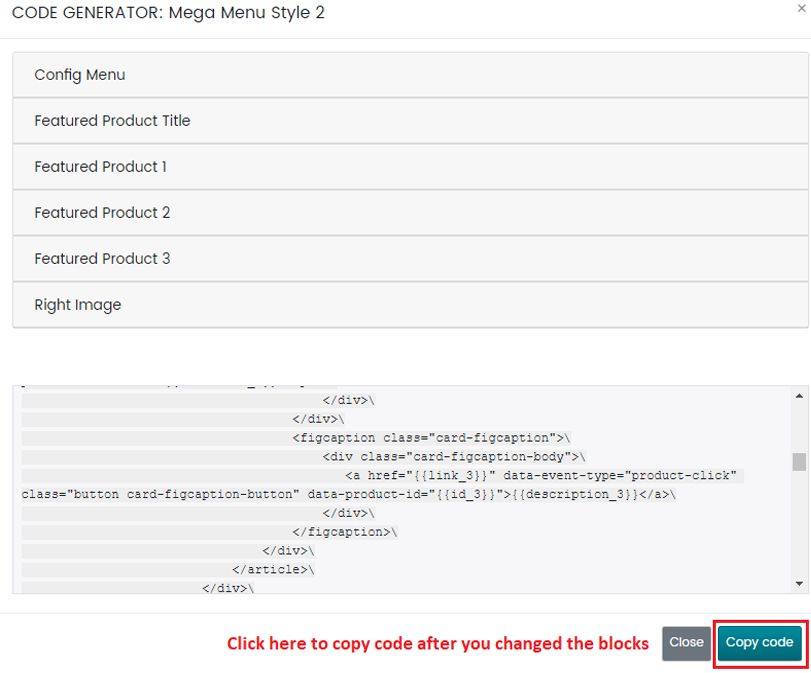
Sample Options Megamenu Style 3
fullWidth alignment, 3-columns categories, 5 banner image
Recommended banner Size: 215x130px, 460x65px
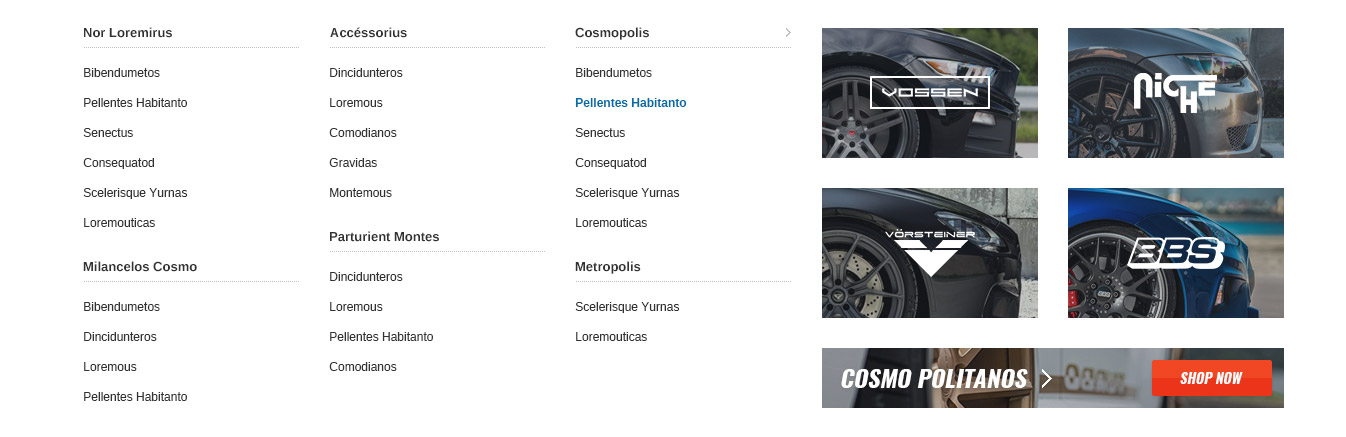
themevaleMenu.menuItem(5).themevaleMegaMenu({
    dropAlign: 'fullWidth',   // Dropdown MegaMenu Alignment: left, right, center, fullWidth
    dropWidth: '800px',       // Width of Dropdown MegaMenu (if dropAlign: fullWidth => dropWidth auto set 100%)
    dropType: 'imageRight',    // Type of Dropdown MegaMenu content: imageLeft, imageRight, noImage
    imageAreaWidth: '40%',    // width of images area
    cateAreaWidth: '60%',     // width of categories area
    cateColumns: 3,           // columns of categories area - max 5 columns
    // contents for images column (HTML supported)
    images: '<div class="imgList">\
                <div class="imgItem">\
                <a href="#"><img class="lazyload" src="{{cdn "img/loading.svg"}}" data-src="/product_images/uploaded_images/megamenu-7.jpg" alt="" sizes="205px"/></a>\
                </div>\
                <div class="imgItem">\
                <a href="#"><img class="lazyload" src="{{cdn "img/loading.svg"}}" data-src="/product_images/uploaded_images/megamenu-8.jpg" alt="" sizes="205px"/></a>\
                </div>\
                <div class="imgItem">\
                <a href="#"><img class="lazyload" src="{{cdn "img/loading.svg"}}" data-src="/product_images/uploaded_images/megamenu-9.jpg" alt="" sizes="205px"/></a>\
                </div>\
                <div class="imgItem">\
                <a href="#"><img class="lazyload" src="{{cdn "img/loading.svg"}}" data-src="/product_images/uploaded_images/megamenu-10.jpg" alt="" sizes="205px"/></a>\
                </div>\
                <div class="imgItem imgItem--full">\
                <a href="#"><img class="lazyload" src="{{cdn "img/loading.svg"}}" data-src="/product_images/uploaded_images/megamenu-11.jpg" alt="" sizes="440px"/></a>\
                </div>\
            </div>',
    bottomMegamenu: '<div class="own-text"><span>(Custom Block) Dinterdum Pretium Mauris de Condimentus.</span><a href="#">More Details</a></div>'
});
Or use button below to generate the code with your mega menu style 3. Please click the Copy code on the popup after you changed text of the blocks.
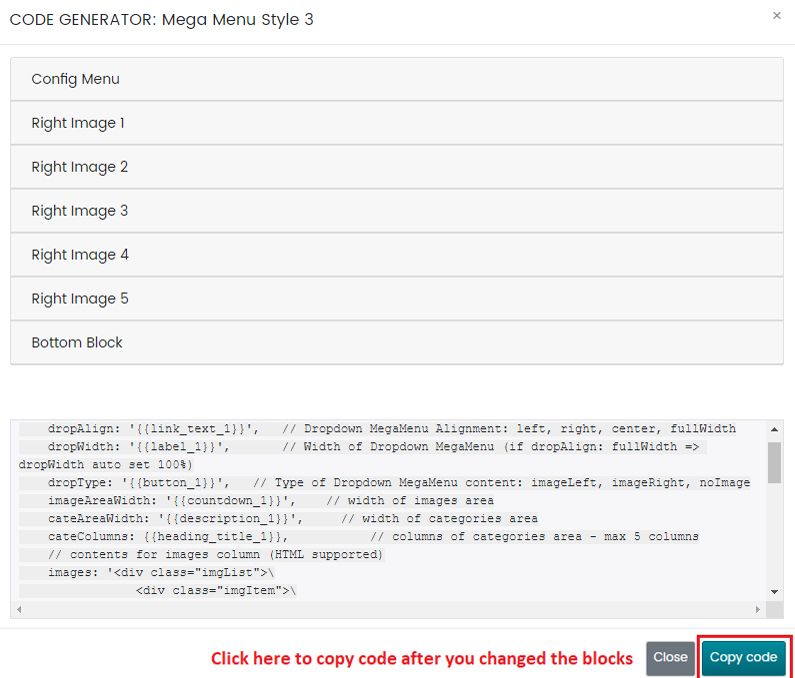
Paste the code that you've just copied into /templates/components/themevale/header/megamenu.html file
When you are happy with your changes, don't forget click Save.
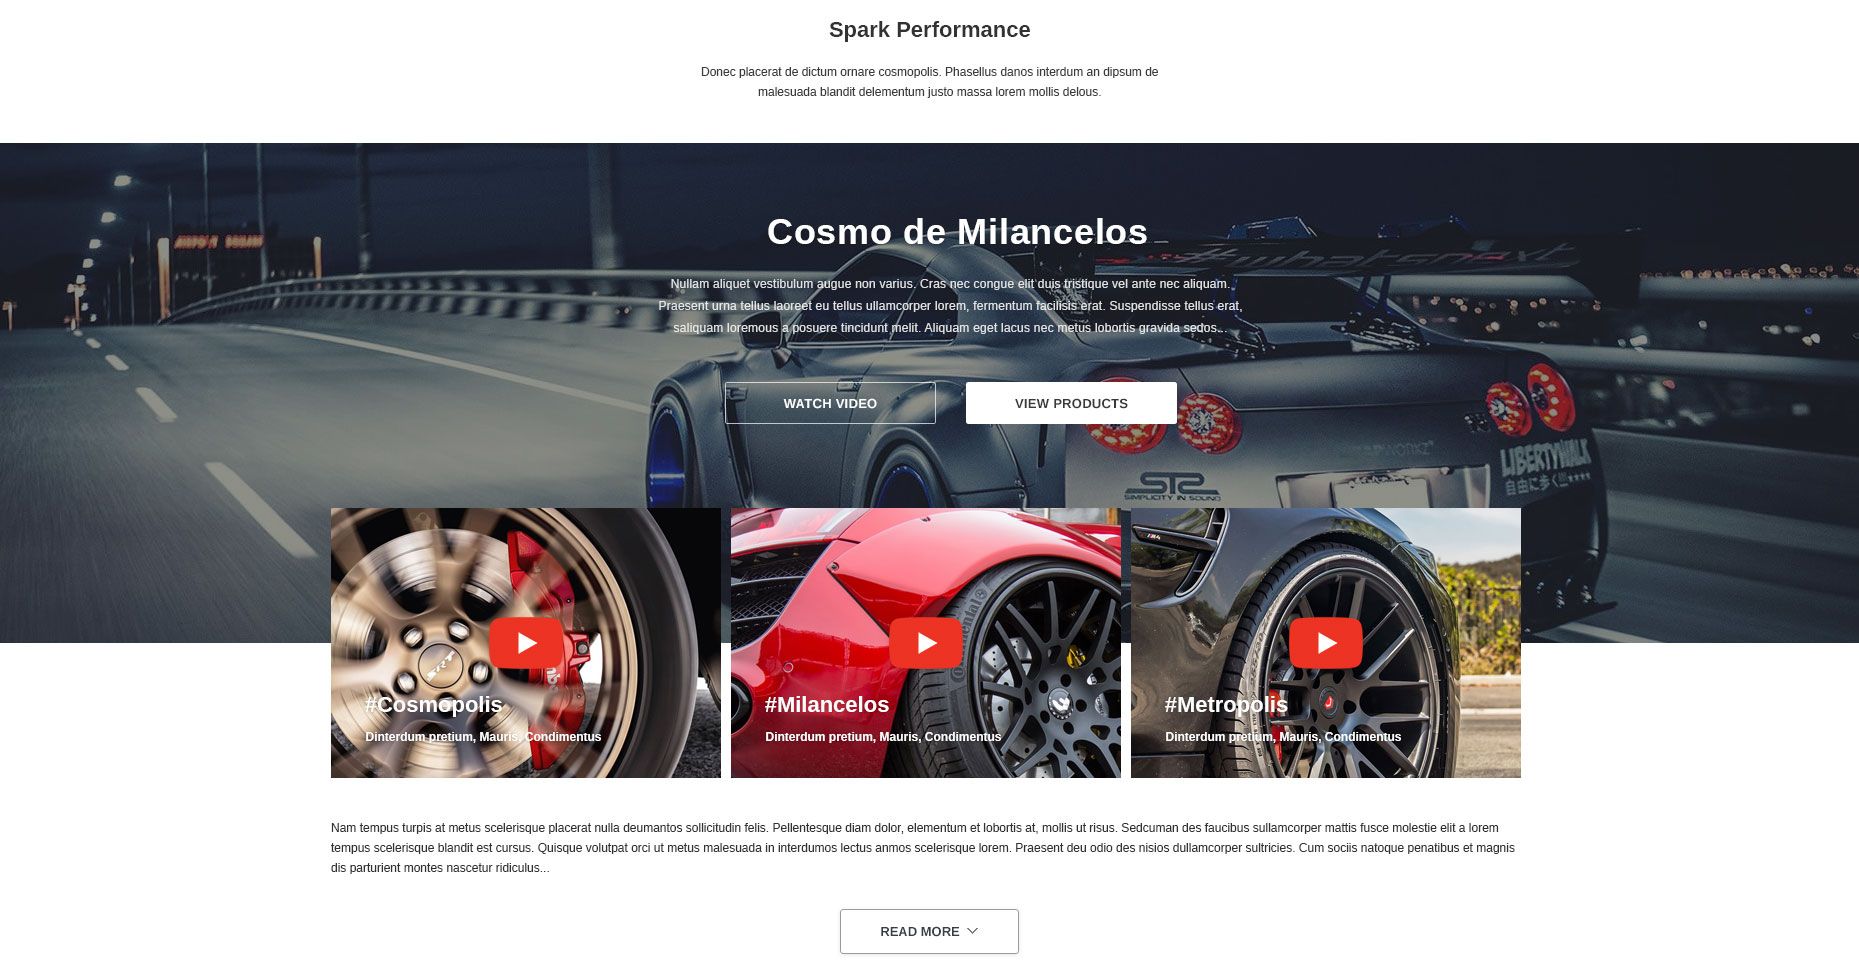
Setting Up HomePage 1 Content
What We'll Cover
Home Slideshow

Recommended banner Size: 1920x620px. Please notice that you will need to upload the correct size like our recommended size for slider banner to show the perfect banners like our Demo theme.
In the Admin panel -> go to Storefront › Home page carousel
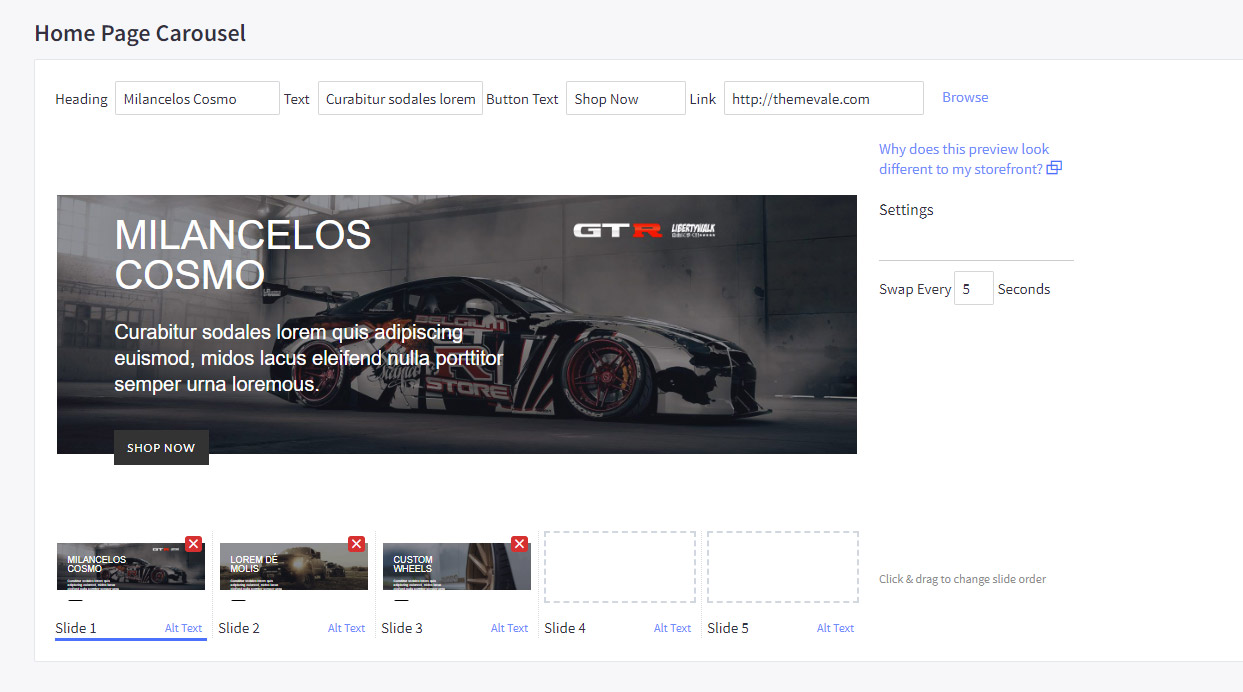
Also, Here is an article of BigCommerce for your reference: https://support.bigcommerce.com/articles/Public/Using-the-Carousel-Builder/
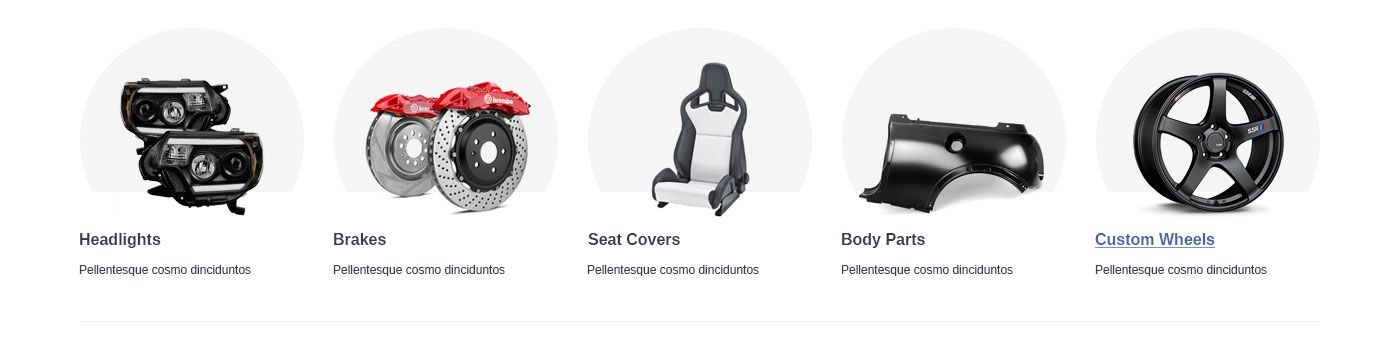
Home Featured Categories
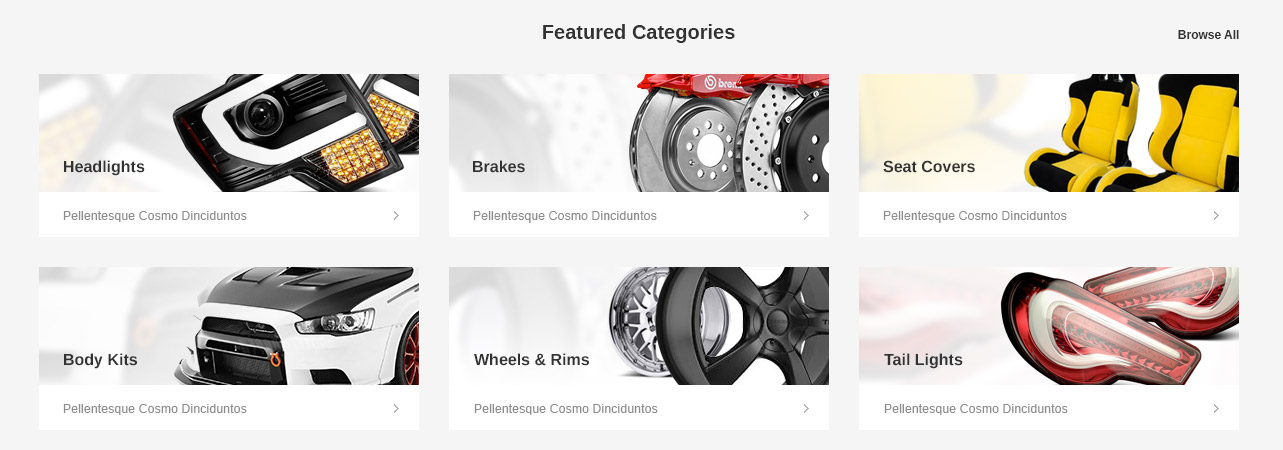
Go to Storefront -> My Theme -> Customize.
In the Stencil Theme Editor -> go to edit theme files/templates/components/themevale/homepage/ featured-category.html file.

<div class="themevale_sectionChild">
    <div class="themevale_page-heading-wrapper text-center">
        <h2 class="page-heading">Featured Categories</h2>
        <a href="#" class="themevale_link">Browse All</a>
    </div>
    <div class="themevale_column themevale_column--col{{theme_settings.themevale_featured-category-col}}">
        <div class="item">
            <article class="featured-card">
                <figure class="featured-figure">
                    <div class="featured-img-container">
                        <img class="featured-image lazyload" src="{{cdn 'img/loading.svg'}}" data-src="/product_images/uploaded_images/featured-1.jpg" alt="" >
                    </div>
                </figure>
                <div class="featured-body">
                    <h4 class="title">Headlights</h4>
                    <div class="description">
                        <p>Pellentesque Cosmo Dinciduntos</p>
                        <svg class="icon"><use xlink:href="#icon-chevron-right"></use></svg>
                    </div>
                </div>
                <a href="#"></a>
            </article>
            <article class="featured-card">
                <figure class="featured-figure">
                    <div class="featured-img-container">
                        <img class="featured-image lazyload" src="{{cdn 'img/loading.svg'}}" data-src="/product_images/uploaded_images/featured-2.jpg" alt="" >
                    </div>
                </figure>
                <div class="featured-body">
                    <h4 class="title">Body Kits</h4>
                    <div class="description">
                        <p>Pellentesque Cosmo Dinciduntos</p>
                        <svg class="icon"><use xlink:href="#icon-chevron-right"></use></svg>
                    </div>
                </div>
                <a href="#"></a>
            </article>
        </div>
        <div class="item">
            <article class="featured-card">
                <figure class="featured-figure">
                    <div class="featured-img-container">
                        <img class="featured-image lazyload" src="{{cdn 'img/loading.svg'}}" data-src="/product_images/uploaded_images/featured-3.jpg" alt="" >
                    </div>
                </figure>
                <div class="featured-body">
                    <h4 class="title">Brakes</h4>
                    <div class="description">
                        <p>Pellentesque Cosmo Dinciduntos</p>
                        <svg class="icon"><use xlink:href="#icon-chevron-right"></use></svg>
                    </div>
                </div>
                <a href="#"></a>
            </article>
            <article class="featured-card">
                <figure class="featured-figure">
                    <div class="featured-img-container">
                        <img class="featured-image lazyload" src="{{cdn 'img/loading.svg'}}" data-src="/product_images/uploaded_images/featured-4.jpg" alt="" >
                    </div>
                </figure>
                <div class="featured-body">
                    <h4 class="title">Wheels & Rims</h4>
                    <div class="description">
                        <p>Pellentesque Cosmo Dinciduntos</p>
                        <svg class="icon"><use xlink:href="#icon-chevron-right"></use></svg>
                    </div>
                </div>
                <a href="#"></a>
            </article>
        </div>
        <div class="item">
            <article class="featured-card">
                <figure class="featured-figure">
                    <div class="featured-img-container">
                        <img class="featured-image lazyload" src="{{cdn 'img/loading.svg'}}" data-src="/product_images/uploaded_images/featured-5.jpg" alt="" >
                    </div>
                </figure>
                <div class="featured-body">
                    <h4 class="title">Seat Covers</h4>
                    <div class="description">
                        <p>Pellentesque Cosmo Dinciduntos</p>
                        <svg class="icon"><use xlink:href="#icon-chevron-right"></use></svg>
                    </div>
                </div>
                <a href="#"></a>
            </article>
            <article class="featured-card">
                <figure class="featured-figure">
                    <div class="featured-img-container">
                        <img class="featured-image lazyload" src="{{cdn 'img/loading.svg'}}" data-src="/product_images/uploaded_images/featured-6.jpg" alt="" >
                    </div>
                </figure>
                <div class="featured-body">
                    <h4 class="title">Tail Lights</h4>
                    <div class="description">
                        <p>Pellentesque Cosmo Dinciduntos</p>
                        <svg class="icon"><use xlink:href="#icon-chevron-right"></use></svg>
                    </div>
                </div>
                <a href="#"></a>
            </article>
        </div>
    </div>
</div>
Or use button below to generate the code with your featured categories. Please click the Copy code on the popup after you changed text of the blocks.
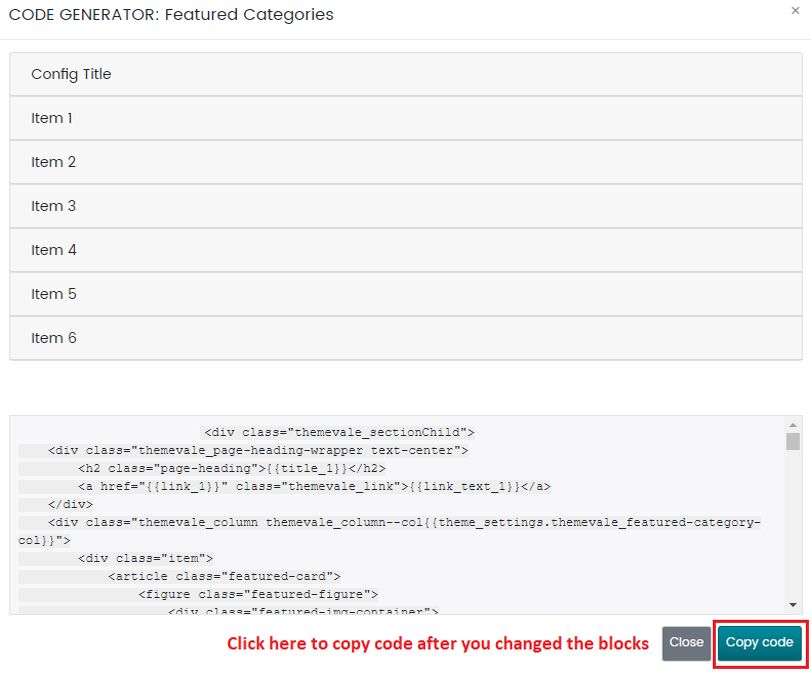
Paste the code that you've just copied into /templates/components/themevale/homepage/featured-category.html file.
When you are happy with your changes, don't forget click Save.
Change column:
Go to Storefront -> My Theme -> Customize.
In the Stencil Theme Editor, look into the options showing on the Home Page
Find out selector Featured Categories and choose number column
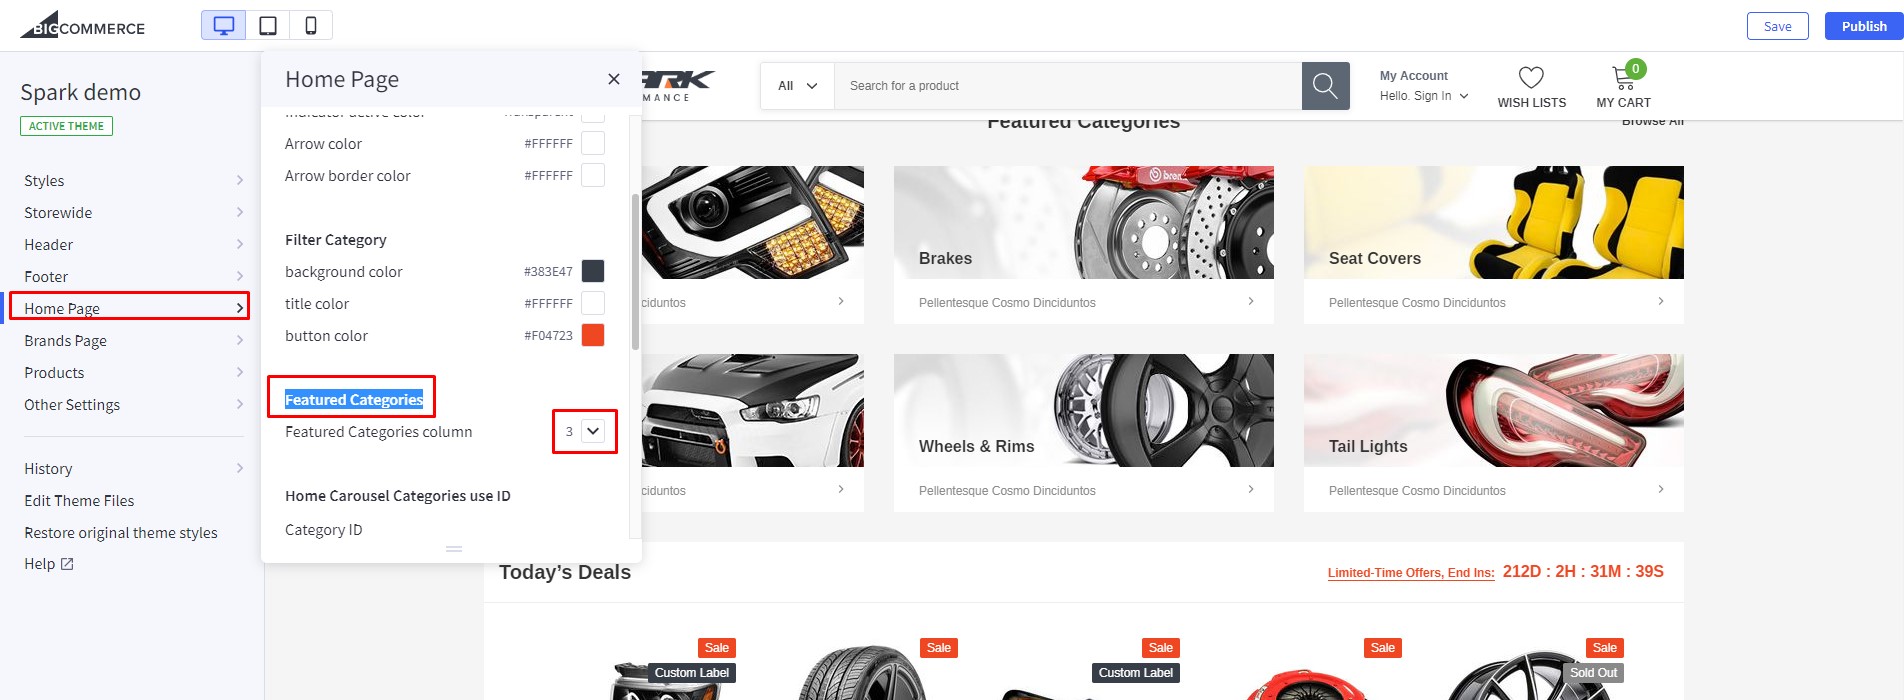
Recommended Size for banner images: 380x160px
When you are happy with your changes, don't forget click Save to repackage the edited theme.
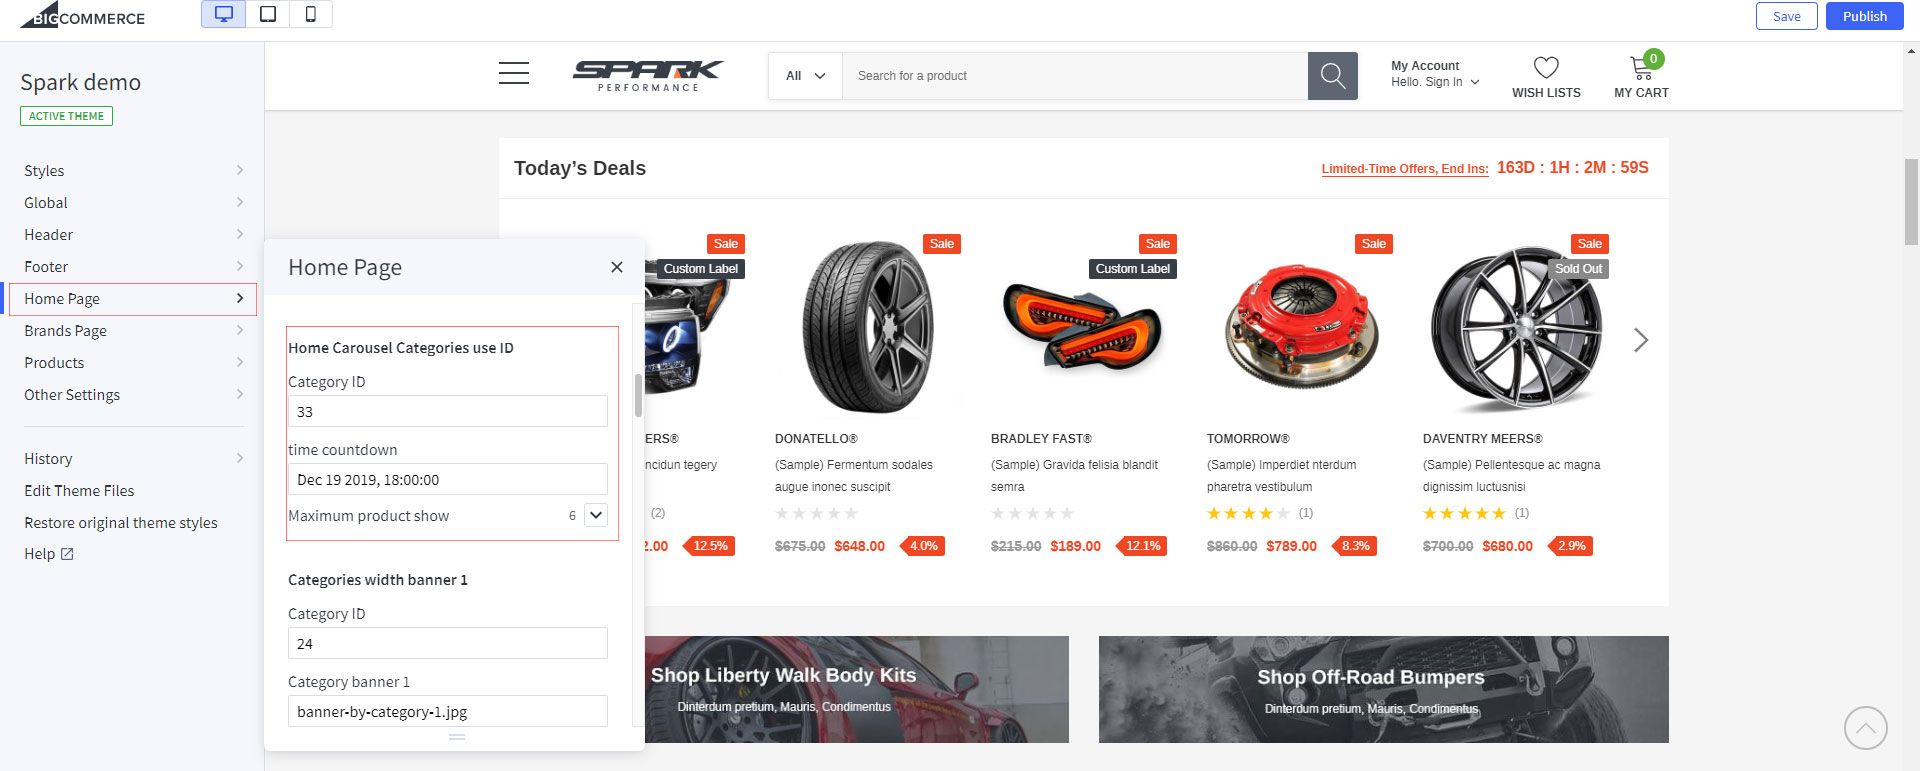
Home Carousel Categories use ID

How to setting layout?
Go to Storefront -> My Theme -> Customize.
In the Stencil Theme Editor -> go to Home Page / Choose Carousel Categories use ID
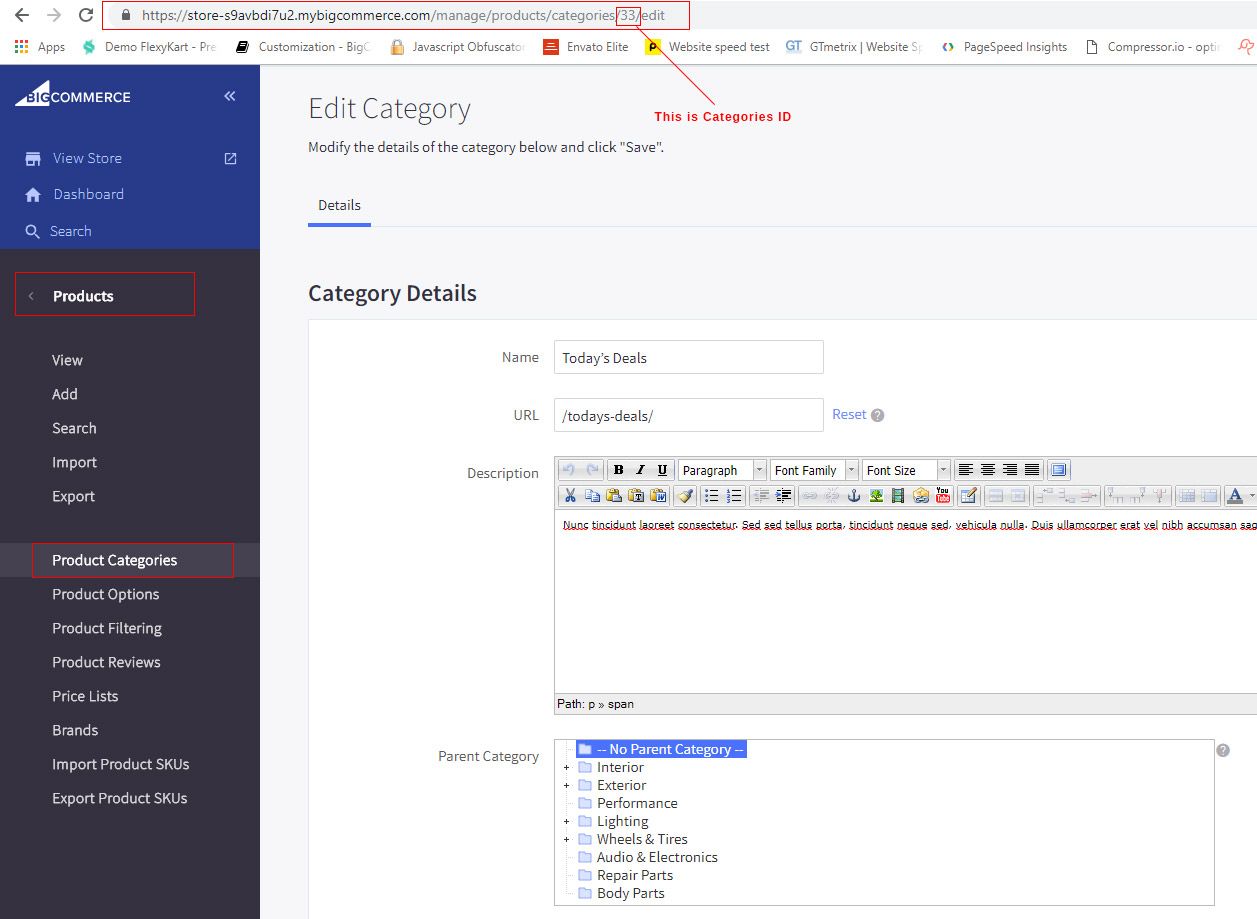
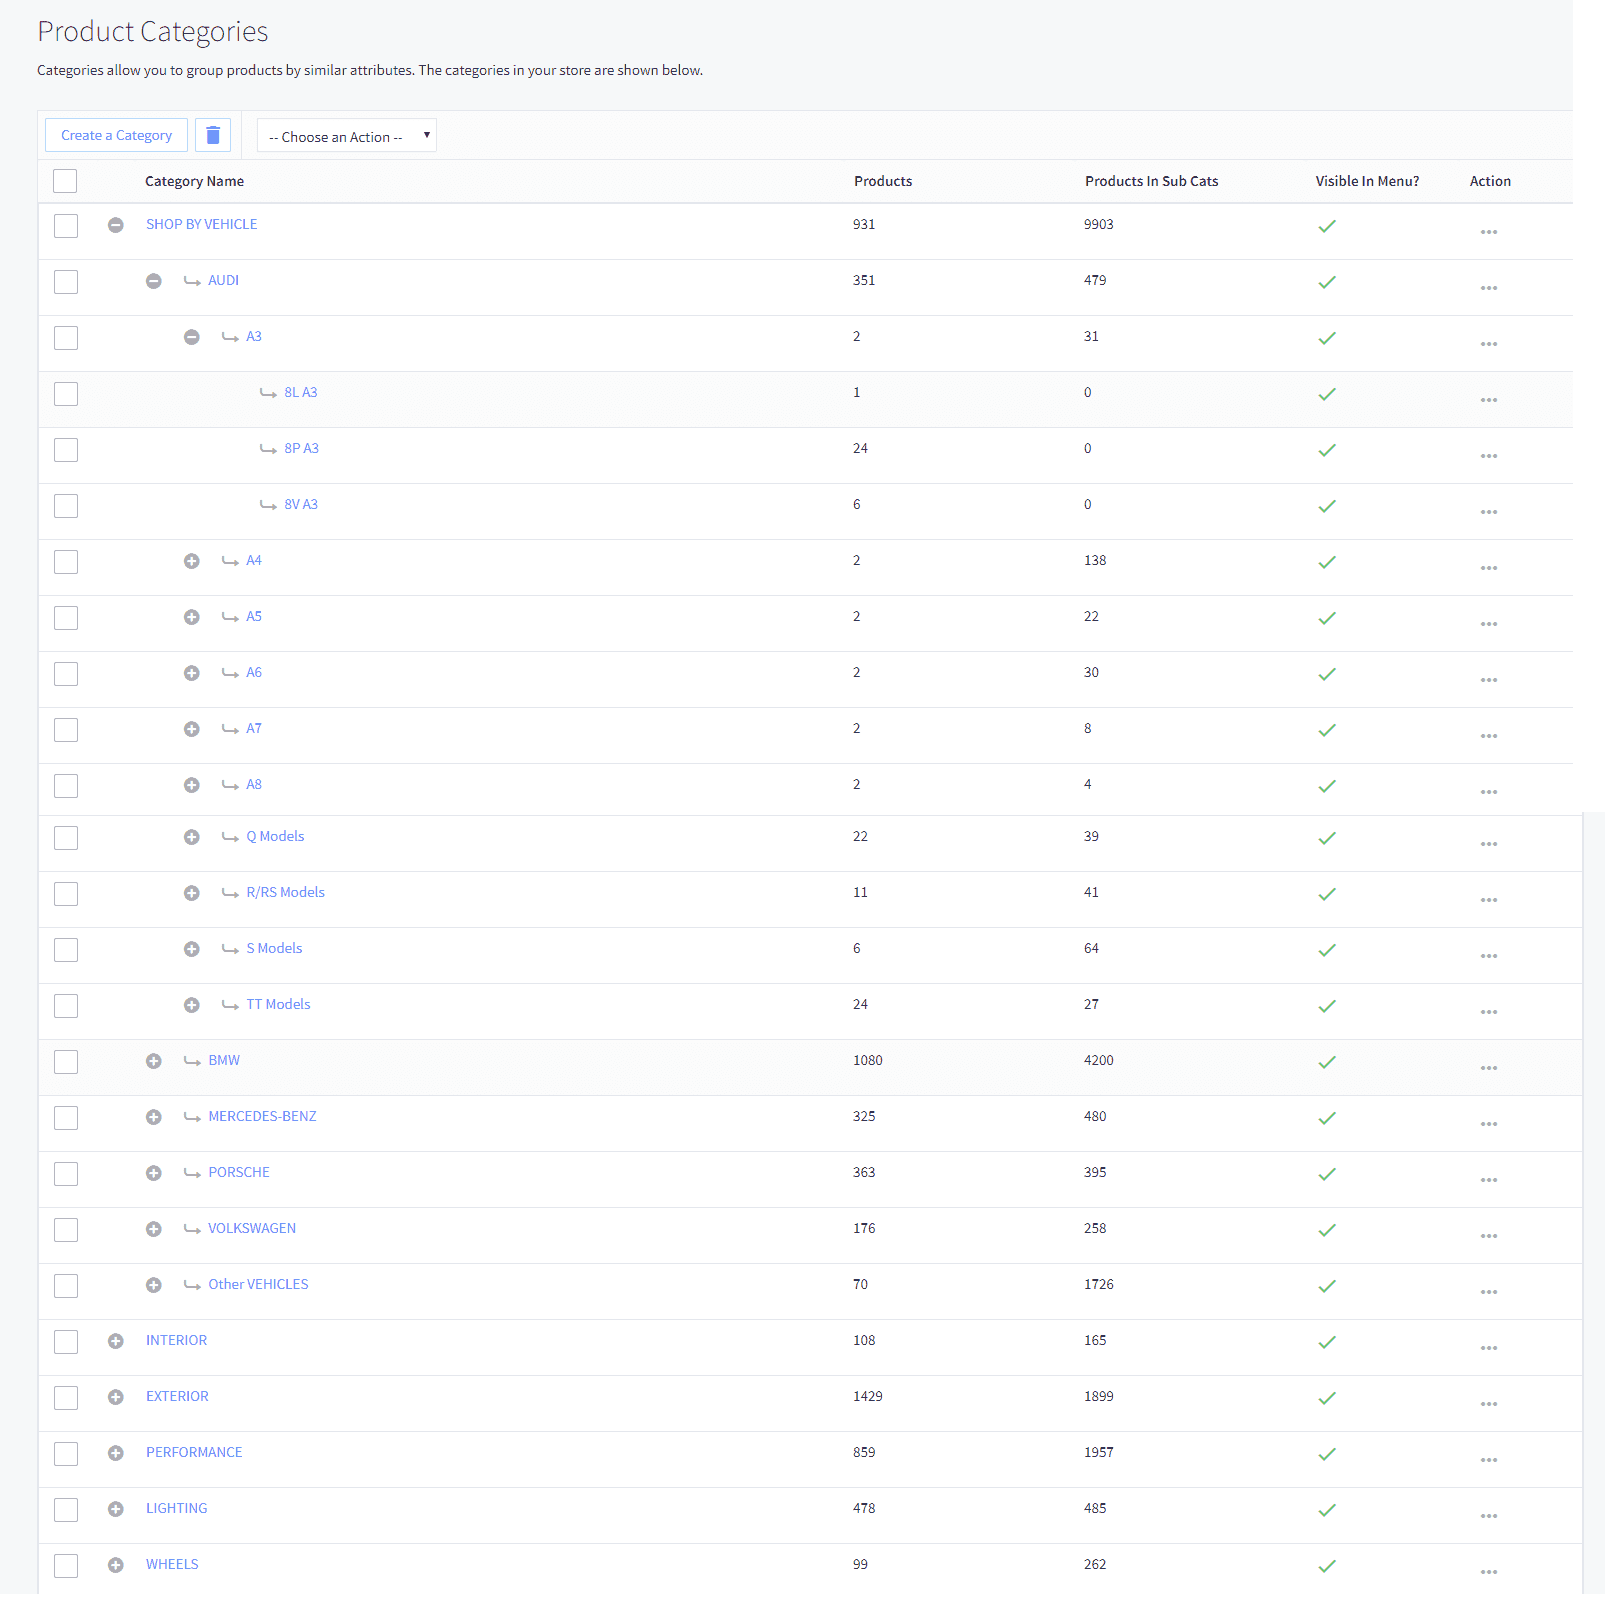
How to get Categories ID?
Go to Storefront -> Products -> Product Categories.
In the Product Categories, you can see ID categories like example:
How to Change banners image?

Go to Storefront -> My Theme -> Customize.
In the Stencil Theme Editor -> go to edit theme files/templates/components/themevale/homepage/ catergory-url.html file.

Recommended Size for banner images: 585x110px
When you are happy with your changes, don't forget click Save to repackage the edited theme.
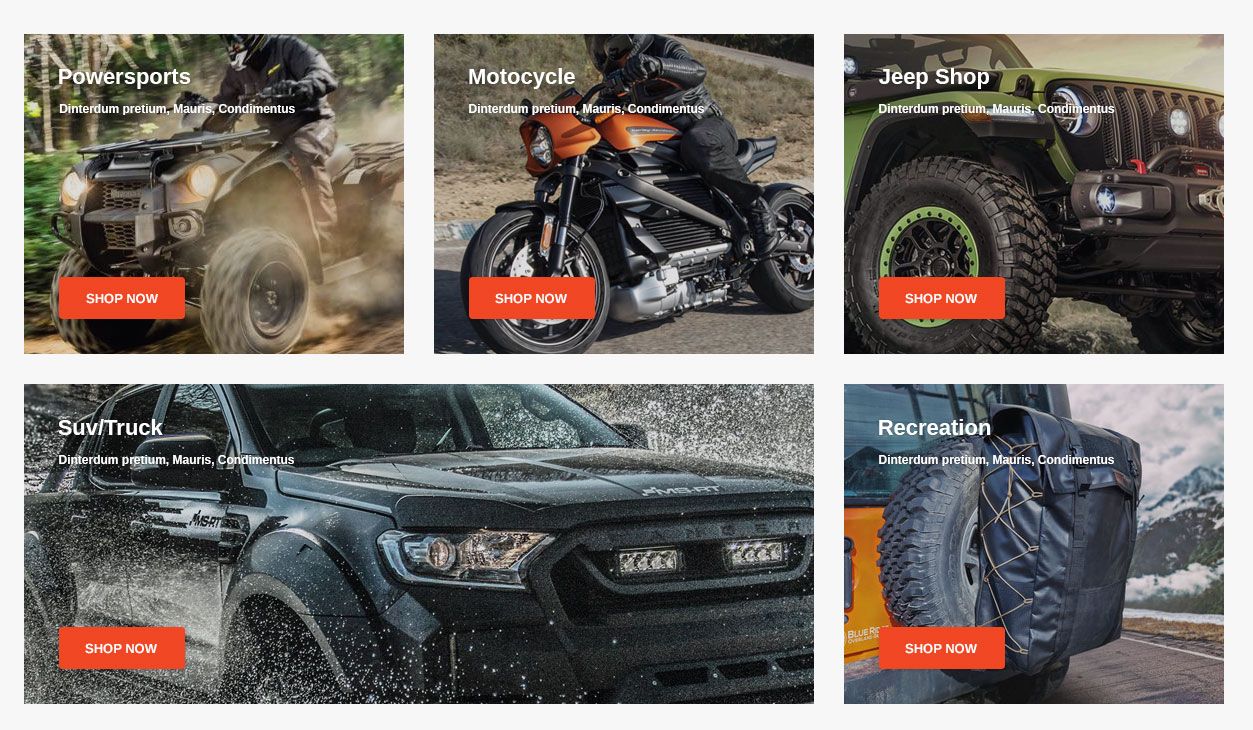
Home Product Category Blocks

How to setting layout?
Go to Storefront -> My Theme -> Customize.
In the Stencil Theme Editor -> go to Home Page / Choose Categories width banner (number)
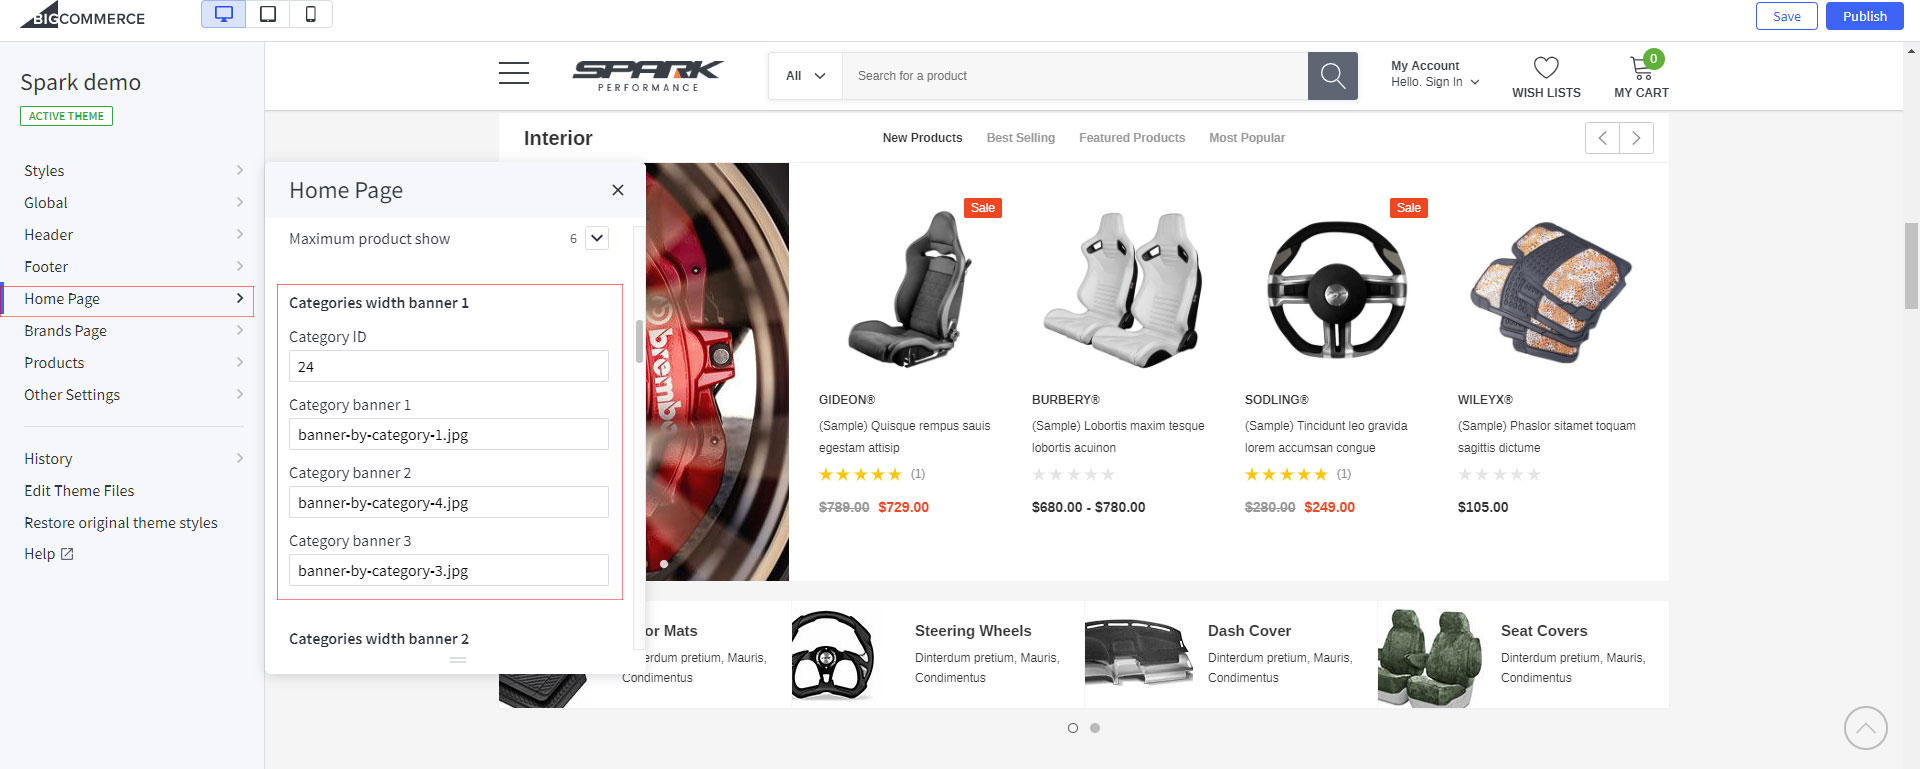
Recommended Size for banner images: 290x420px
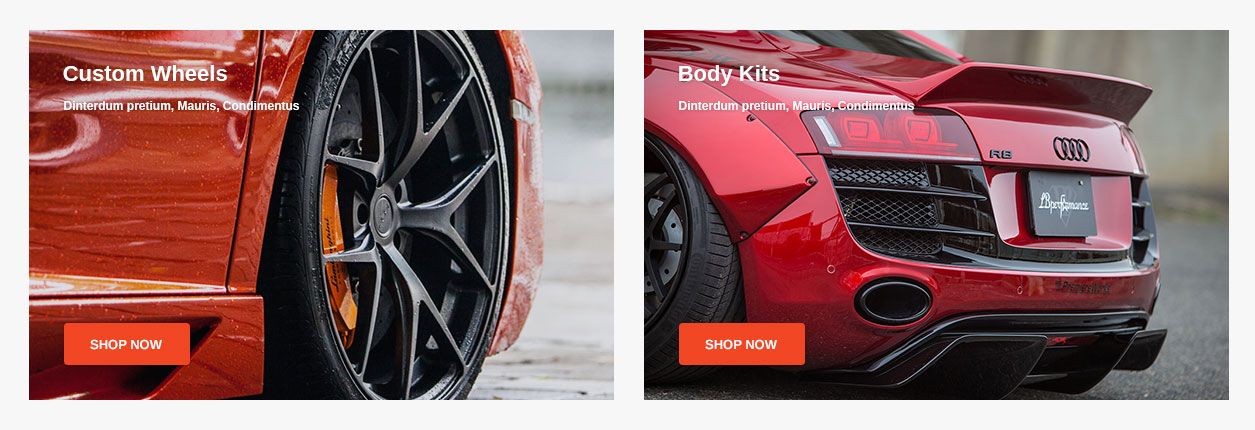
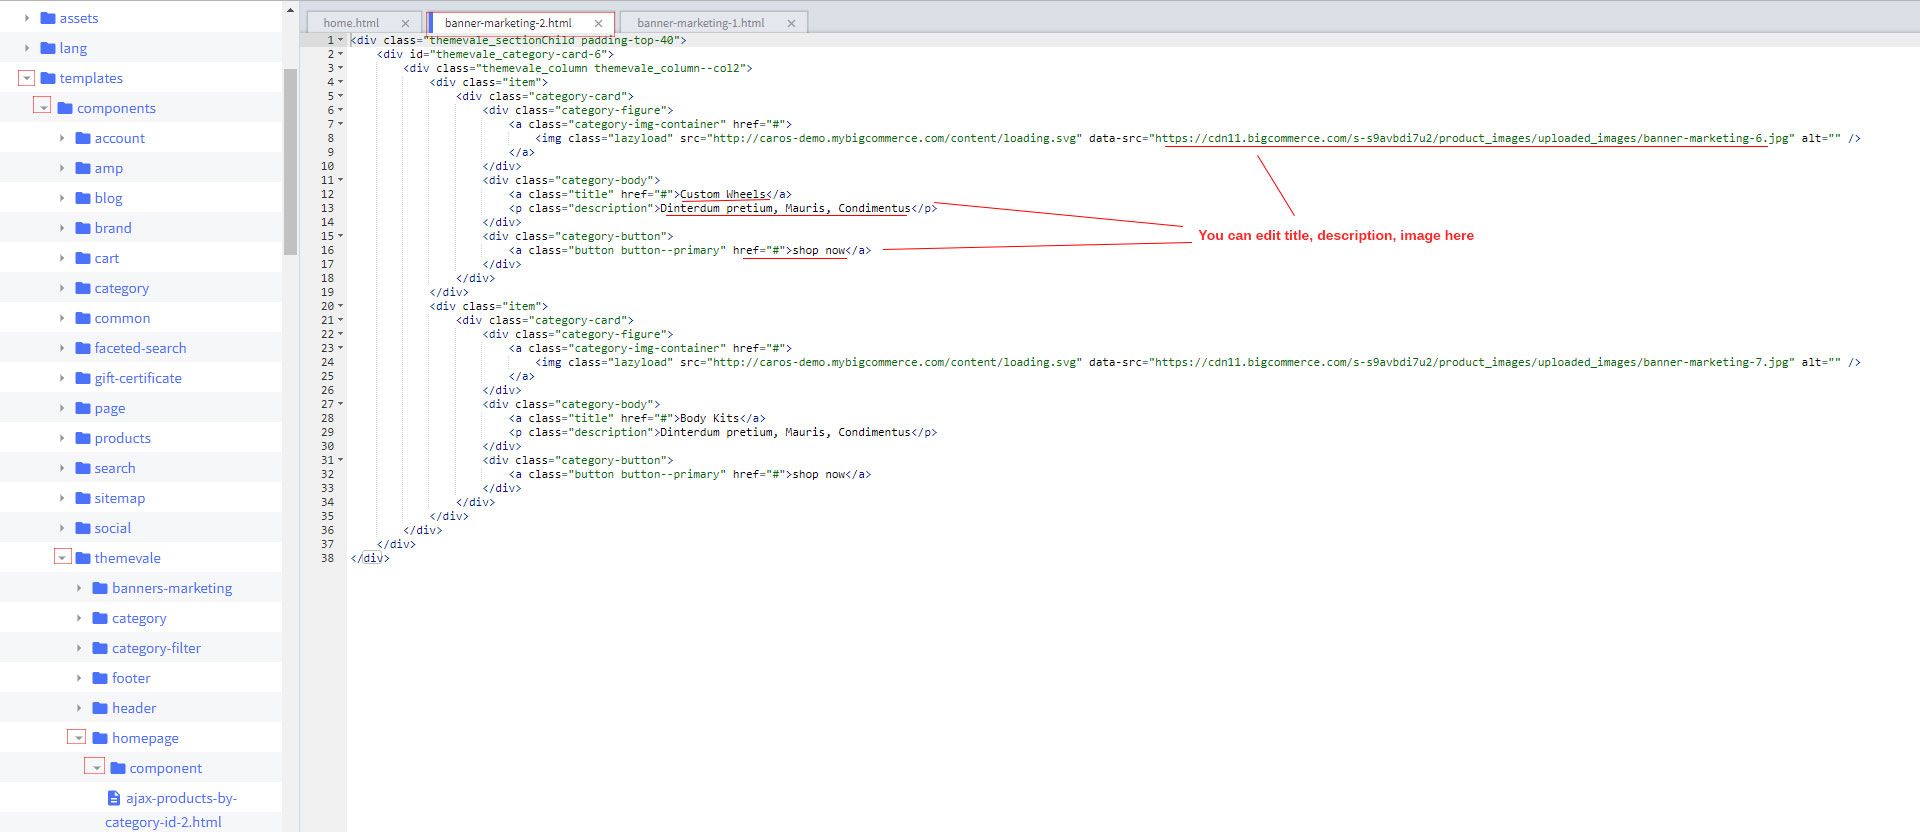
How to change banner marketing carousel for categories?
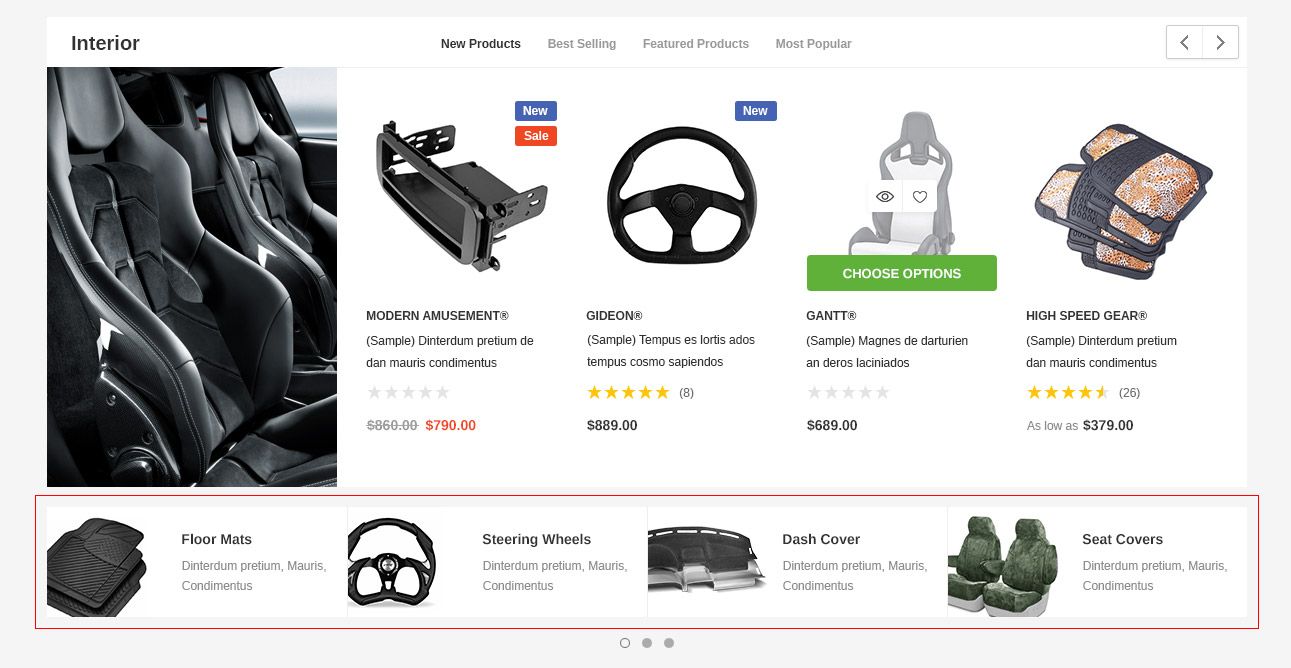
Go to Storefront -> My Theme -> Customize.
In the Stencil Theme Editor -> go to edit theme files/templates/components/themevale/homepage/conponent ajax-products-by-category-sorting-tabs-(number).html file.
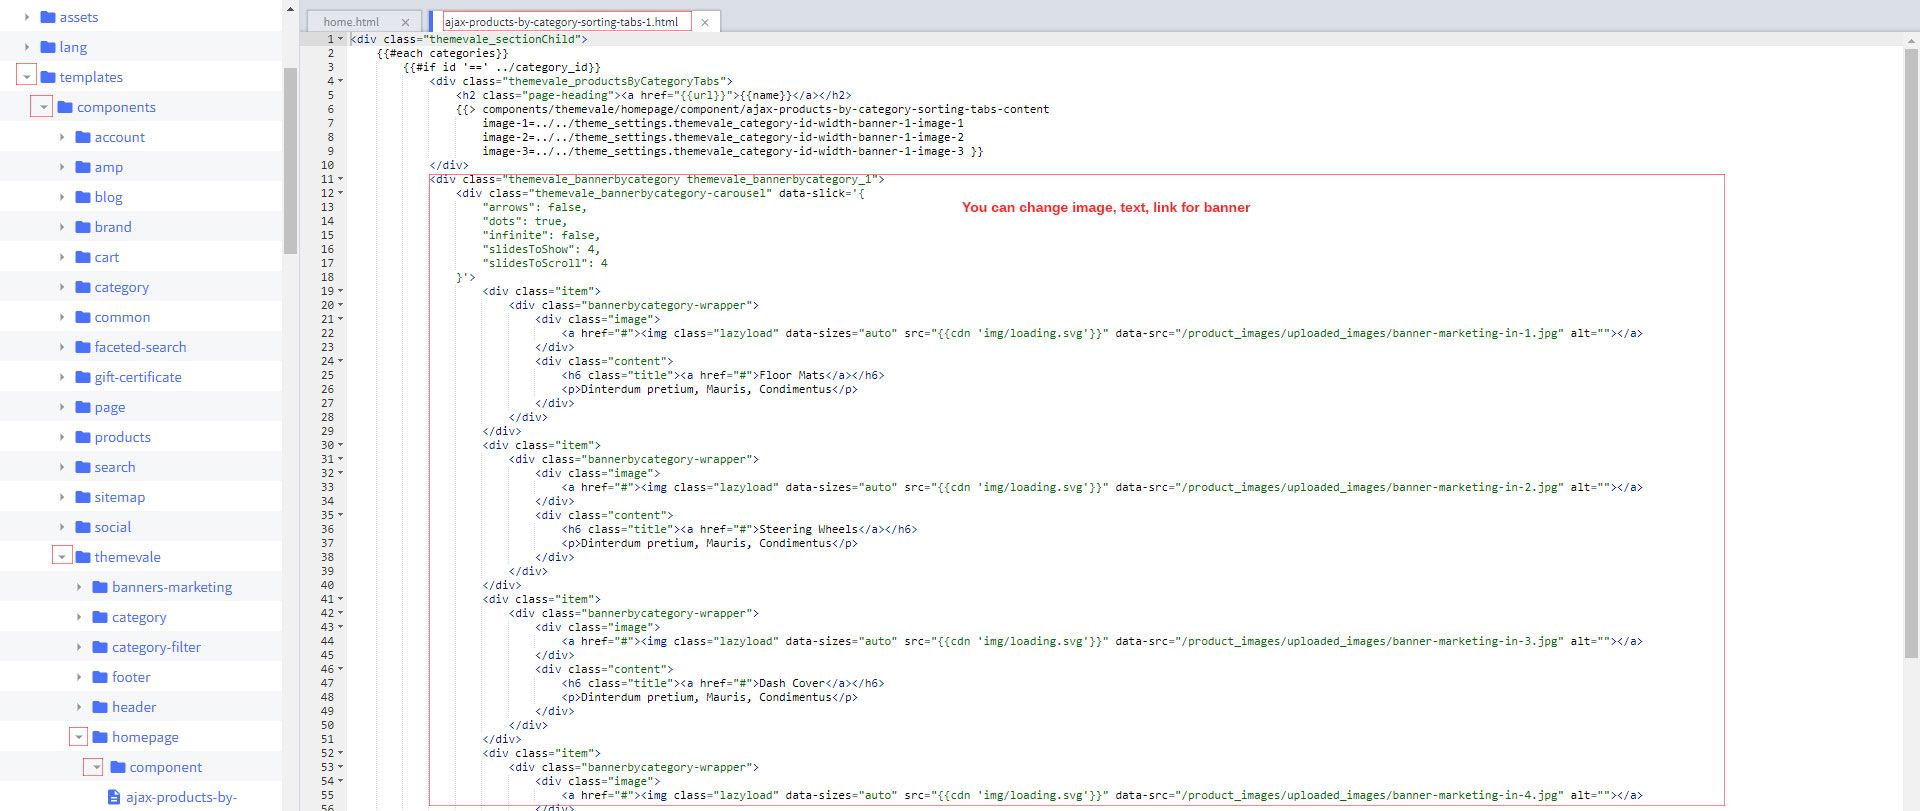
Recommended Size for banner images: 120x110px
When you are happy with your changes, don't forget click Save to repackage the edited theme.
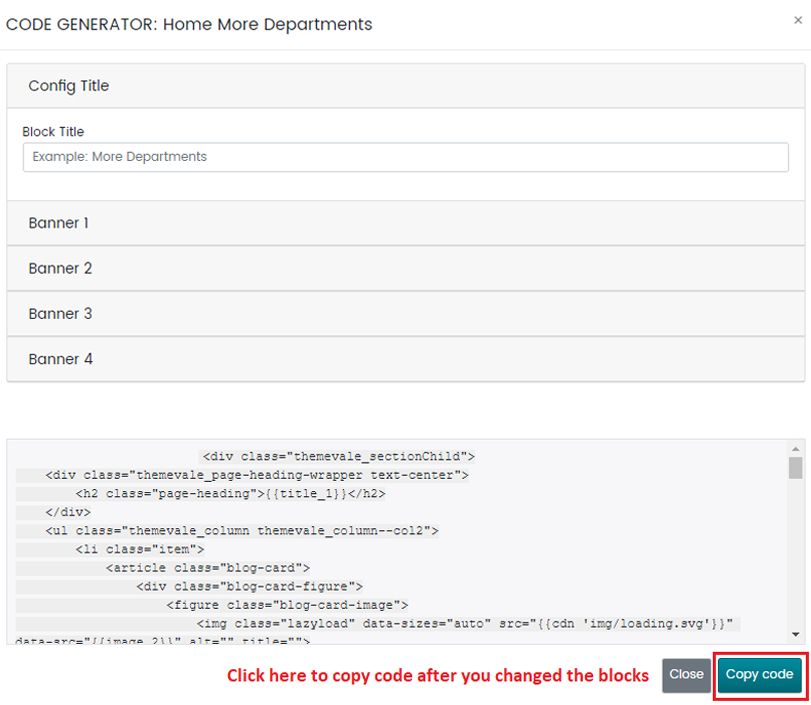
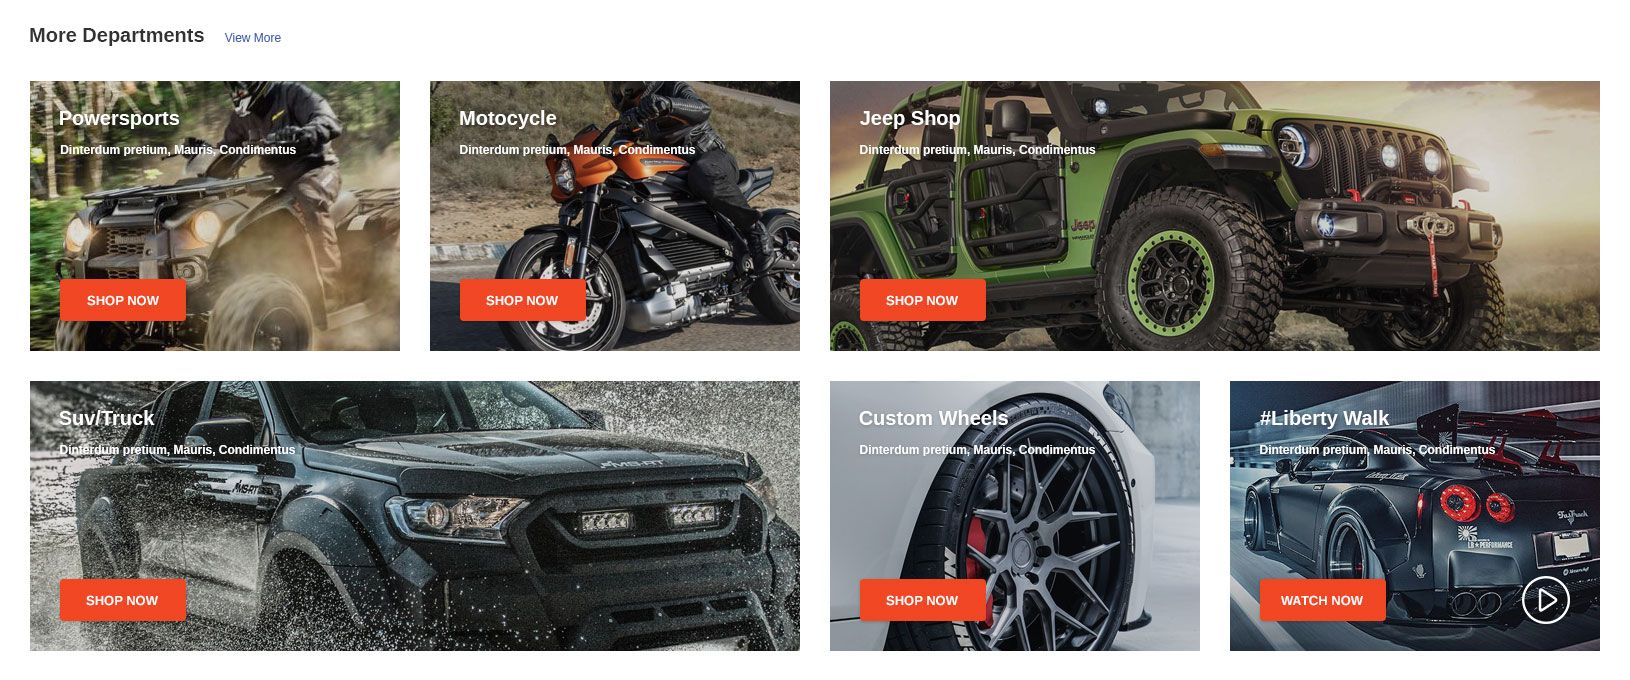
Home More Departments
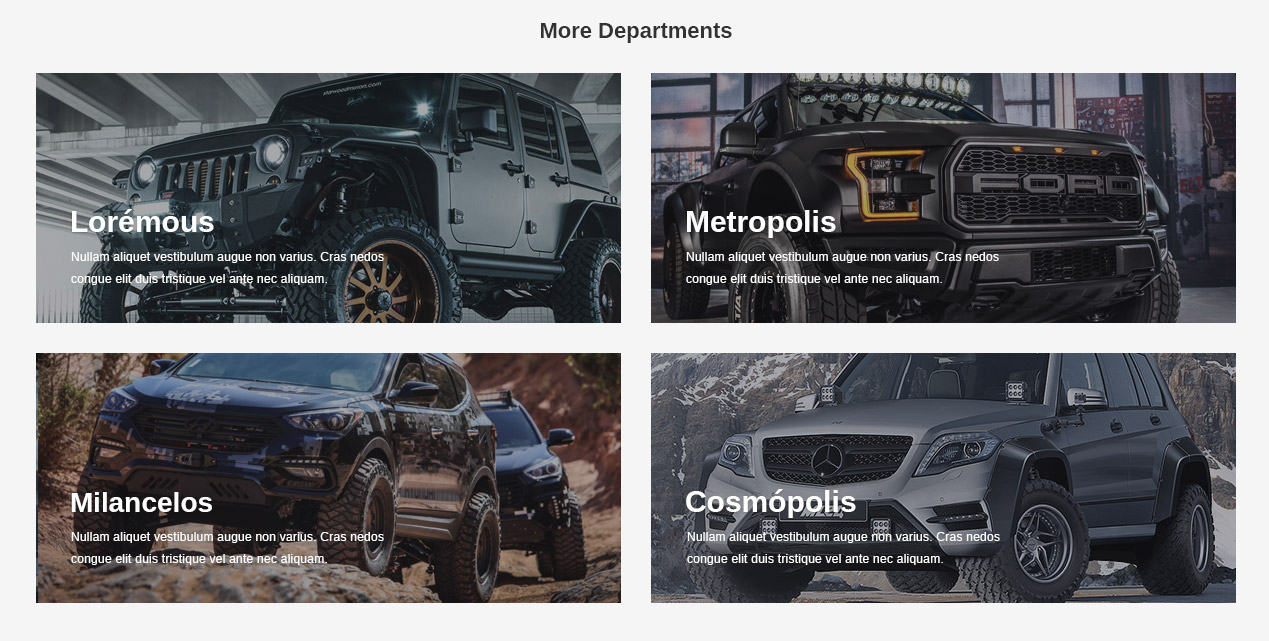
Go to Storefront -> My Theme -> Customize.
In the Stencil Theme Editor -> go to edit theme files/templates/components/themevale/homepage/component/blog-marketing.html file.

Recommended Size for banner images: 585x250px
When you are happy with your changes, don't forget click Save to repackage the edited theme.
<div class="themevale_sectionChild">
    <div class="themevale_page-heading-wrapper text-center">
        <h2 class="page-heading">More Departments</h2>
    </div>
    <ul class="themevale_column themevale_column--col2">
        <li class="item">
            <article class="blog-card">
                <div class="blog-card-figure">
                    <figure class="blog-card-image">
                        <img class="lazyload" data-sizes="auto" src="{{cdn 'img/loading.svg'}}" data-src="/product_images/uploaded_images/blog-4.jpg" alt="" title="">
                        <a href="#" class="link-url"></a>
                    </figure>
                </div>
                <div class="blog-card-body">
                    <h2 class="blog-card-title">
                        <a href="#">Loremous</a>
                    </h2>
                    <p class="blog-card-desciption">
                        Nullam aliquet vestibulum augue non varius. Cras nedos congue elit duis tristique vel ante nec aliquam.
                    </p>
                </div>
            </article>
        </li>
        <li class="item">
            <article class="blog-card">
                <div class="blog-card-figure">
                    <figure class="blog-card-image">
                        <img class="lazyload" data-sizes="auto" src="{{cdn 'img/loading.svg'}}" data-src="/product_images/uploaded_images/blog-5.jpg" alt="" title="">
                        <a href="#" class="link-url"></a>
                    </figure>
                </div>
                <div class="blog-card-body">
                    <h2 class="blog-card-title">
                        <a href="#">Metropolis</a>
                    </h2>
                    <p class="blog-card-desciption">
                        Nullam aliquet vestibulum augue non varius. Cras nedos congue elit duis tristique vel ante nec aliquam.
                    </p>
                </div>
            </article>
        </li>
        <li class="item">
            <article class="blog-card">
                <div class="blog-card-figure">
                    <figure class="blog-card-image">
                        <img class="lazyload" data-sizes="auto" src="{{cdn 'img/loading.svg'}}" data-src="/product_images/uploaded_images/blog-6.jpg" alt="" title="">
                        <a href="#" class="link-url"></a>
                    </figure>
                </div>
                <div class="blog-card-body">
                    <h2 class="blog-card-title">
                        <a href="#">Milancelos</a>
                    </h2>
                    <p class="blog-card-desciption">
                        Nullam aliquet vestibulum augue non varius. Cras nedos congue elit duis tristique vel ante nec aliquam.
                    </p>
                </div>
            </article>
        </li>
        <li class="item">
            <article class="blog-card">
                <div class="blog-card-figure">
                    <figure class="blog-card-image">
                        <img class="lazyload" data-sizes="auto" src="{{cdn 'img/loading.svg'}}" data-src="/product_images/uploaded_images/blog-7.jpg" alt="" title="">
                        <a href="#" class="link-url"></a>
                    </figure>
                </div>
                <div class="blog-card-body">
                    <h2 class="blog-card-title">
                        <a href="#">Cosmópolis</a>
                    </h2>
                    <p class="blog-card-desciption">
                        Nullam aliquet vestibulum augue non varius. Cras nedos congue elit duis tristique vel ante nec aliquam.
                    </p>
                </div>
            </article>
        </li>
    </ul>
</div>
Or use button below to generate the code with your home more departments. Please click the Copy code on the popup after you changed text of the blocks.
Paste the code that you've just copied into /templates/components/themevale/homepage/recent-post-list-2.html file.
When you are happy with your changes, don't forget click Save.
Home Shop Wheels + Rims
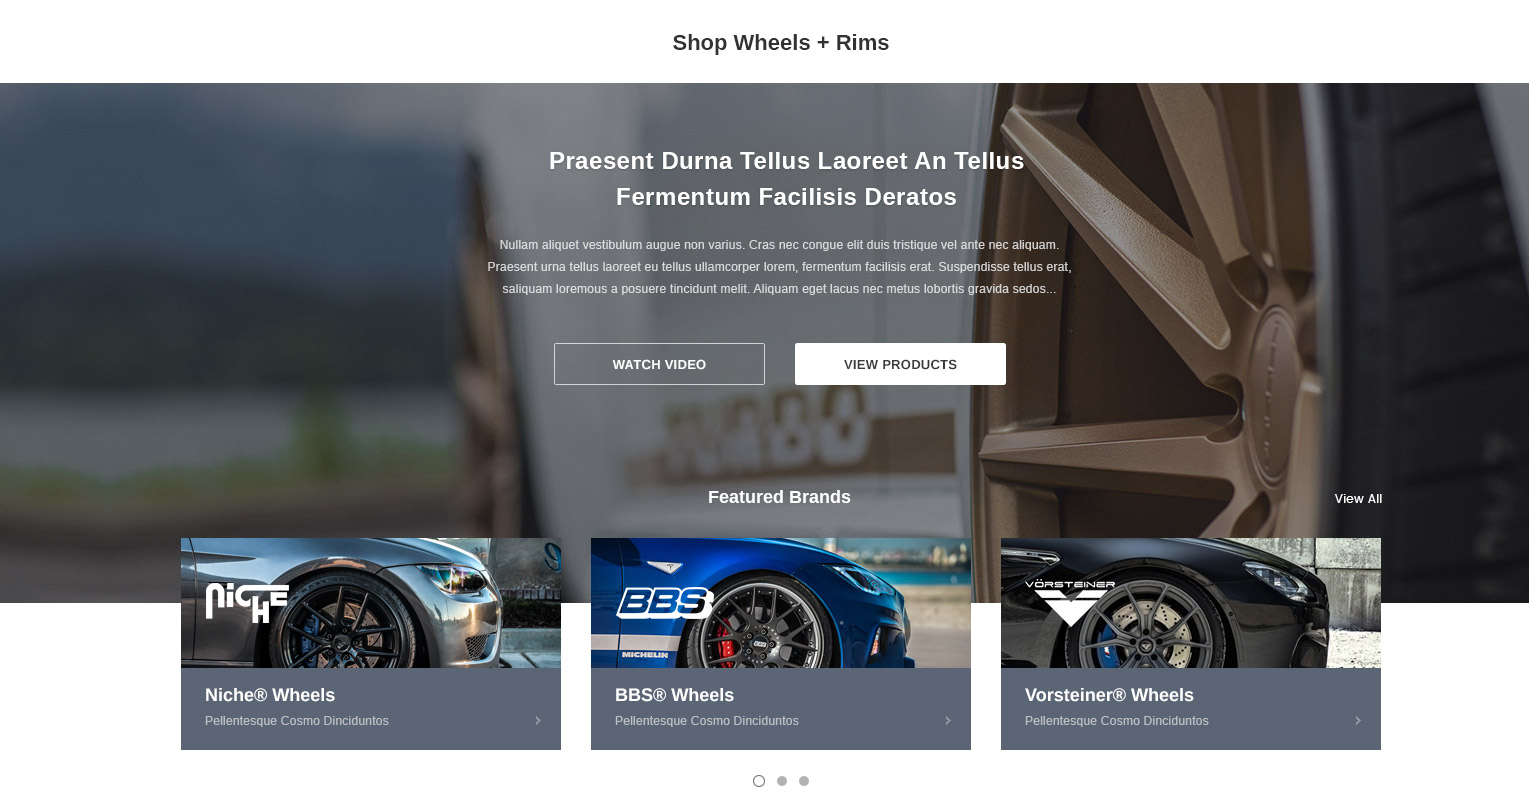
Go to Storefront -> My Theme -> Customize.
In the Stencil Theme Editor -> go to edit theme files/templates/components/themevale/homepage/ custom-banner.html file.
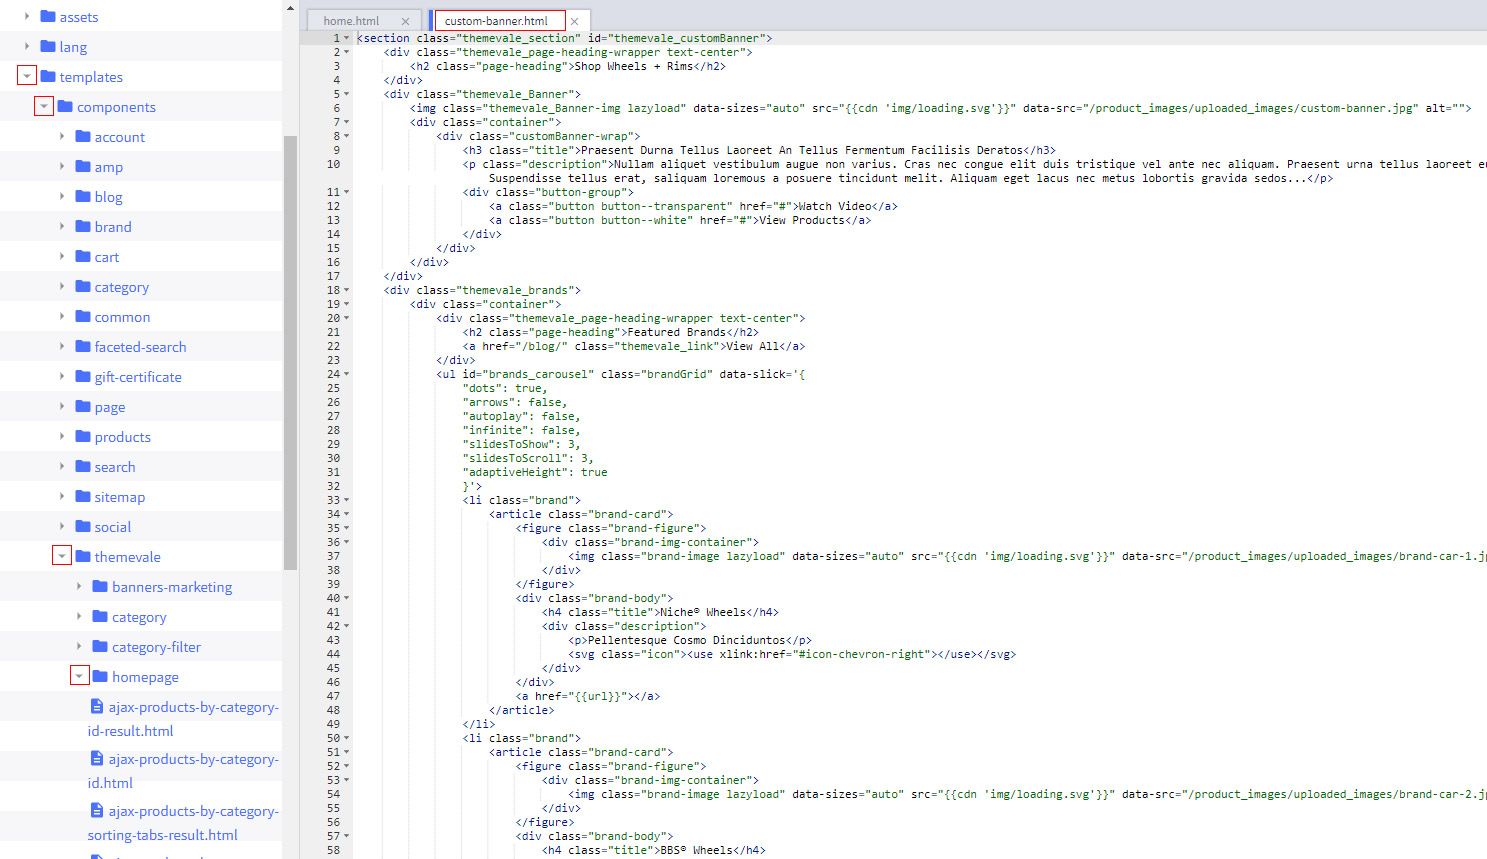
Recommended Size for banner images: small images: 380x130px, large image: 1920x920px
When you are happy with your changes, don't forget click Save to repackage the edited theme.
Up load Video popup
Go to Storefront -> My Theme -> Customize.
In the Stencil Theme Editor, look into the options showing on the Home Page
Find out selector Popup Video and insert link youtube

Home From Our Blog

Go to Storefront -> My Theme -> Customize.
In the Stencil Theme Editor -> go to edit theme files/templates/components/themevale/homepage/ recent-post-list.html file.
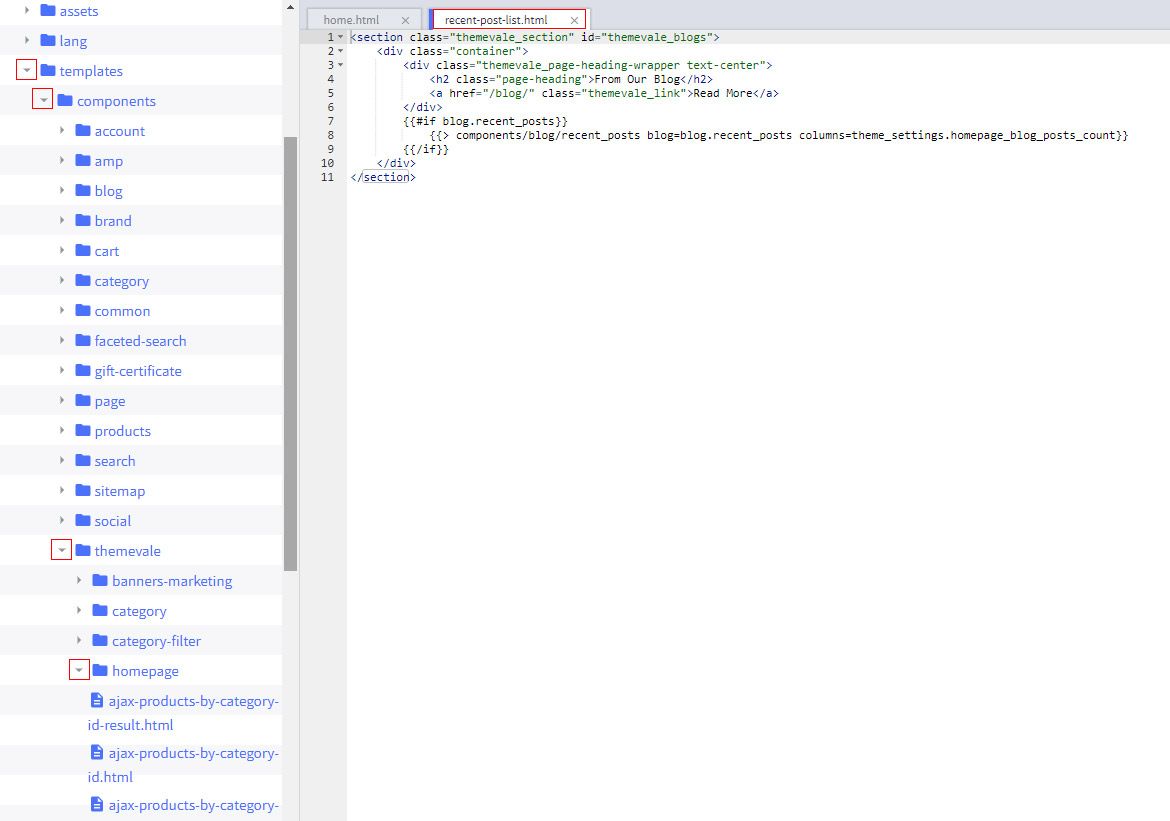
When you are happy with your changes, don't forget click Save to repackage the edited theme.
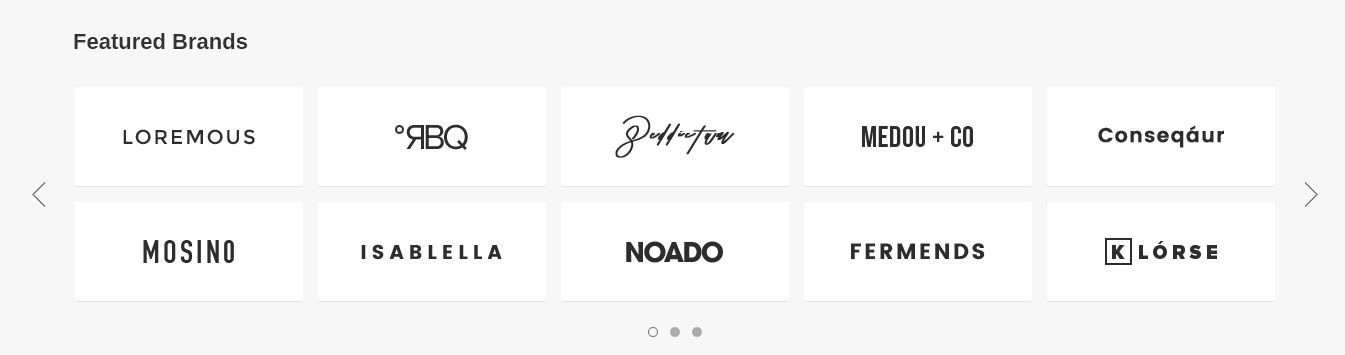
Home Brands Carousel

Go to Storefront -> My Theme -> Customize.
In the Stencil Theme Editor -> go to edit theme files/templates/components/themevale/homepage/ brand-image-carousel.html file.
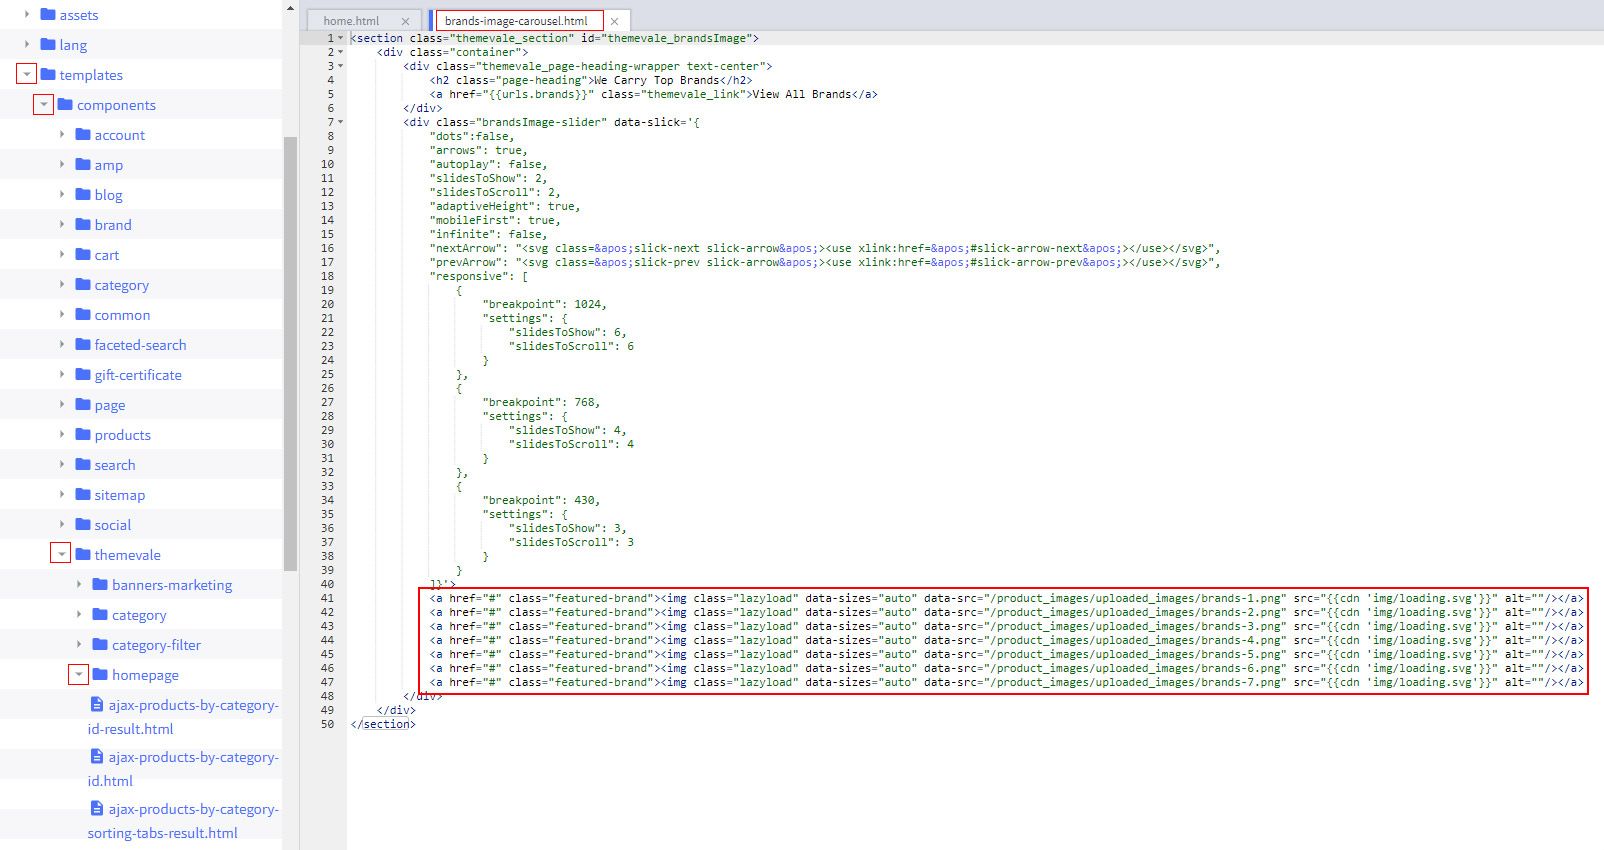
Recommended Size for banner images: 175x72px
When you are happy with your changes, don't forget click Save to repackage the edited theme.
<section class="themevale_section" id="themevale_brandsImage">
    <div class="container">
        <div class="themevale_page-heading-wrapper text-center">
            <h2 class="page-heading">We Carry Top Brands</h2>
            <a href="{{urls.brands}}" class="themevale_link">View All Brands</a>
        </div>
        <div class="brandsImage-slider layout-1" data-slick='{
            "dots":false,
            "arrows": true,
            "autoplay": false,
            "slidesToShow": 2,
            "slidesToScroll": 2,
            "adaptiveHeight": true,
            "mobileFirst": true,
            "infinite": false,
            "nextArrow": "<svg class='slick-next slick-arrow'><use xlink:href='#slick-arrow-next'></use></svg>",
            "prevArrow": "<svg class='slick-prev slick-arrow'><use xlink:href='#slick-arrow-prev'></use></svg>",
            "responsive": [
                {
                    "breakpoint": 1024,
                    "settings": {
                        "slidesToShow": 6,
                        "slidesToScroll": 6
                    }
                },
                {
                    "breakpoint": 768,
                    "settings": {
                        "slidesToShow": 4,
                        "slidesToScroll": 4
                    }
                },
                {
                    "breakpoint": 430,
                    "settings": {
                        "slidesToShow": 3,
                        "slidesToScroll": 3
                    }
                }
            ]}'>
            <div class="brand-item">
                <a href="http://spark-demo.mybigcommerce.com" class="featured-brand"><img class="lazyload" data-sizes="auto" src="{{cdn 'img/loading.svg'}}" data-src="/product_images/uploaded_images/brands-1.png" alt="brands-1"/></a>
            </div>
            <div class="brand-item">
                <a href="http://moda-demo.mybigcommerce.com" class="featured-brand"><img class="lazyload" data-sizes="auto" src="{{cdn 'img/loading.svg'}}" data-src="/product_images/uploaded_images/brands-2.png" alt="brands-2"/></a>
            </div>
            <div class="brand-item">
                <a href="http://ella-demo.mybigcommerce.com" class="featured-brand"><img class="lazyload" data-sizes="auto" src="{{cdn 'img/loading.svg'}}" data-src="/product_images/uploaded_images/brands-3.png" alt="brands-3"/></a>
            </div>
            <div class="brand-item">
                <a href="http://jewel-custom-demo.mybigcommerce.com/" class="featured-brand"><img class="lazyload" data-sizes="auto" src="{{cdn 'img/loading.svg'}}" data-src="/product_images/uploaded_images/brands-4.png" alt="brands-4"/></a>
            </div>
            <div class="brand-item">
                <a href="http://jewel-demo.mybigcommerce.com" class="featured-brand"><img class="lazyload" data-sizes="auto" src="{{cdn 'img/loading.svg'}}" data-src="/product_images/uploaded_images/brands-5.png" alt="brands-5"/></a>
            </div>
            <div class="brand-item">
                <a href="http://sweetsationtherapy-demo2.mybigcommerce.com/" class="featured-brand"><img class="lazyload" data-sizes="auto" src="{{cdn 'img/loading.svg'}}" data-src="/product_images/uploaded_images/brands-6.png" alt="brands-6"/></a>
            </div>
            <div class="brand-item">
                <a href="http://gamerok-demo.mybigcommerce.com" class="featured-brand"><img class="lazyload" data-sizes="auto" src="{{cdn 'img/loading.svg'}}" data-src="/product_images/uploaded_images/brands-7.png" alt="brands-7"/></a>
            </div>
        </div>
    </div>
</section>
Or use button below to generate the code with your home brands carousel. Please click the Copy code on the popup after you changed text of the blocks.

Paste the code that you've just copied into /templates/components/themevale/homepage/recent-post-list-2.html file.
When you are happy with your changes, don't forget click Save.
Show Custom Label For Product
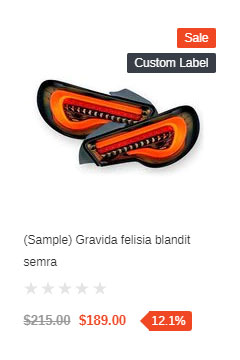
In the Admin Panel --> go to edit a product --> go to Custom Fields tab
Then add a custom field with Custom Field Name must be: custom-label and Custom Field Value is the text of label you want to show.
Here is a screenshot for your reference:
Setting Up HomePage 2 Content
What We'll Cover
Home Featured Categories
Go to Storefront -> My Theme -> Customize.
In the Stencil Theme Editor -> go to edit theme files/templates/components/themevale/homepage/conponent/ catergory-custom-block.html file.

Recommended Size for banner images: 224x190px
When you are happy with your changes, don't forget click Save to repackage the edited theme.
Home Special Offers & Pre order
How to setting layout?
Go to Storefront -> My Theme -> Customize.
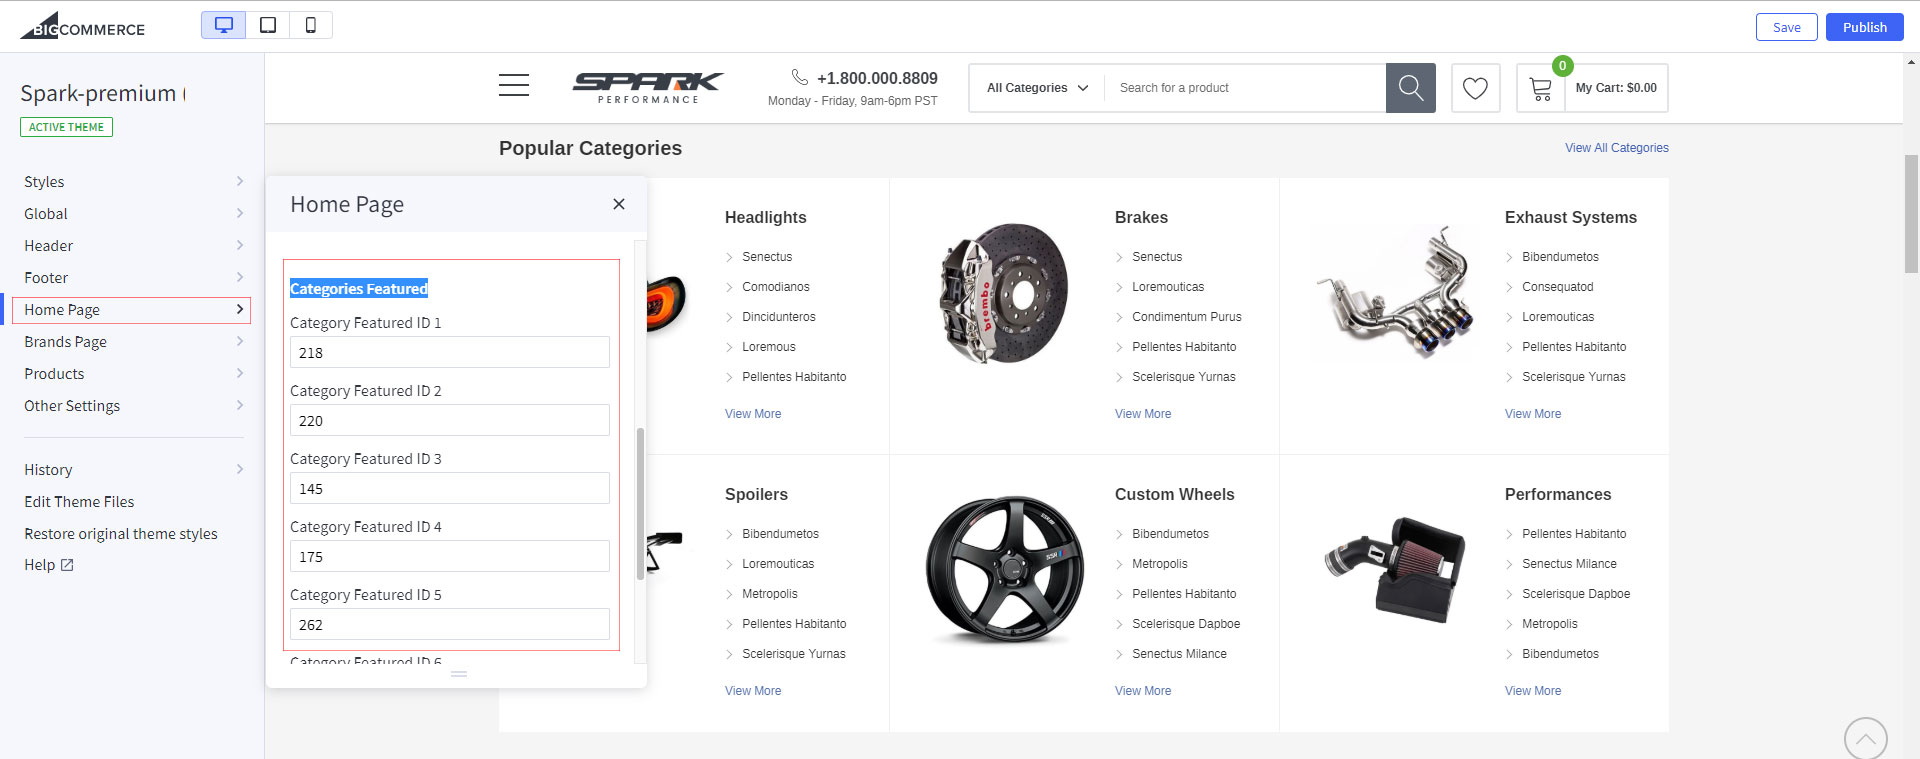
In the Stencil Theme Editor -> go to Home Page / Choose Categories get ID
When you are happy with your changes, don't forget click Save to repackage the edited theme.
Home Categories use ID width banner
How to setting layout?
Go to Storefront -> My Theme -> Customize.
In the Stencil Theme Editor -> go to Home Page / Choose Categories width banner
Recommended Size for banner images: Large image of category: 426x717 and Small image: 220x270
When you are happy with your changes, don't forget click Save to repackage the edited theme.
How to setting brands image?
Go to Storefront -> My Theme -> Customize.
In the Stencil Theme Editor -> go to edit theme files/templates/components/themevale/homepage/conponent/ ajax-products-by-category-special-( number ).html file.
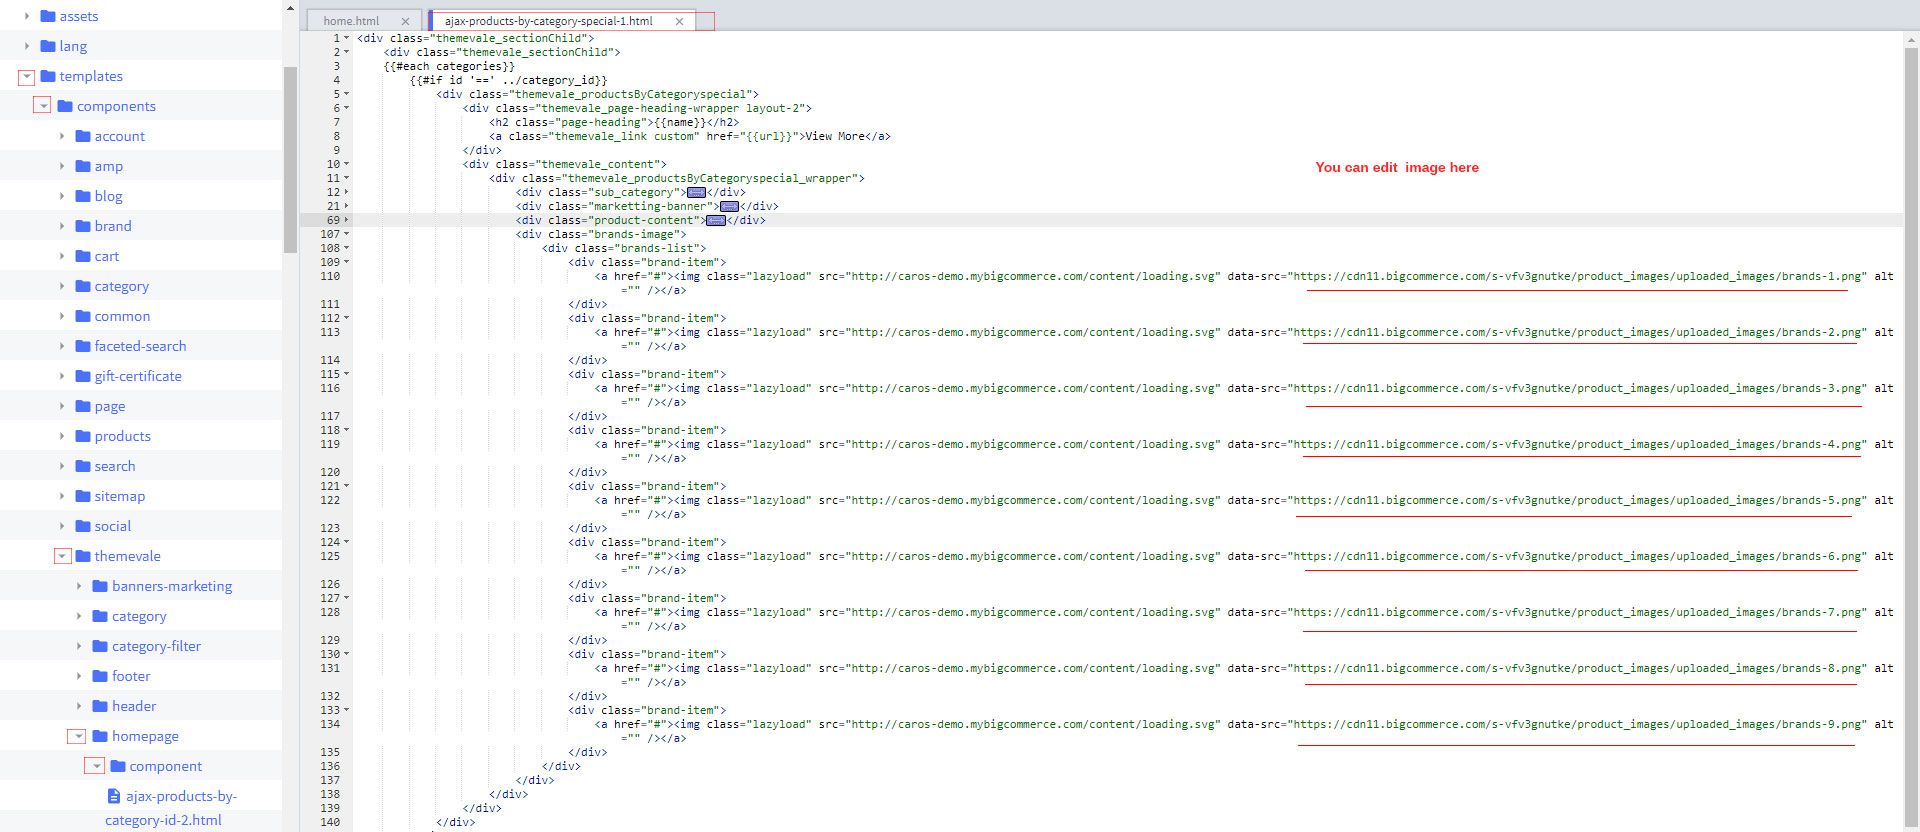
Recommended Size for banner images: 170x70px
When you are happy with your changes, don't forget click Save to repackage the edited theme.
Home Categories get ID (Recommendations for you)

How to setting layout?
Go to Storefront -> My Theme -> Customize.
In the Stencil Theme Editor -> go to Home Page / Choose Categories get ID (Recommendations for you)
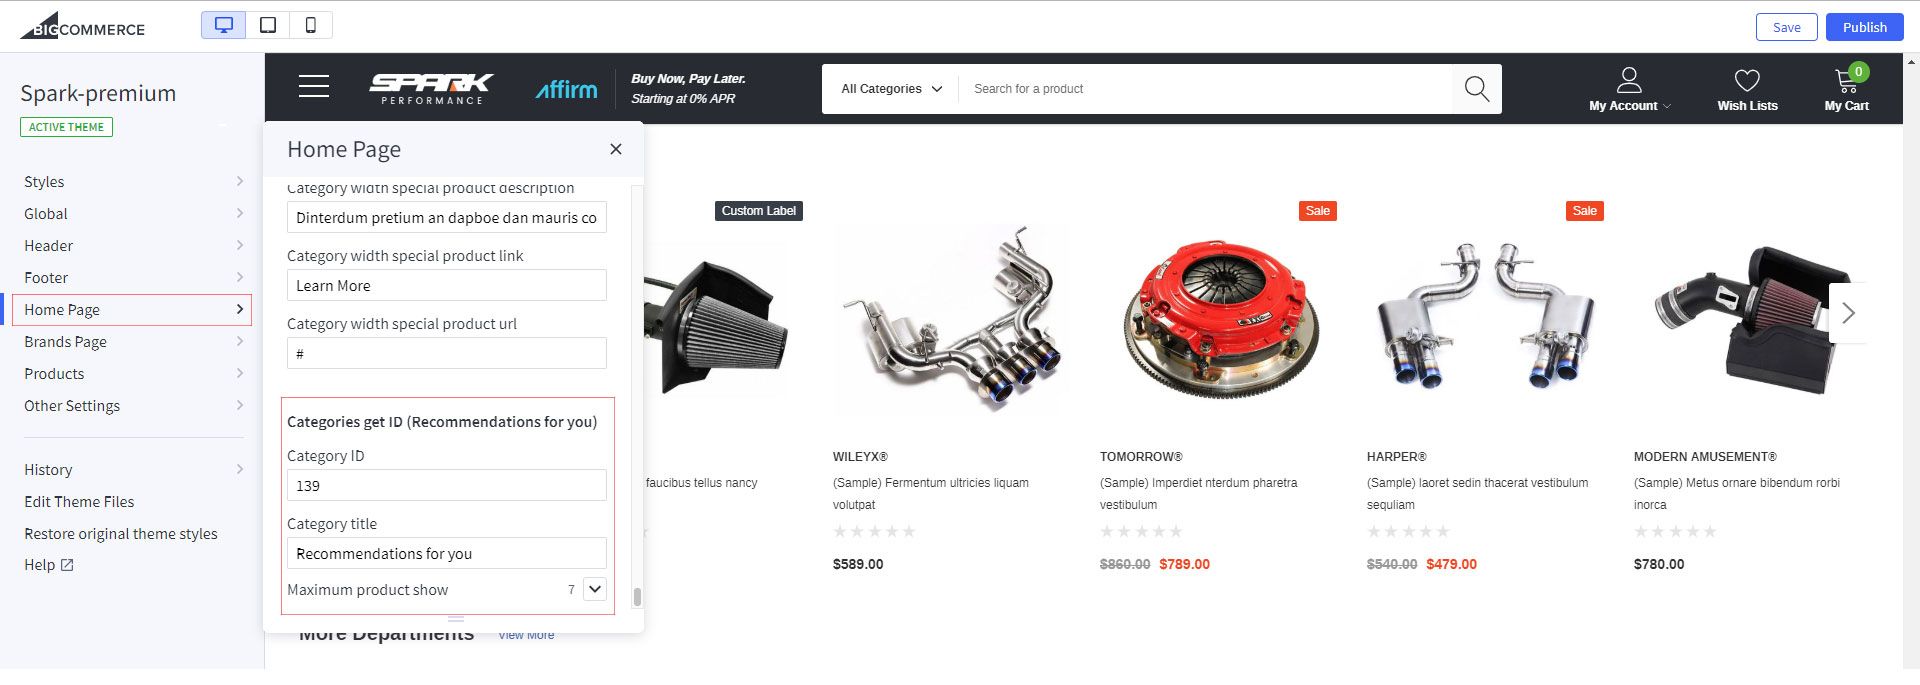
When you are happy with your changes, don't forget click Save to repackage the edited theme.
Home Banner marketting (More Departments)
Go to Storefront -> My Theme -> Customize.
In the Stencil Theme Editor -> go to edit theme files/templates/components/themevale/homepage/conponent/ banner-marketing-3.html file.
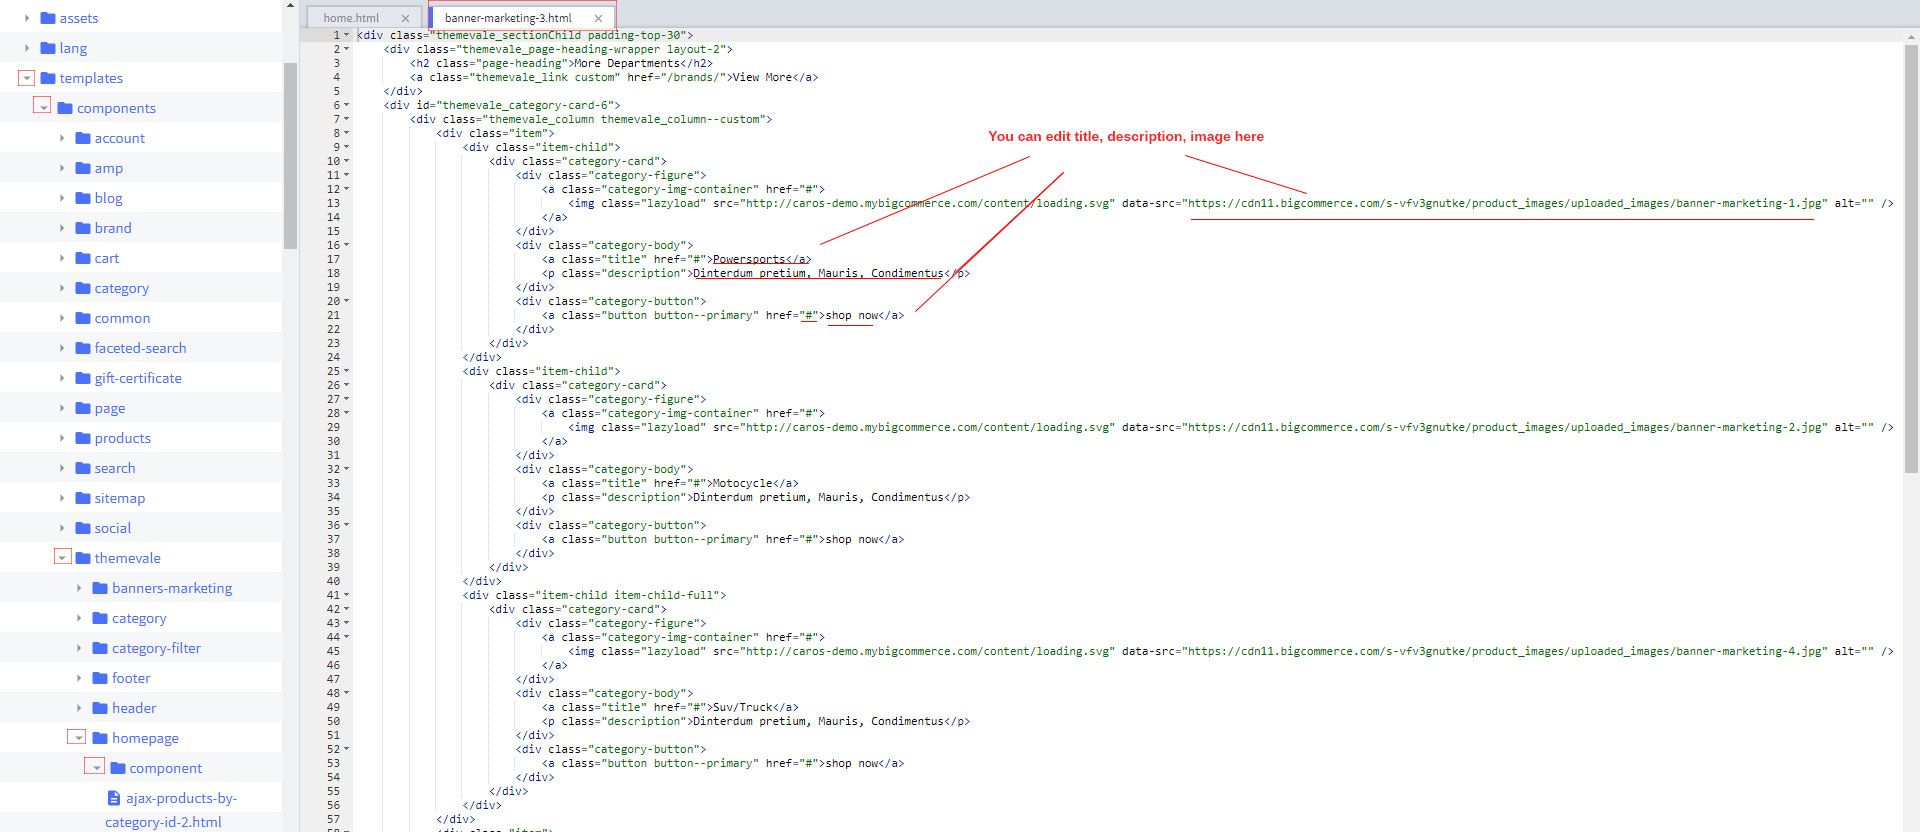
Recommended Size for banner images: small images: 380x320px, large images: 790x320px
When you are happy with your changes, don't forget click Save to repackage the edited theme.
Home Brands Gird

Go to Storefront -> My Theme -> Customize.
In the Stencil Theme Editor -> go to edit theme files/templates/components/themevale/homepage/conponent/ brands-image-grid-2.html file.

Recommended Size for banner images: 170x70px
When you are happy with your changes, don't forget click Save to repackage the edited theme.
Home Recent Blog Posts
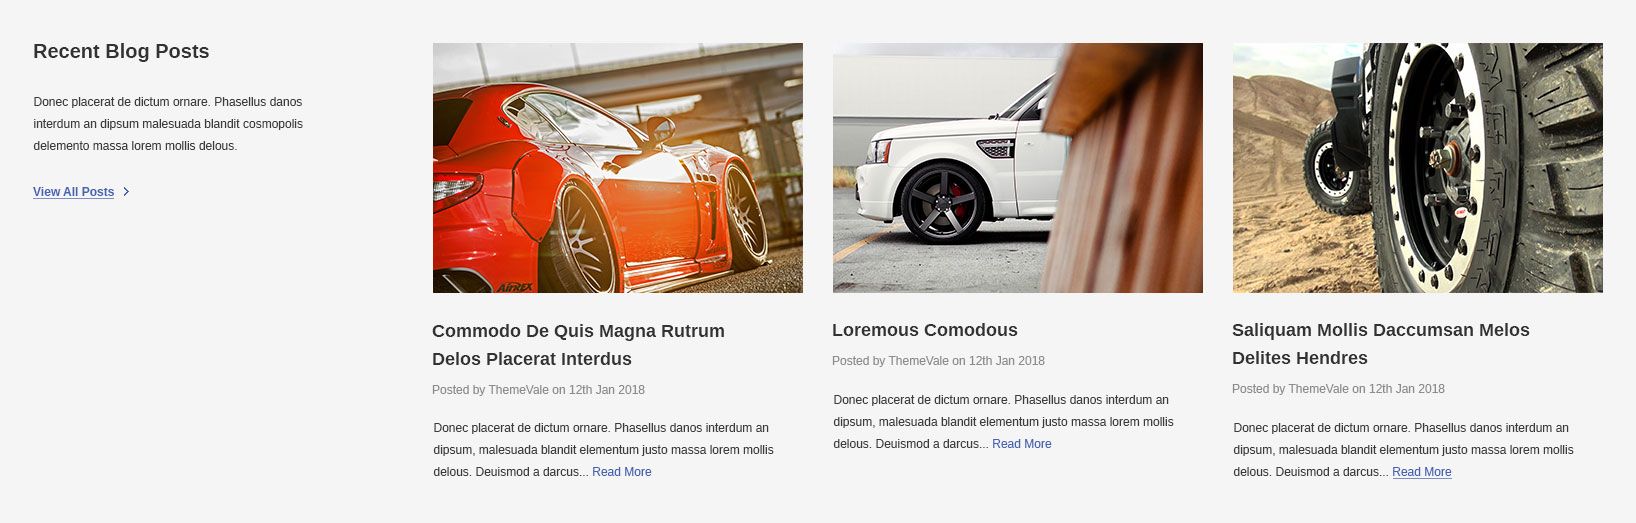
Go to Storefront -> My Theme -> Customize.
In the Stencil Theme Editor -> go to edit theme files/templates/components/themevale/homepage/conponent/ recent-post-list-3.html file.

When you are happy with your changes, don't forget click Save to repackage the edited theme.
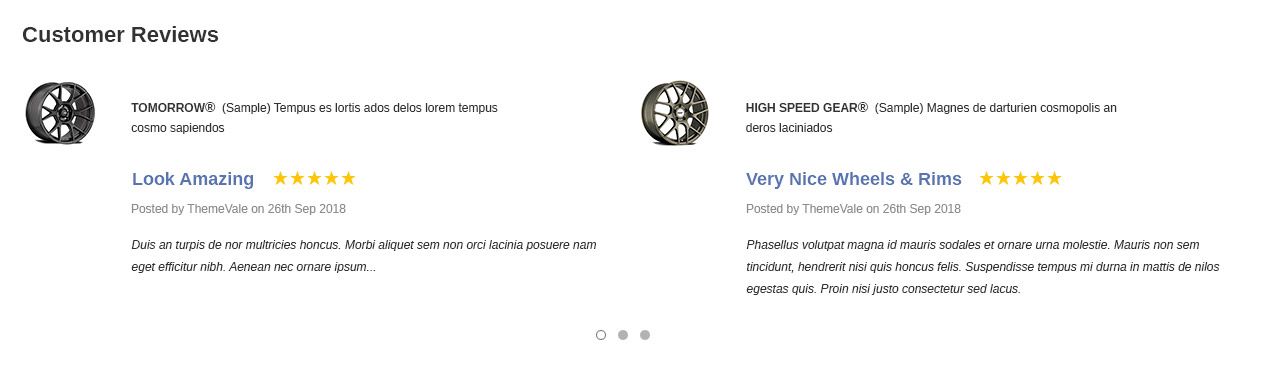
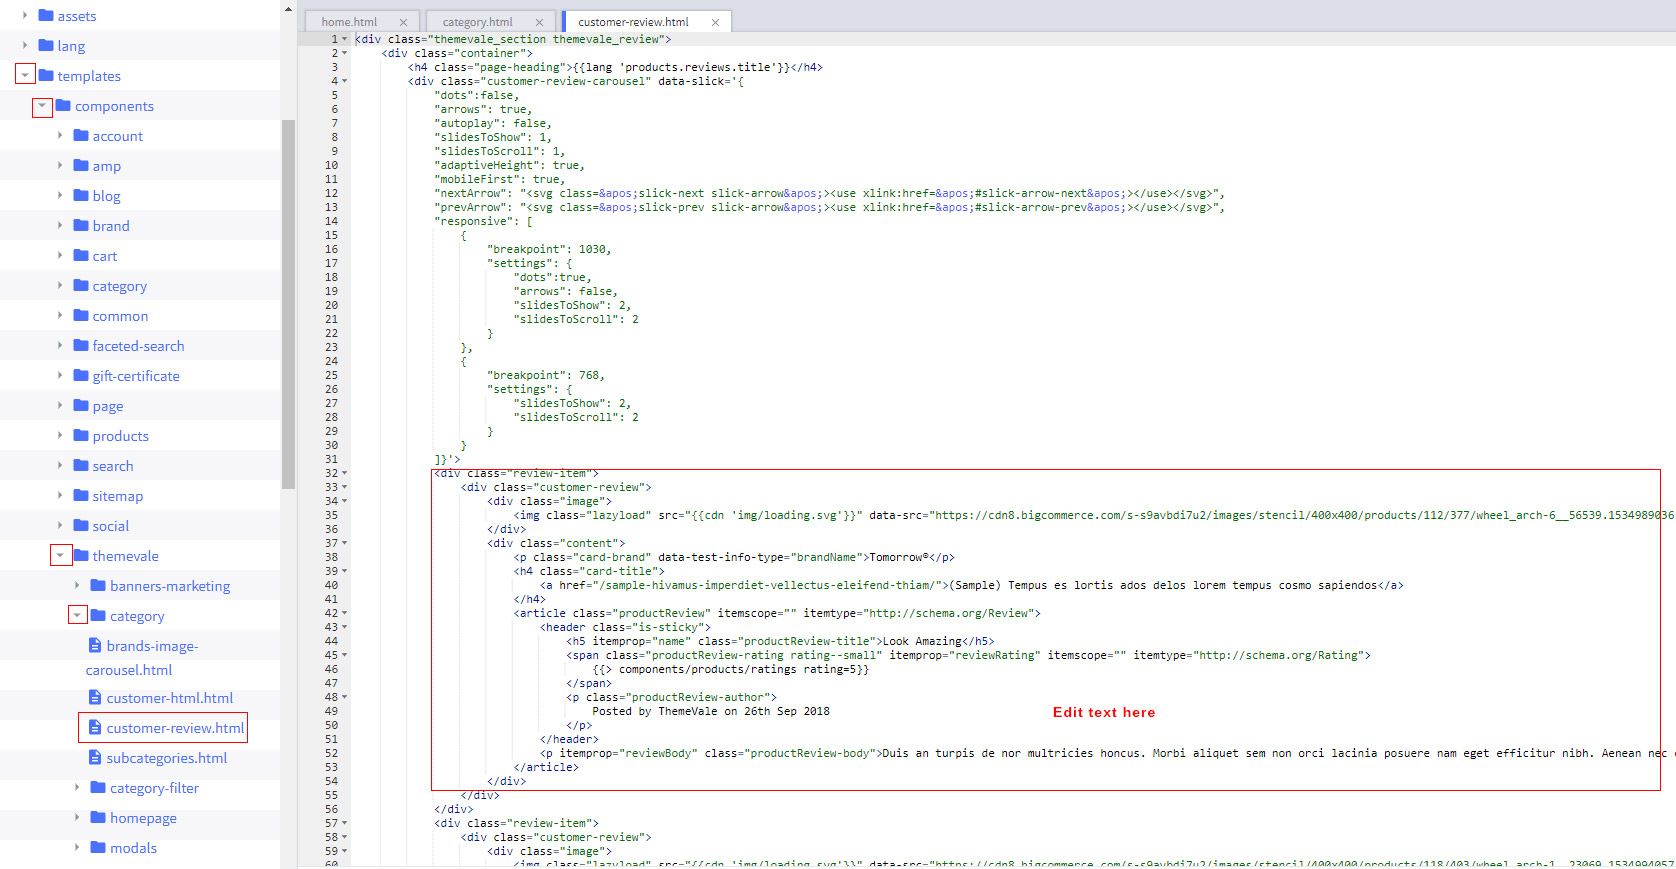
Home Customer Reviews

Go to Storefront -> My Theme -> Customize.
In the Stencil Theme Editor -> go to edit theme files/templates/components/themevale/homepage/conponent/ customer-review.html file.

When you are happy with your changes, don't forget click Save to repackage the edited theme.
Setting Up HomePage 3 Content
What We'll Cover
Home Featured Categories

How to setting layout?
Go to Storefront -> My Theme -> Customize.
In the Stencil Theme Editor -> go to Home Page / Choose Categories Featured
Recommended Size for banner images: 200x200px
Category ID will be not show on Shop By Categories on Navigation menu
When you are happy with your changes, don't forget click Save to repackage the edited theme.
Home Popular Brands
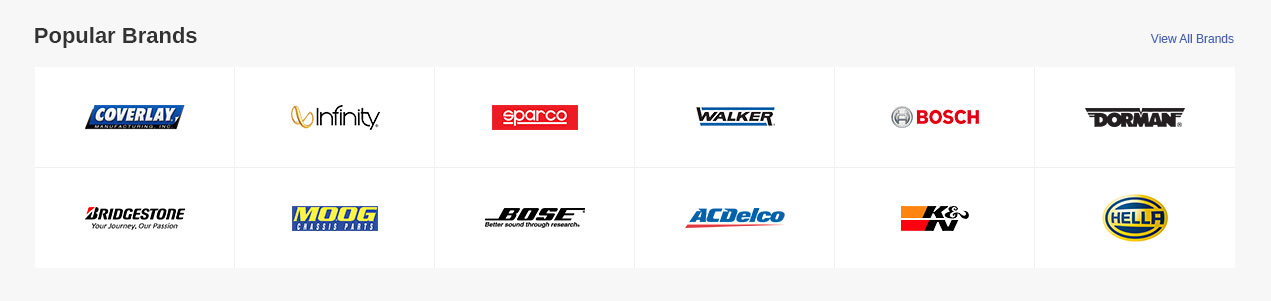
Go to Storefront -> My Theme -> Customize.
In the Stencil Theme Editor -> go to edit theme files/templates/components/themevale/homepage/conponent/ brands-image-grid.html file.

Recommended Size for banner images: 170x70px
When you are happy with your changes, don't forget click Save to repackage the edited theme.
Home Categories use ID (Today’s Deals)

How to setting layout?
Go to Storefront -> My Theme -> Customize.
In the Stencil Theme Editor -> go to Home Page / Choose Categories get ID
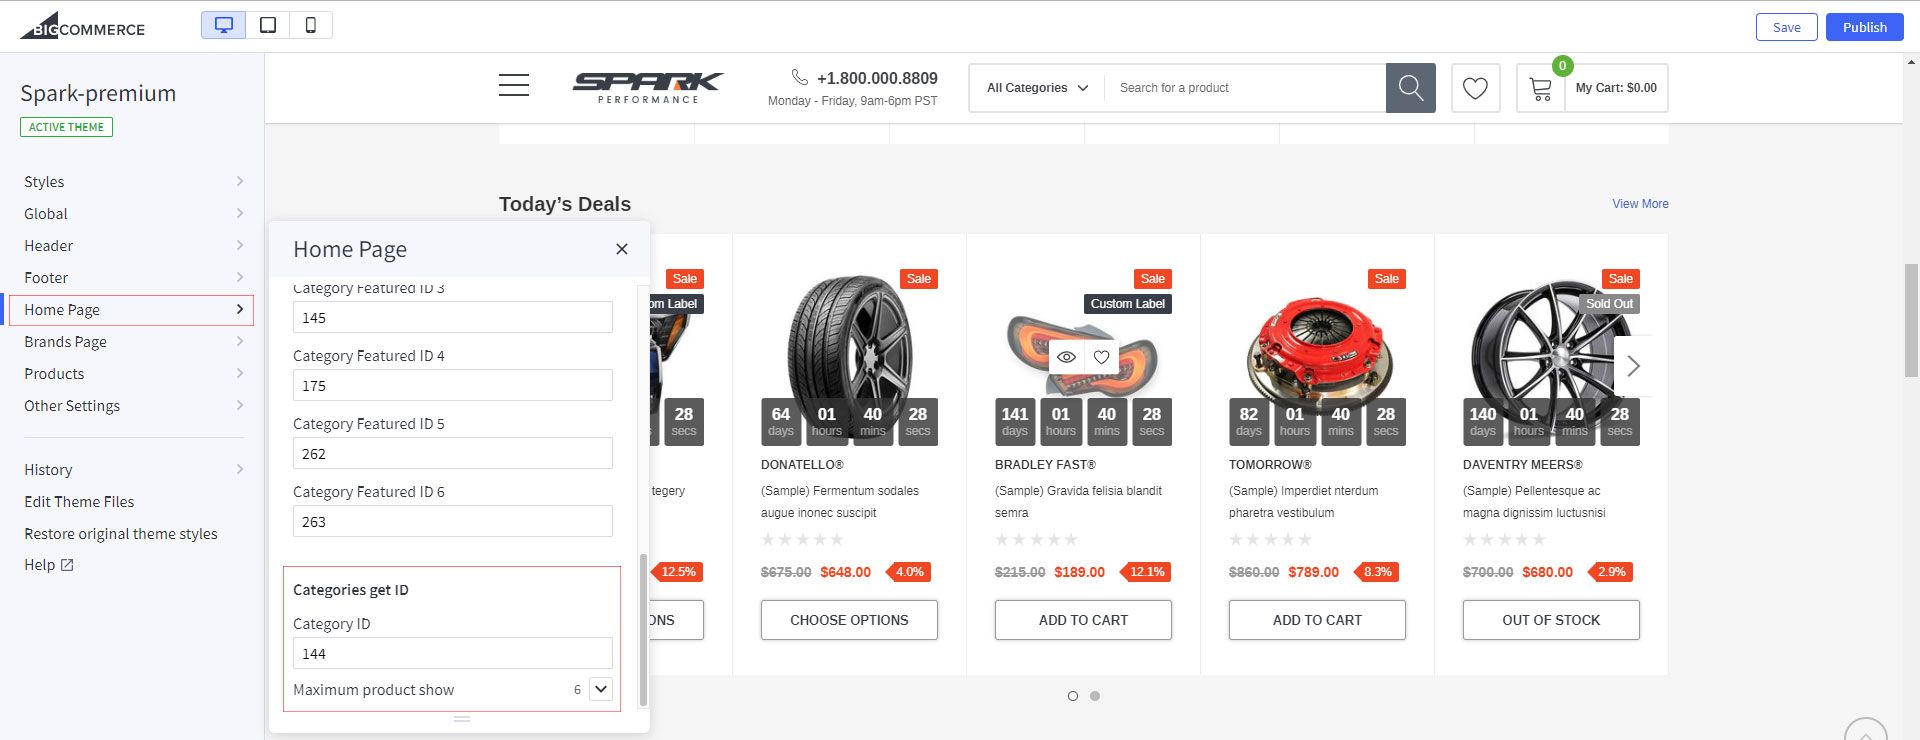
When you are happy with your changes, don't forget click Save to repackage the edited theme.
Home Banner marketting
Go to Storefront -> My Theme -> Customize.
In the Stencil Theme Editor -> go to edit theme files/templates/components/themevale/homepage/conponent/ banner-marketing-1.html file.

Recommended Size for banner images: 380x320px, 790x320px
When you are happy with your changes, don't forget click Save to repackage the edited theme.
Home Banner marketting 2
Go to Storefront -> My Theme -> Customize.
In the Stencil Theme Editor -> go to edit theme files/templates/components/themevale/homepage/conponent/ banner-marketing-2.html file.
Recommended Size for banner images: 585x370px
When you are happy with your changes, don't forget click Save to repackage the edited theme.
Home banner with video popup
Go to Storefront -> My Theme -> Customize.
In the Stencil Theme Editor -> go to edit theme files/templates/components/themevale/homepage/conponent/ banner-with-video-2.html file.
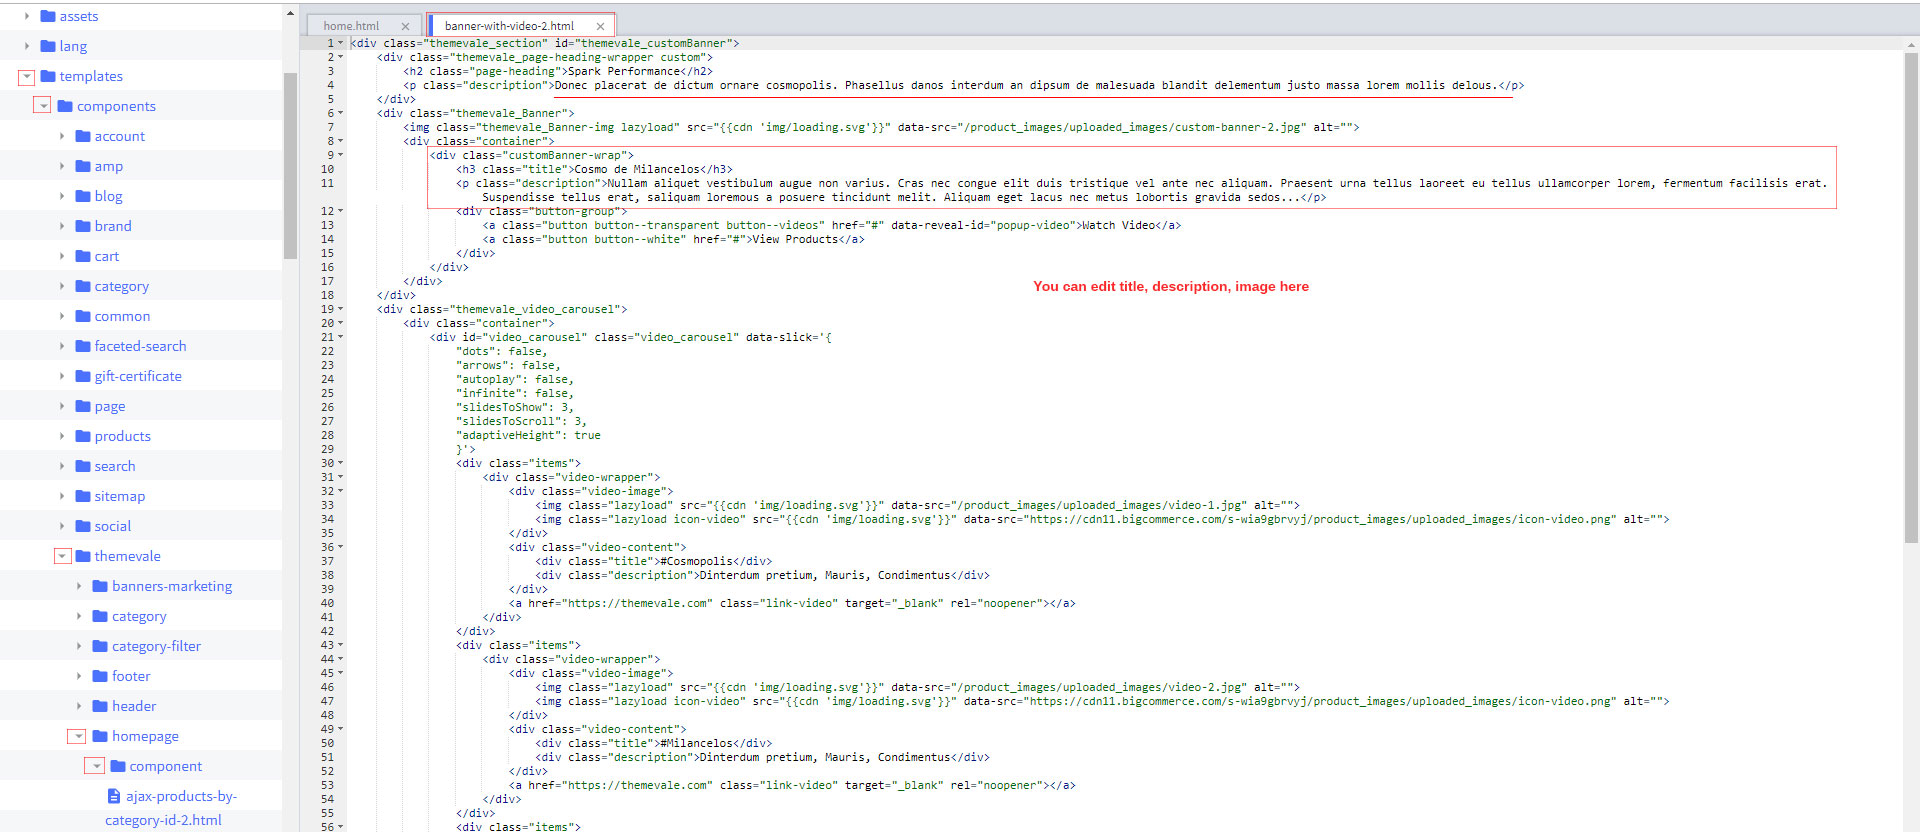
When you are happy with your changes, don't forget click Save to repackage the edited theme.
How to setting popup video?
Go to Storefront -> My Theme -> Customize.
In the Stencil Theme Editor -> go to Home Page / Choose Popup Video

When you are happy with your changes, don't forget click Save to repackage the edited theme.
Home Recent Blog Posts
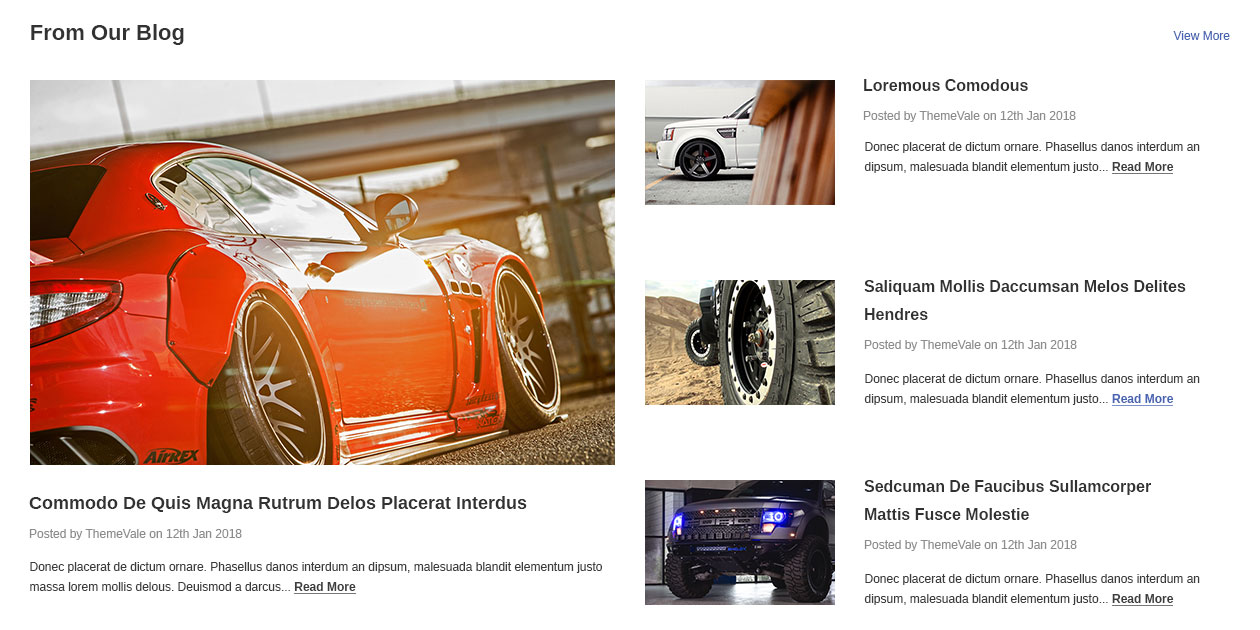
Go to Storefront -> My Theme -> Customize.
In the Stencil Theme Editor -> go to edit theme files/templates/components/themevale/homepage/conponent/ recent-post-list-2.html file.

When you are happy with your changes, don't forget click Save to repackage the edited theme.
Setting Up Footer Content
What We'll Cover
Footer layout 1

Setting Contact Us

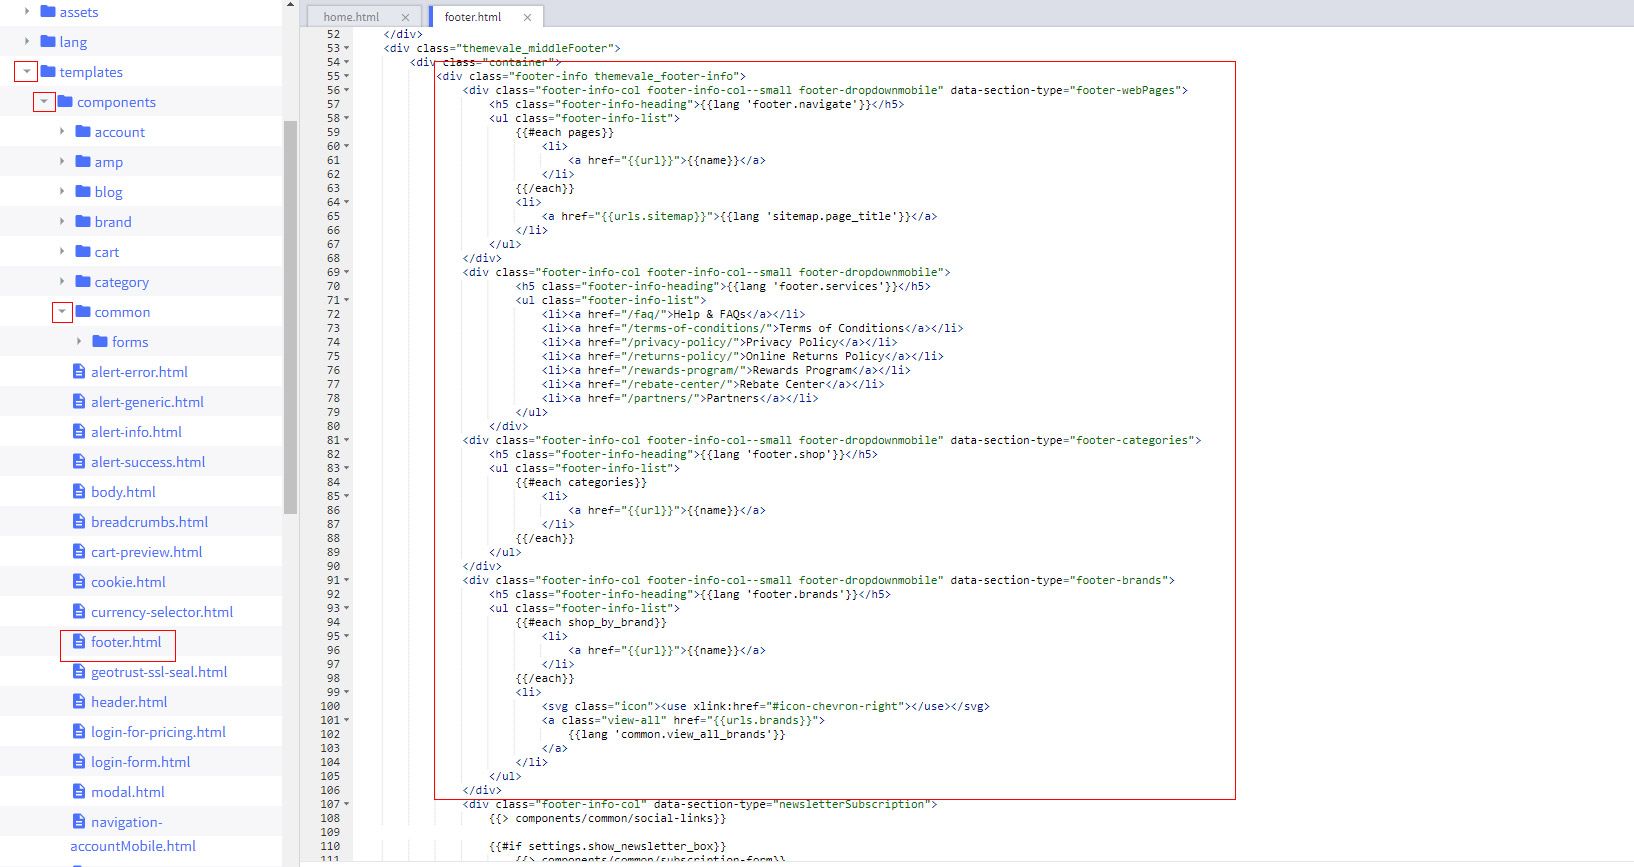
In the Stencil Theme Editor -> go to edit theme file -> templates/components/themevale/footer/ footer-1.html file.
In the footer.html file, you can add/edit/remove the phone number and email.

When you are happy with your changes, don't forget click Save to repackage the edited theme.
Setting Service Block

In the Stencil Theme Editor -> go to edit theme file -> templates/components/themevale/footer/ footer-1.html file.
In the footer.html file, you can add/edit/remove the icon & text of service block.

When you are happy with your changes, don't forget click Save to repackage the edited theme.
Footer Column Links
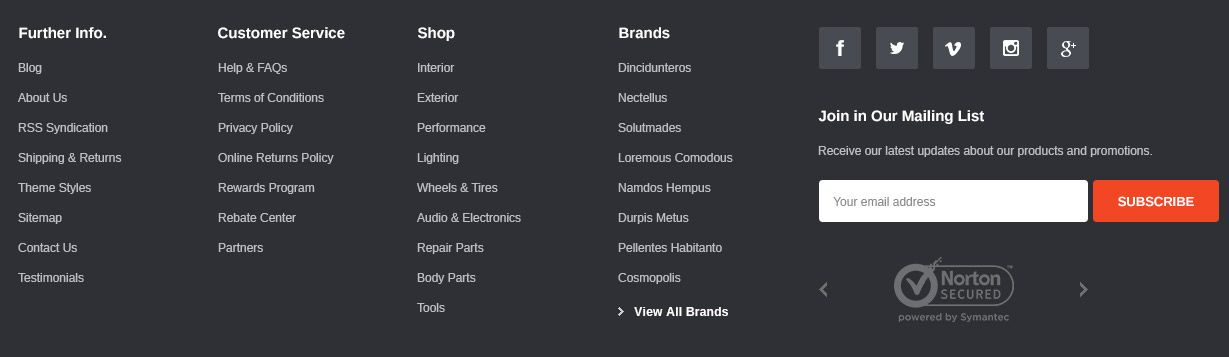
In the Stencil Theme Editor -> go to edit theme file -> templates/components/themevale/footer/ footer-1.html file.
In the footer.html file, you can add/edit/remove the column links.
For the Shop and Brand column, this is a column with the dynamic category links.
When you are happy with your changes, don't forget click Save to repackage the edited theme.
Footer Payment Image

In the Stencil Theme Editor -> go to edit theme file -> templates/components/common/ payment-icons.html file.
In the payment-icons.html file, you can add/edit/remove the image.

When you are happy with your changes, don't forget click Save to repackage the edited theme.
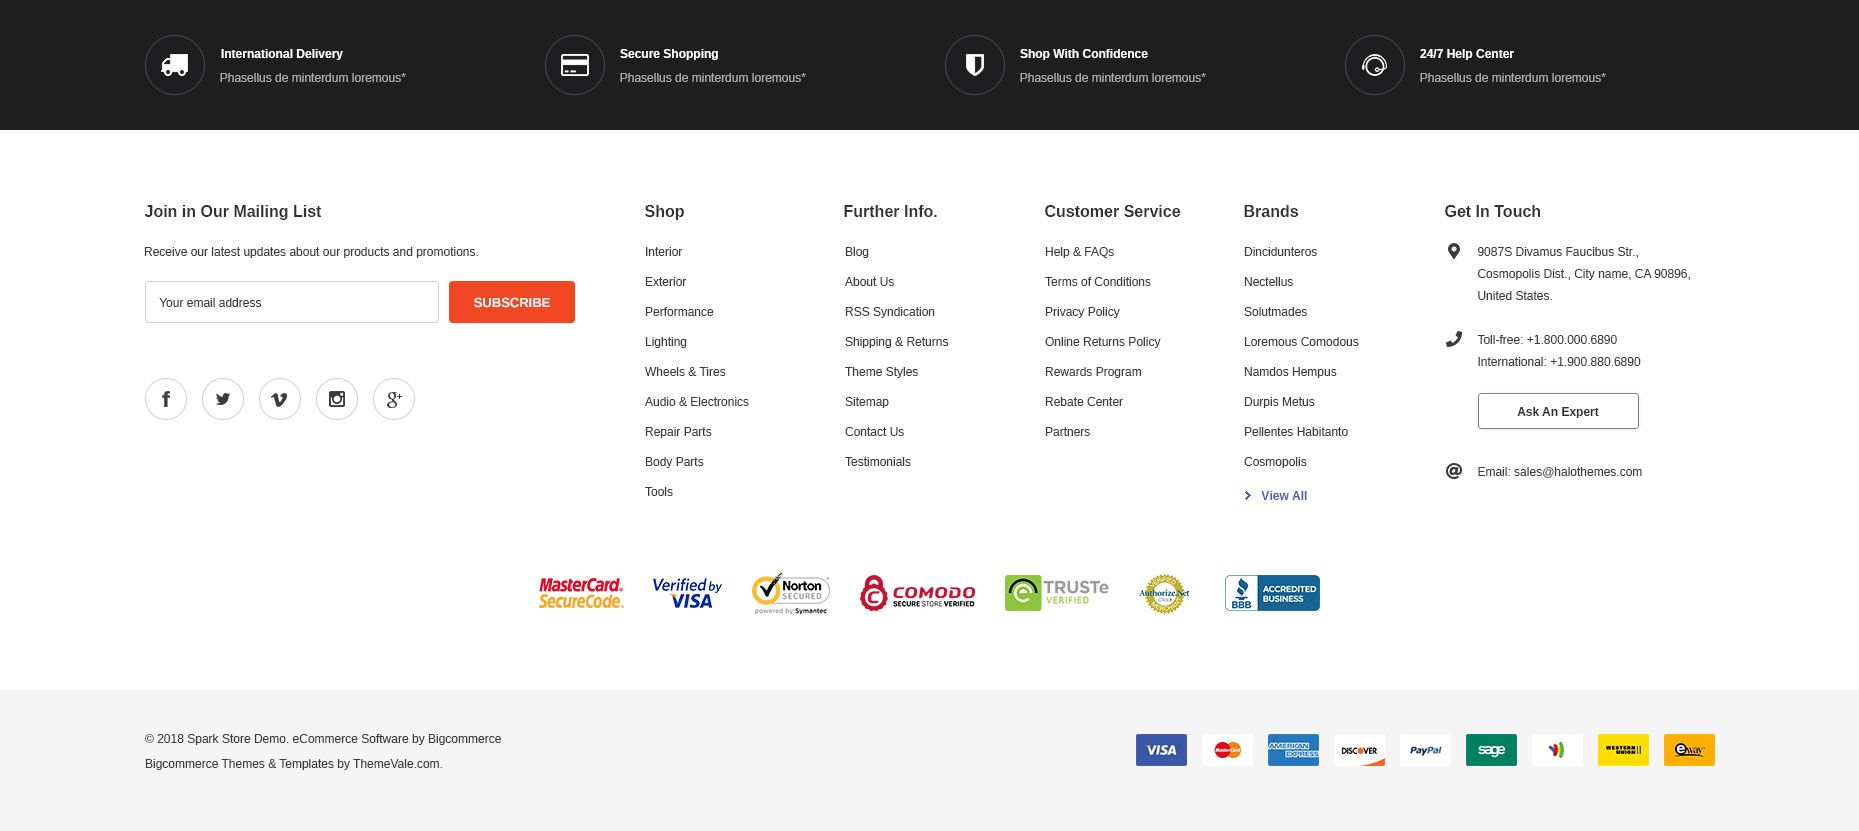
Footer layout 2
Go to Storefront -> My Theme -> Customize.
In the Stencil Theme Editor -> go to edit theme filestemplates/components/themevale/footer/ footer-2.html file.
When you are happy with your changes, don't forget click Save to repackage the edited theme.
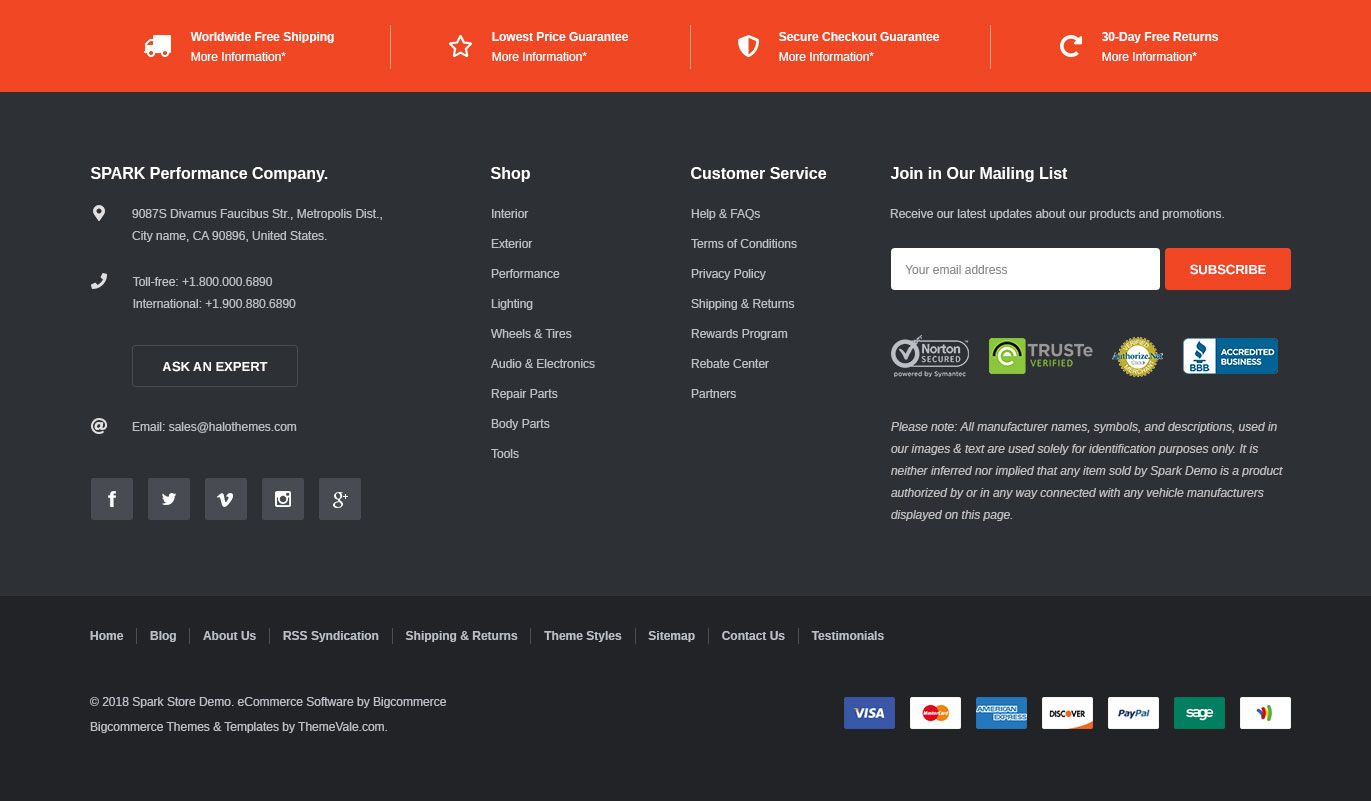
Footer layout 3
Go to Storefront -> My Theme -> Customize.
In the Stencil Theme Editor -> go to edit theme filestemplates/components/themevale/footer/ footer-3.html file.
When you are happy with your changes, don't forget click Save to repackage the edited theme.
Footer Customization
Go to Storefront -> My Theme -> Customize.
In the Stencil Theme Editor, look into the options showing on the footer section
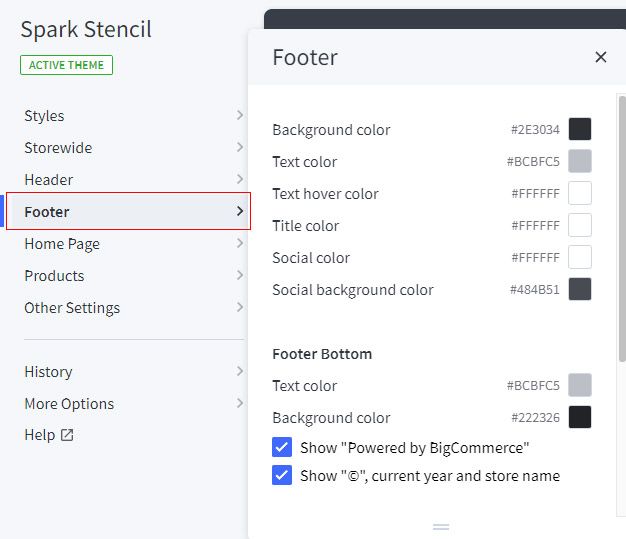
You can change color for background, title, text, button, turn on/off section... And don't forget click Save to repackage the edited theme.
Setting Up Multi Level Category Filter add on
This add on is showing on Spark theme and only included in Spark Premium pack as you are seeing
Our BigCommerce multi-level category filter add on will work based levels of categories (Category structure in Back Office). And there are 2 ways to show this add on on website.
01: Setup with All Categories: You can show all product categories on menu for Multi Level Category Filter like our Spark theme: http://spark-demo.mybigcommerce.com
Please go to Other Settings -> Multi Level Category Filter -> Choose this below option for option 01:

Or
02: You can create one category. Example "Shop All" or any name you want to contain all children category levels you need to show on the filter like this site below and still keep other categories on menu not to include in Filter so the rest categories can work separately

Please go to Other Settings -> Multi Level Category Filter -> Choose this below option for option 01:

By Default, on Spark it will use option 01, if you need the way this add on works like option 02, please contact us at support@halothemes.com so we can support you
Setting Up Categories Page
Categories banner image

In the Admin panel -> go to marketing -> banner. Then, click Create a banner
In the Create a banner, please upload image in Banner Content, and choose page category you want show

Recommended Size for banner images: 1920x280px
When you are happy with your changes, don't forget click Save to repackage the edited theme.
Categories carousel image

In the Admin panel -> go to products -> product categories Then, choose category you want
In the Edit Category, please click icon edit html in Description, and add code html to this:

<div class="categoryImage-carousel">
	<div class="item">
		<a class="img-wrap fancybox" href="javascript:void(0);" data-href="https://cdn11.bigcommerce.com/s-35csgqmz9s/product_images/uploaded_images/blog-1.jpg" data-fancybox="gallery" aria-label="Open Category Image 1 in a popup"> <img class="lazyload" src="http://caros-demo.mybigcommerce.com/content/loading.svg" alt="Category Image 1" data-src="https://cdn8.bigcommerce.com/s-s9avbdi7u2/product_images/uploaded_images/category-carousel-1.jpg" /> </a>
	</div>
	<div class="item">
		<a class="img-wrap fancybox" href="javascript:void(0);" data-href="https://cdn11.bigcommerce.com/s-35csgqmz9s/product_images/uploaded_images/blog-2.jpg" data-fancybox="gallery" aria-label="Open Category Image 2 in a popup"> <img class="lazyload" src="http://caros-demo.mybigcommerce.com/content/loading.svg" alt="Category Image 2" data-src="https://cdn8.bigcommerce.com/s-s9avbdi7u2/product_images/uploaded_images/category-carousel-2.jpg" /> </a>
	</div>
	<div class="item">
		<a class="img-wrap fancybox" href="javascript:void(0);" data-href="https://cdn11.bigcommerce.com/s-35csgqmz9s/product_images/uploaded_images/blog-3.jpg" data-fancybox="gallery" aria-label="Open Category Image 3 in a popup"> <img class="lazyload" src="http://caros-demo.mybigcommerce.com/content/loading.svg" alt="Category Image 3" data-src="https://cdn8.bigcommerce.com/s-s9avbdi7u2/product_images/uploaded_images/category-carousel-3.jpg" /> </a>
	</div>
	<div class="item">
		<a class="img-wrap fancybox" href="javascript:void(0);" data-href="https://cdn11.bigcommerce.com/s-35csgqmz9s/product_images/uploaded_images/blog-4.jpg" data-fancybox="gallery" aria-label="Open Category Image 4 in a popup"> <img class="lazyload" src="http://caros-demo.mybigcommerce.com/content/loading.svg" alt="Category Image 4" data-src="https://cdn8.bigcommerce.com/s-s9avbdi7u2/product_images/uploaded_images/category-carousel-4.jpg" /> </a>
	</div>
	<div class="item">
		<a class="img-wrap fancybox" href="javascript:void(0);" data-href="https://cdn11.bigcommerce.com/s-35csgqmz9s/product_images/uploaded_images/blog-5.jpg" data-fancybox="gallery" aria-label="Open Category Image 5 in a popup"> <img class="lazyload" src="http://caros-demo.mybigcommerce.com/content/loading.svg" alt="Category Image 5" data-src="https://cdn8.bigcommerce.com/s-s9avbdi7u2/product_images/uploaded_images/category-carousel-5.jpg" /> </a>
	</div>
	<div class="item">
		<a class="img-wrap fancybox" href="javascript:void(0);" data-href="https://cdn11.bigcommerce.com/s-35csgqmz9s/product_images/uploaded_images/blog-1.jpg" data-fancybox="gallery" aria-label="Open Category Image 6 in a popup"> <img class="lazyload" src="http://caros-demo.mybigcommerce.com/content/loading.svg" alt="Category Image 6" data-src="https://cdn8.bigcommerce.com/s-s9avbdi7u2/product_images/uploaded_images/category-carousel-1.jpg" /> </a>
	</div>
	<div class="item">
		<a class="img-wrap fancybox" href="javascript:void(0);" data-href="https://cdn11.bigcommerce.com/s-35csgqmz9s/product_images/uploaded_images/blog-2.jpg" data-fancybox="gallery" aria-label="Open Category Image 7 in a popup"> <img class="lazyload" src="http://caros-demo.mybigcommerce.com/content/loading.svg" alt="Category Image 7" data-src="https://cdn8.bigcommerce.com/s-s9avbdi7u2/product_images/uploaded_images/category-carousel-2.jpg" /> </a>
	</div>
	<div class="item">
		<a class="img-wrap fancybox" href="javascript:void(0);" data-href="https://cdn11.bigcommerce.com/s-35csgqmz9s/product_images/uploaded_images/blog-3.jpg" data-fancybox="gallery" aria-label="Open Category Image 8 in a popup"> <img class="lazyload" src="http://caros-demo.mybigcommerce.com/content/loading.svg" alt="Category Image 8" data-src="https://cdn8.bigcommerce.com/s-s9avbdi7u2/product_images/uploaded_images/category-carousel-3.jpg" /> </a>
	</div>
	<div class="item">
		<a class="img-wrap fancybox" href="javascript:void(0);" data-href="https://cdn11.bigcommerce.com/s-35csgqmz9s/product_images/uploaded_images/blog-4.jpg" data-fancybox="gallery" aria-label="Open Category Image 9 in a popup"> <img class="lazyload" src="http://caros-demo.mybigcommerce.com/content/loading.svg" alt="Category Image 9" data-src="https://cdn8.bigcommerce.com/s-s9avbdi7u2/product_images/uploaded_images/category-carousel-4.jpg" /> </a>
	</div>
	<div class="item">
		<a class="img-wrap fancybox" href="javascript:void(0);" data-href="https://cdn11.bigcommerce.com/s-35csgqmz9s/product_images/uploaded_images/blog-5.jpg" data-fancybox="gallery" aria-label="Open Category Image 10 in a popup"> <img class="lazyload" src="http://caros-demo.mybigcommerce.com/content/loading.svg" alt="Category Image 10" data-src="https://cdn8.bigcommerce.com/s-s9avbdi7u2/product_images/uploaded_images/category-carousel-5.jpg" /> </a>
	</div>
</div>
Recommended Size for banner images: 230x230px
When you are happy with your changes, don't forget click Save to repackage the edited theme.
Categories Custom CMS Block

In the Stencil Theme Editor -> go to edit theme file -> templates/components/themevale/category/ customer-html.html file.
In the customer-html.html file, you can add/edit/remove the text.

When you are happy with your changes, don't forget click Save to repackage the edited theme.
Categories Customer Reviews
In the Stencil Theme Editor -> go to edit theme file -> templates/components/themevale/category/ customer-review.html file.
In the customer-review.html file, you can add/edit/remove the text.
When you are happy with your changes, don't forget click Save to repackage the edited theme.
Categories brands Carousel
In the Stencil Theme Editor -> go to edit theme file -> templates/components/themevale/category/ brands-image-carousel.html file.
In the brands-image-carousel.html file, you can add/edit/remove the text.
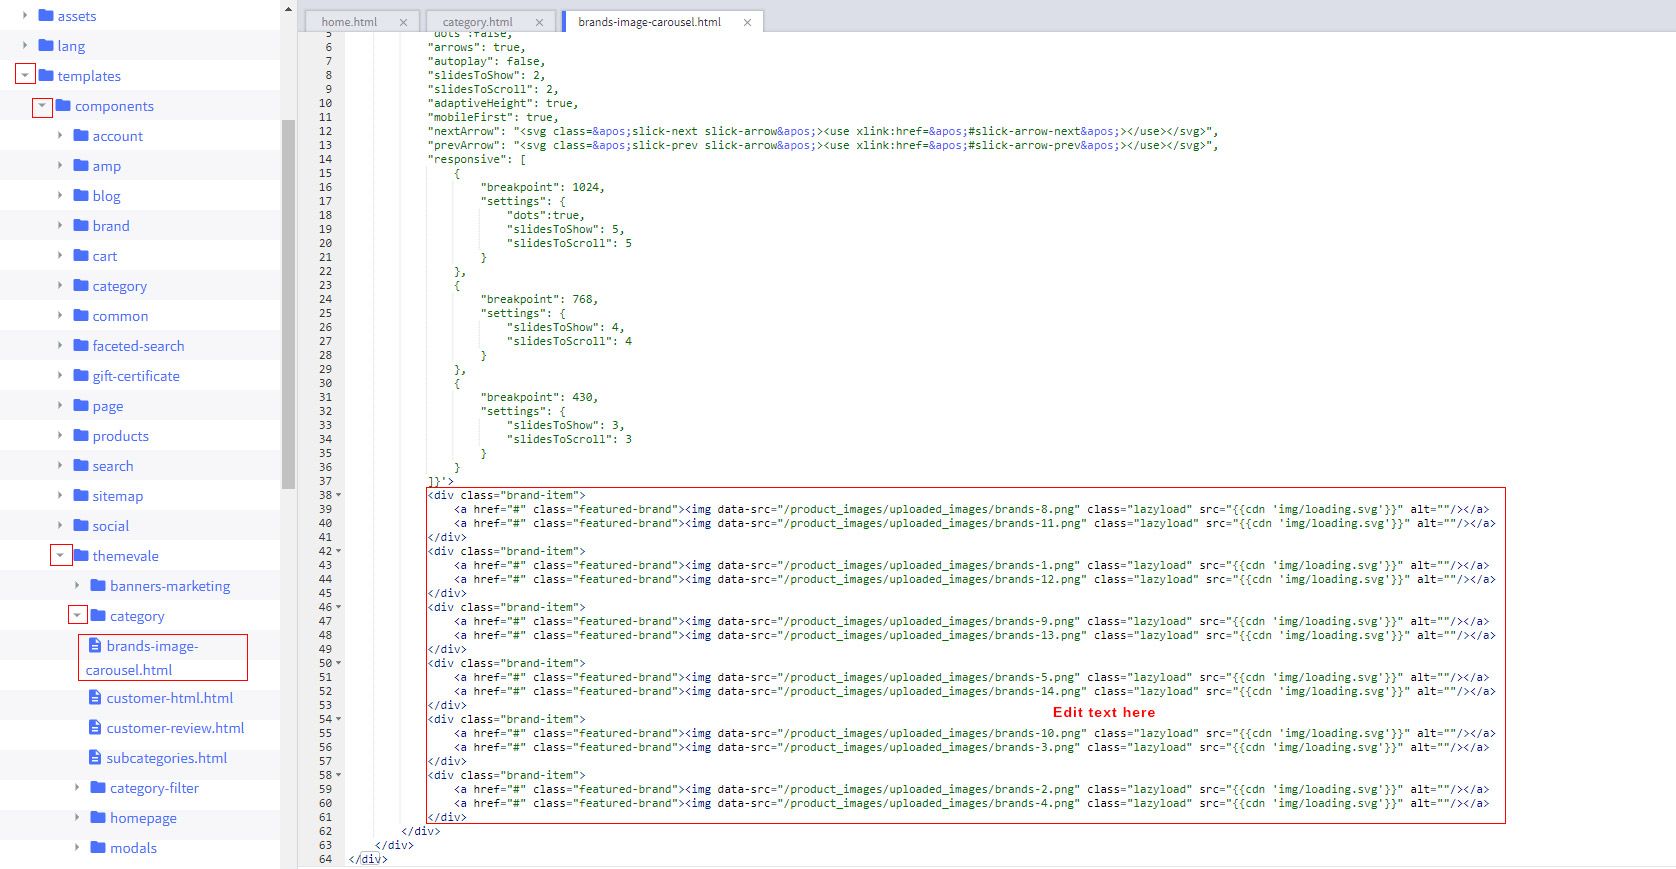
Recommended Size for banner images: 175x70px
When you are happy with your changes, don't forget click Save to repackage the edited theme.
Categories Sidebar banner
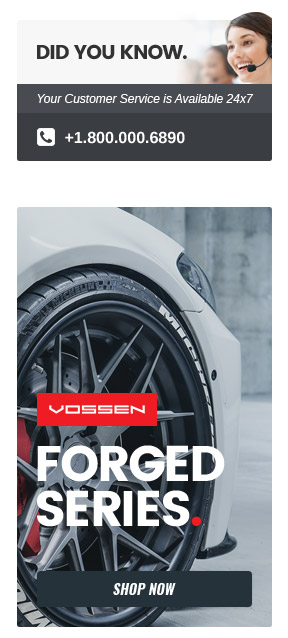
In the Stencil Theme Editor -> go to edit theme file -> templates/components/themevale/sidebar/ advertisement-image-1.html file.
In the advertisement-image-1.html file, you can add/edit/remove the image.
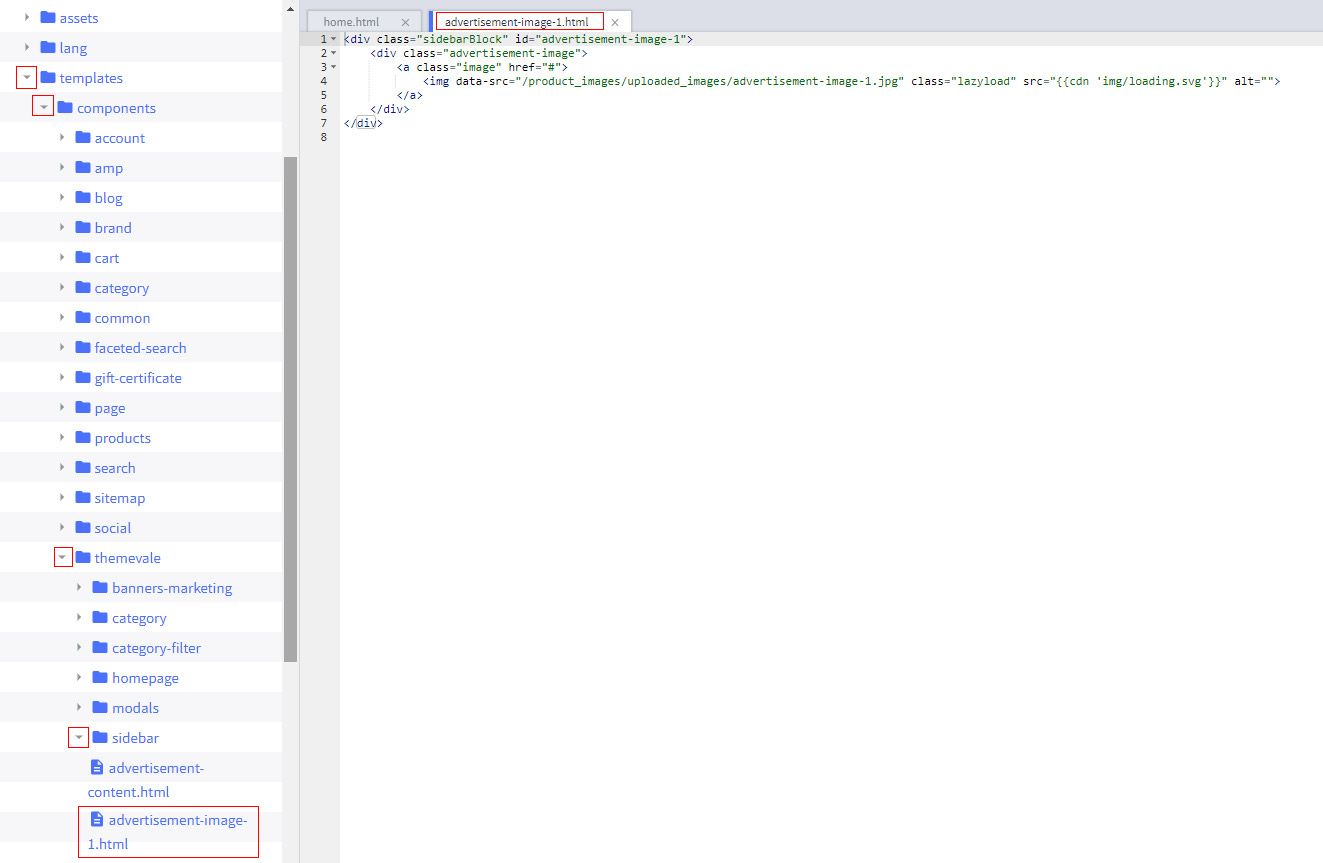
Recommended Size for banner images: 255x150px, 255x420px
When you are happy with your changes, don't forget click Save to repackage the edited theme.
Categories Sidebar CMS BlockK

In the Stencil Theme Editor -> go to edit theme file -> templates/components/themevale/sidebar/ advertisement-content.html file.
In the advertisement-content.html file, you can add/edit/remove the text.

When you are happy with your changes, don't forget click Save to repackage the edited theme.
Setting Up product detail
What We'll Cover
- Product Detail Layout
- How to change Product Detail Layout?
- Change Product Detail Layout For All Products
- Setting video, Instruction, Warranty
- Setting service content
- Setting image security
- Custom Label
- Sold In Last function
- Time Count Down(Sale) Add On
- Customers View Products Add On
- Product Tabs
- Ask an Experts Pop Up
- Frequently Bought Together Add On
Product Detail Layout
Spark has 3 different Product Details page layouts
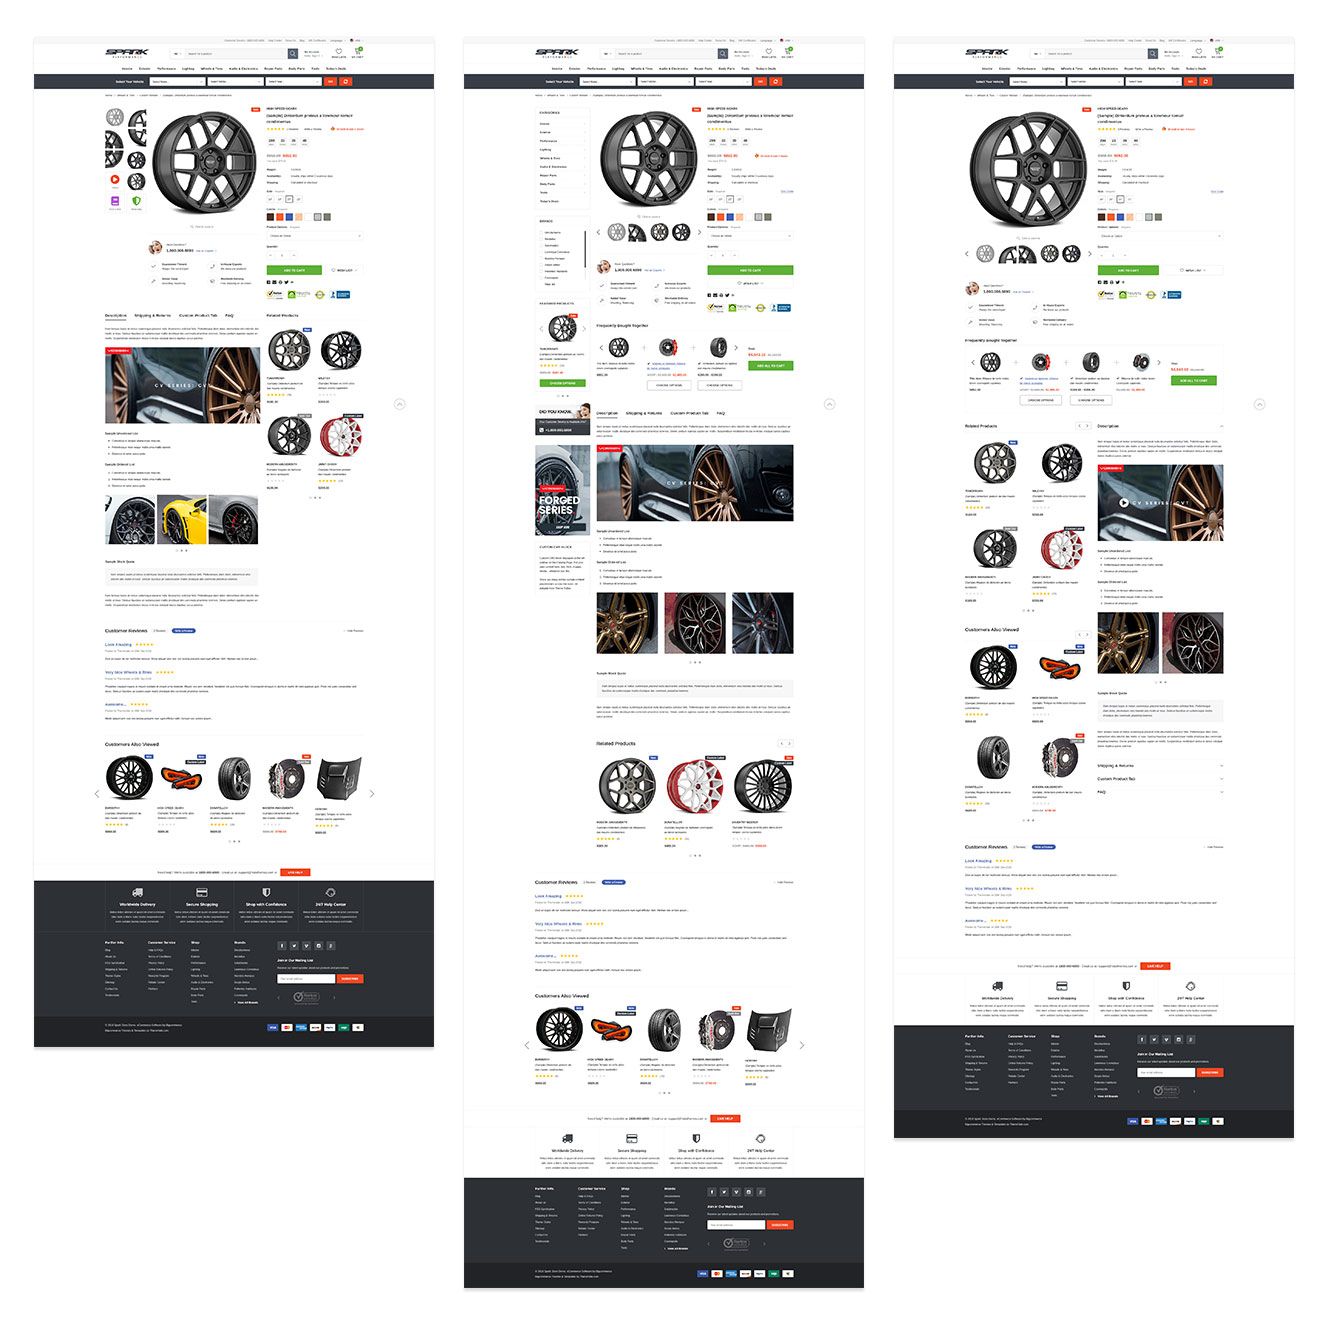
How to change Product Detail Layout?
In the Admin panel -> go to product -> View. Then, click on product name you want
In the Product Details, please find this tab: Other Details. After that, find out the form select which has label: Template Layout File and choose layout you want
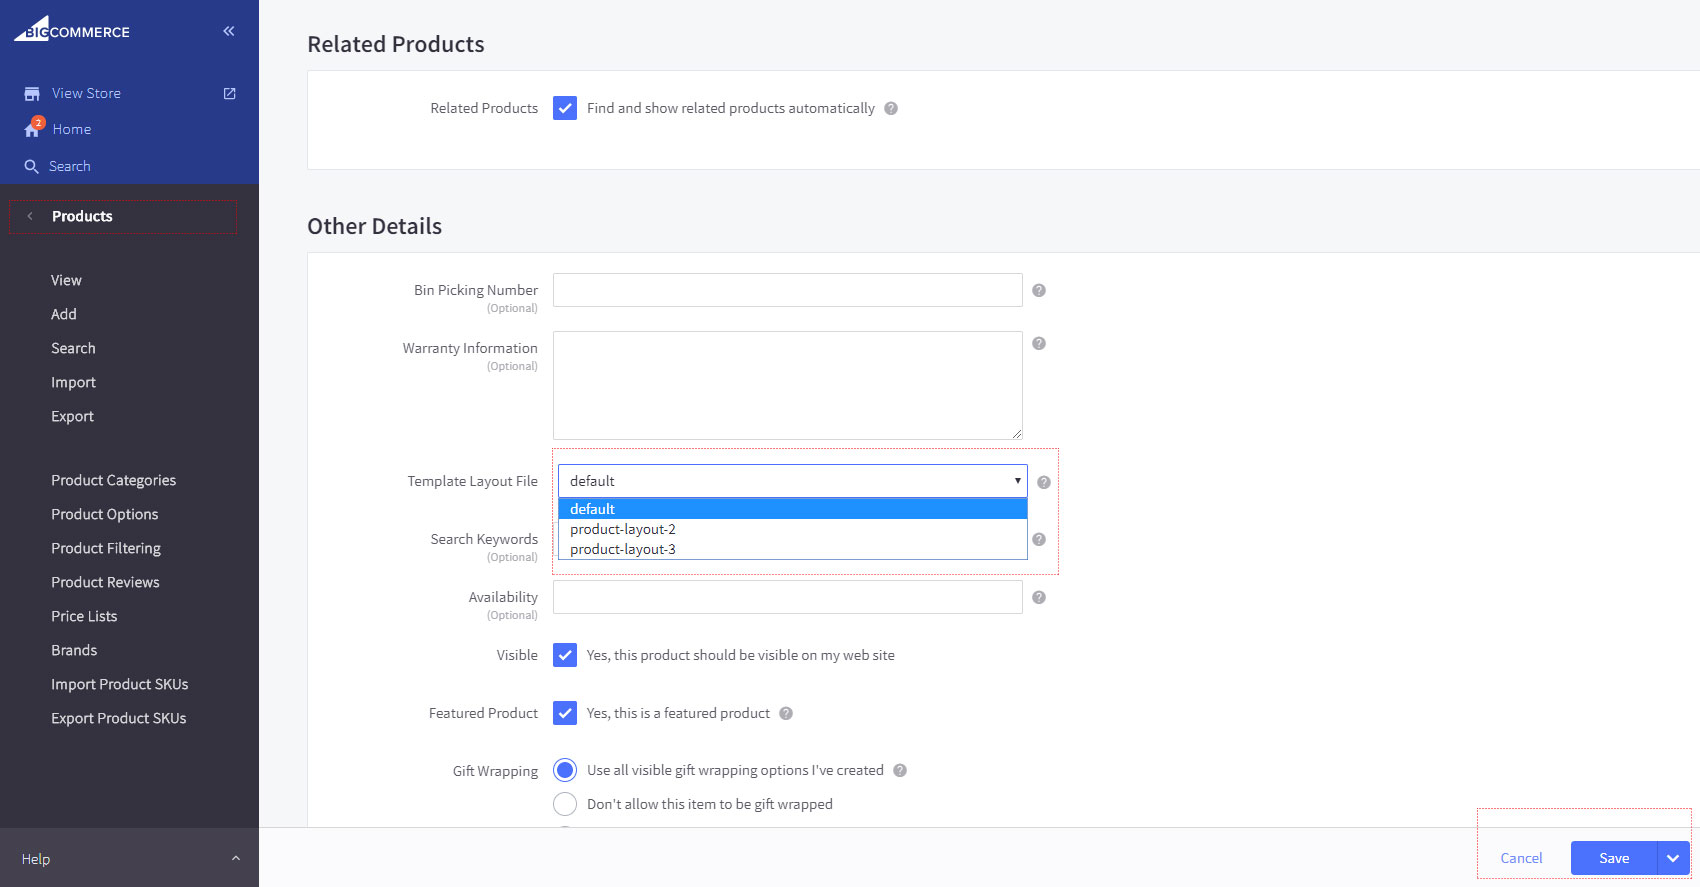
When you are happy with your changes, don't forget click Save to repackage the edited theme.
Change Product Detail Layout For All Products
In case you want to use one product layout for all of products, please follow this instruction:
Go to Storefront -> My Theme -> Advanced -> Edit theme files.
In the Stencil Theme Editor -> go to templates/pages/custom/product/choose the file of layout you want, and Copy all HTML in file.
Example: You are using Default layout and you want to change to product-layout-2 layout, then you need to go to product-layout-2.html file and copy all code
- product-layout-2.html : layout product layout 2
- product-layout-3.html : layout product layout 3

After you copy all of html code, please go to templates/pages/product.html file, Delete the current html code and paste html code (You just copied) in this file and Save.
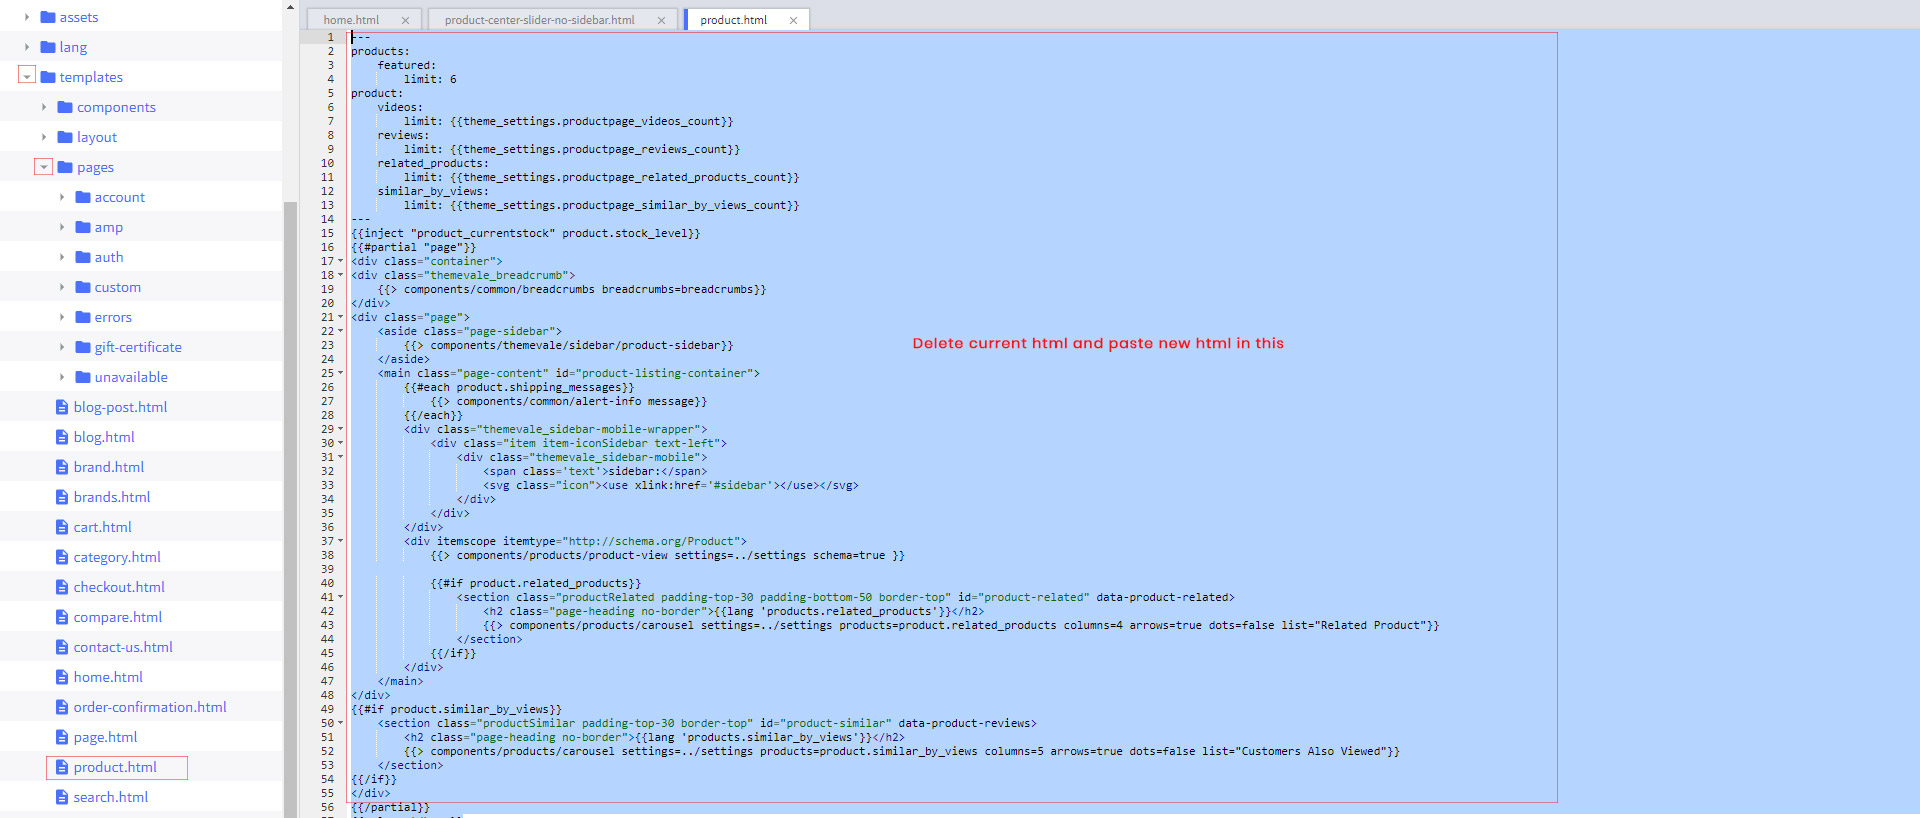
When you are happy with your changes, don't forget click Save to repackage the edited theme. If you cannot do this, please contact us at support@halothemes.com for assistance
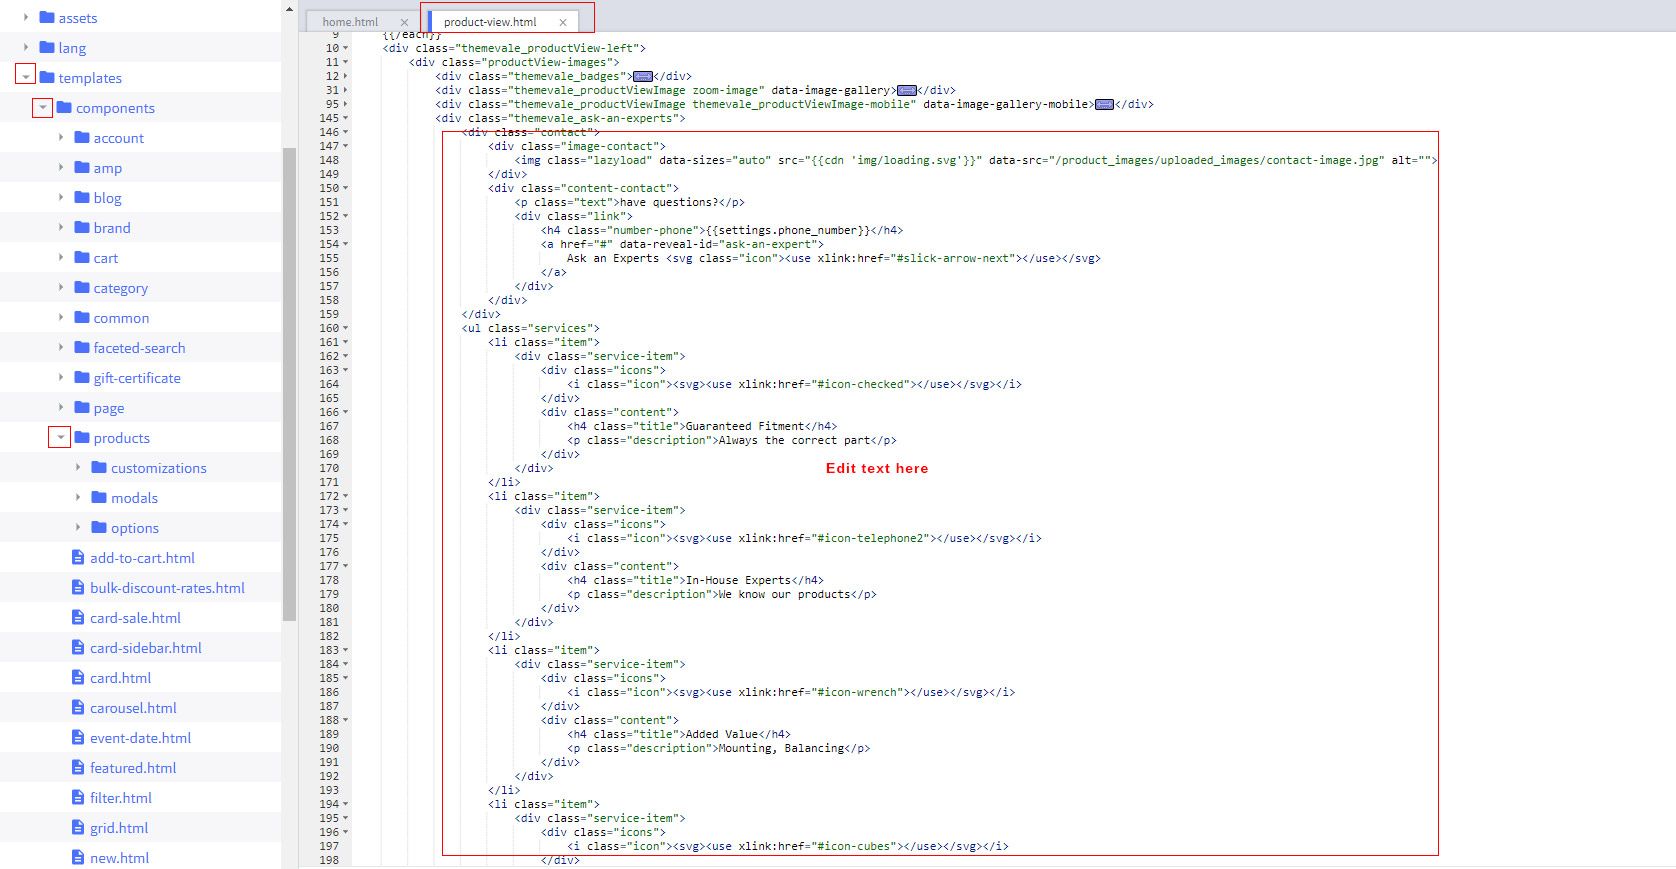
Setting video, Instruction, Warranty
![]()
In the Stencil Theme Editor -> go to edit theme file -> templates/components/product/ product-view.html file.
In the product-view.html file, you can add/edit/remove the text & icon.
![]()
When you are happy with your changes, don't forget click Save to repackage the edited theme.
Setting service content
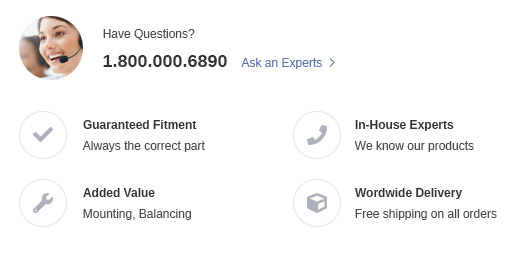
In the Stencil Theme Editor -> go to edit theme file -> templates/components/product/ product-view.html file.
In the product-view.html file, you can add/edit/remove the text & icon.
When you are happy with your changes, don't forget click Save to repackage the edited theme.
Setting image security

In the Stencil Theme Editor -> go to edit theme file -> templates/components/product/ product-view.html file.
In the product-view.html file, you can add/edit/remove the image.

When you are happy with your changes, don't forget click Save to repackage the edited theme.
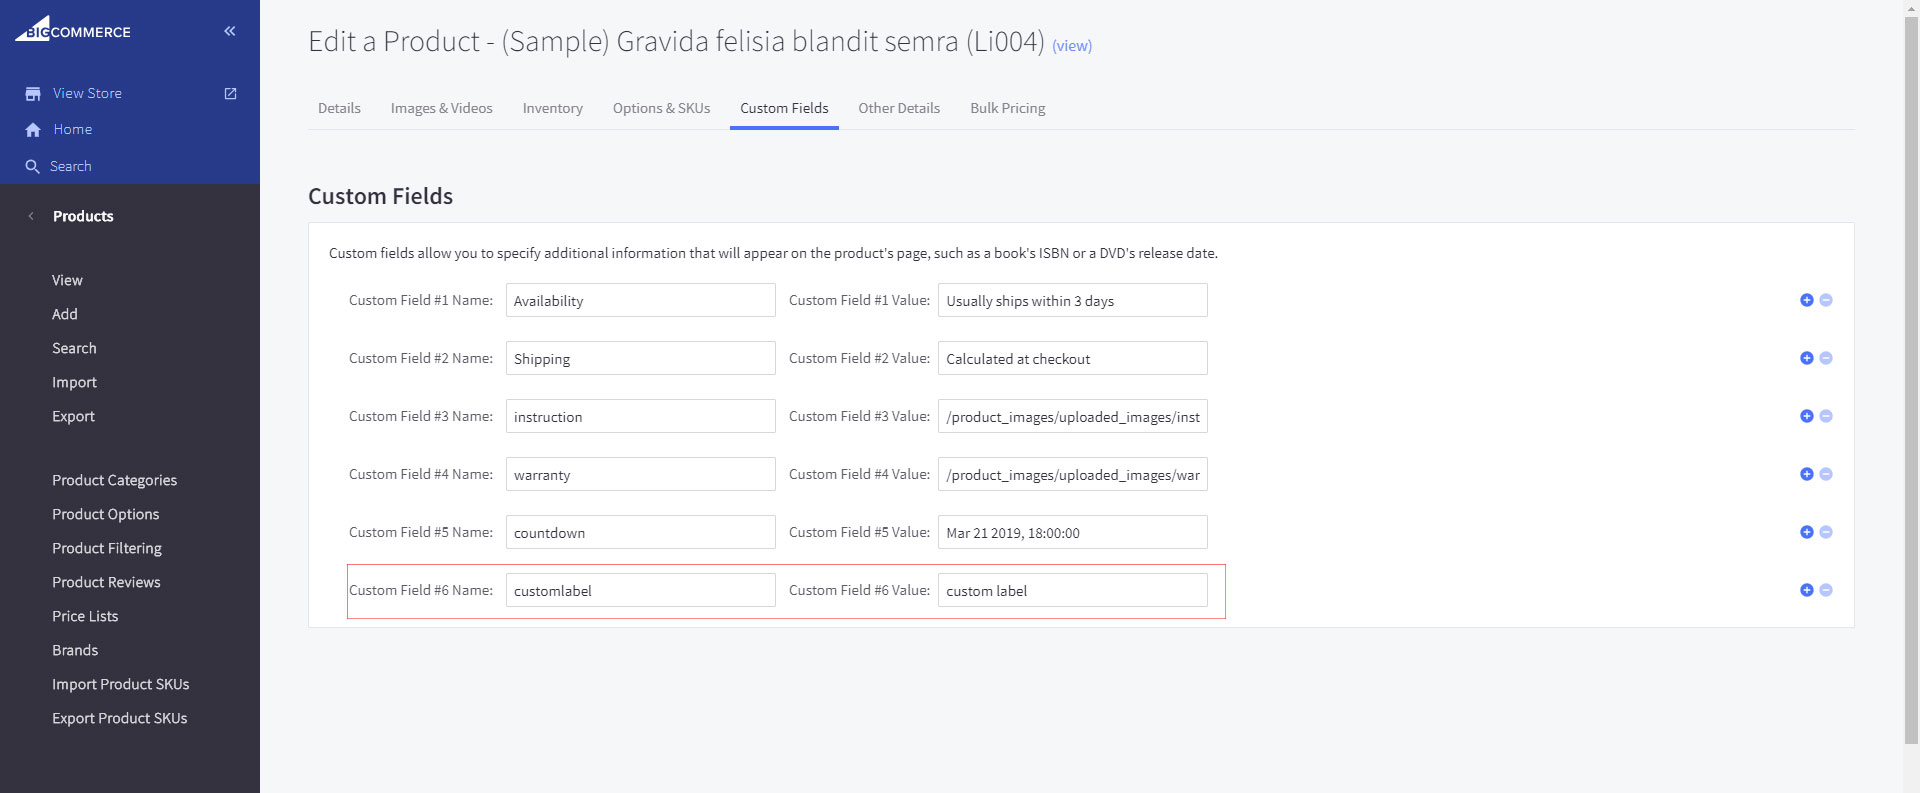
Custom Label
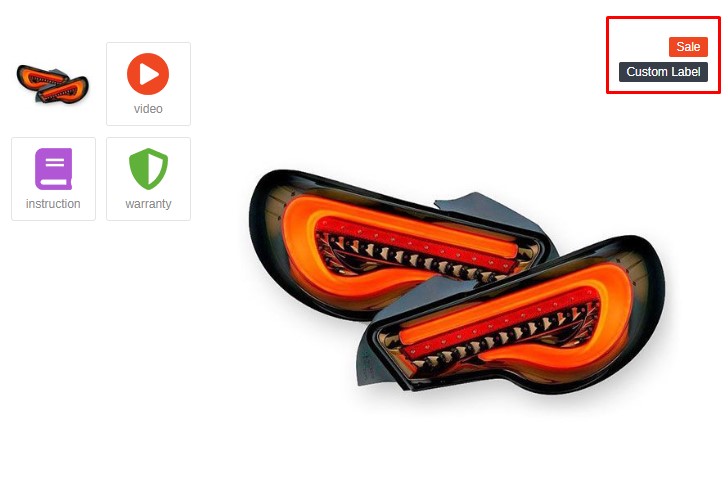
To show custom label: In the Admin panel -> go to product -> View. Then, choose a product you want --> Custom Fields tab.
Then add a custom field with Custom Field Name must be: custom label
And Custom Field #(number) Value will be the text you want to show for that label

When you are happy with your changes, don't forget click Save to repackage the edited theme.
Sold In Last function
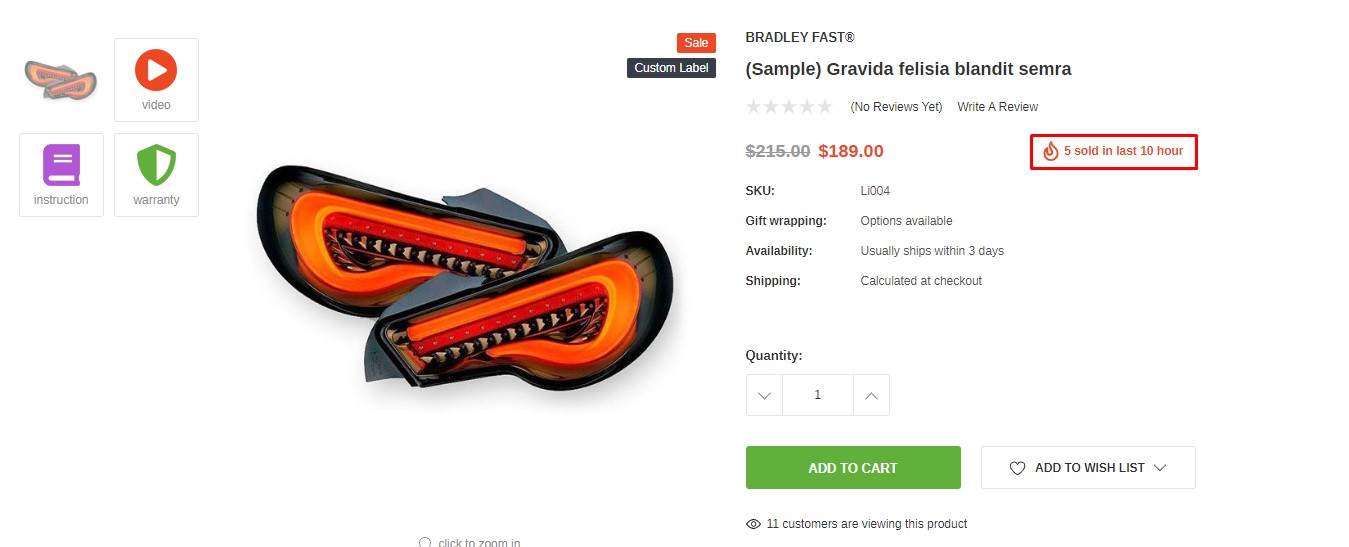
Go to Storefront -> My Theme -> Customize.
In the Stencil Theme Editor -> go to Product Detail Page / Choose Sold in last function

When you are happy with your changes, don't forget click Save to repackage the edited theme.
Time Count Down(Sale) Add On

In the Admin panel -> go to product -> View. Then, click a product you want
In the Product Details, please find tab: Custom Fields.
Custom Field #(number) Name must be: countdown. Custom Field #(number) Value please enter Time (ex: Nov 12 2019, 18:00:00)
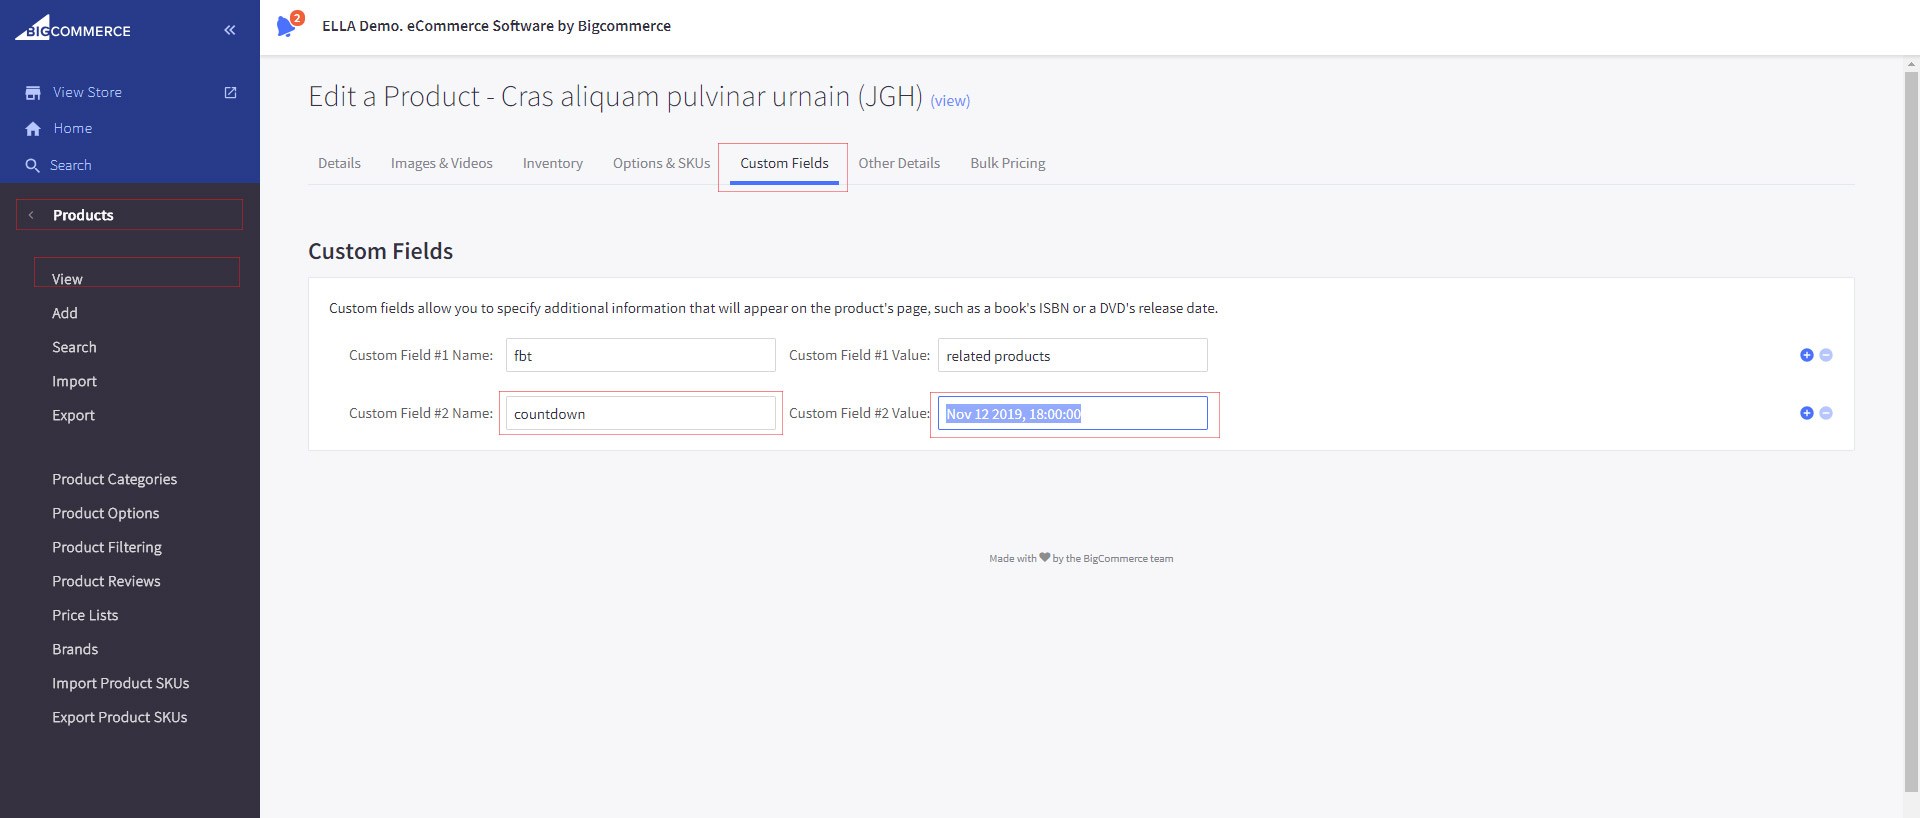
Please use the same this below structure/rule to insert countdown for your product.
Example: Nov 12 2019, 18:00:00
- dec (mm): This is abbreviation of December and you must use the abbreviation of months in this countdown structure.
- Please use 1 white space among mm dd yyyy
When you are happy with your changes, don't forget click Save to repackage the edited theme.
Customers View Products Add On

Go to Storefront -> My Theme -> Customize.
In the Stencil Theme Editor -> go to Other Settings / Choose Customers View In Last function

When you are happy with your changes, don't forget click Save to repackage the edited theme.
Product Tabs
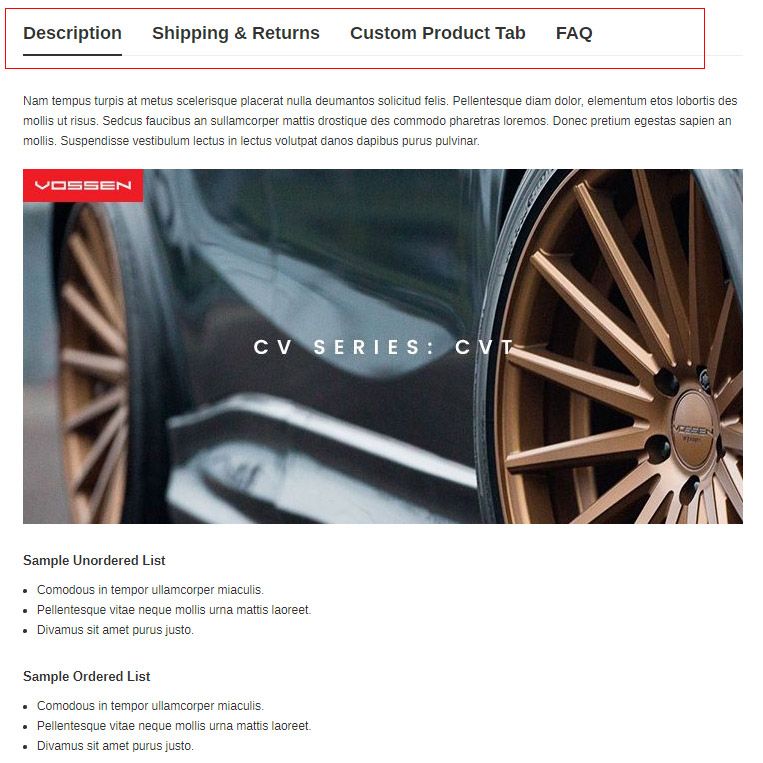
In the Stencil Theme Editor -> go to edit theme file -> templates/components/products/ product-description.html file.
In the product-description.html file, you can add/edit/remove the name tabs.
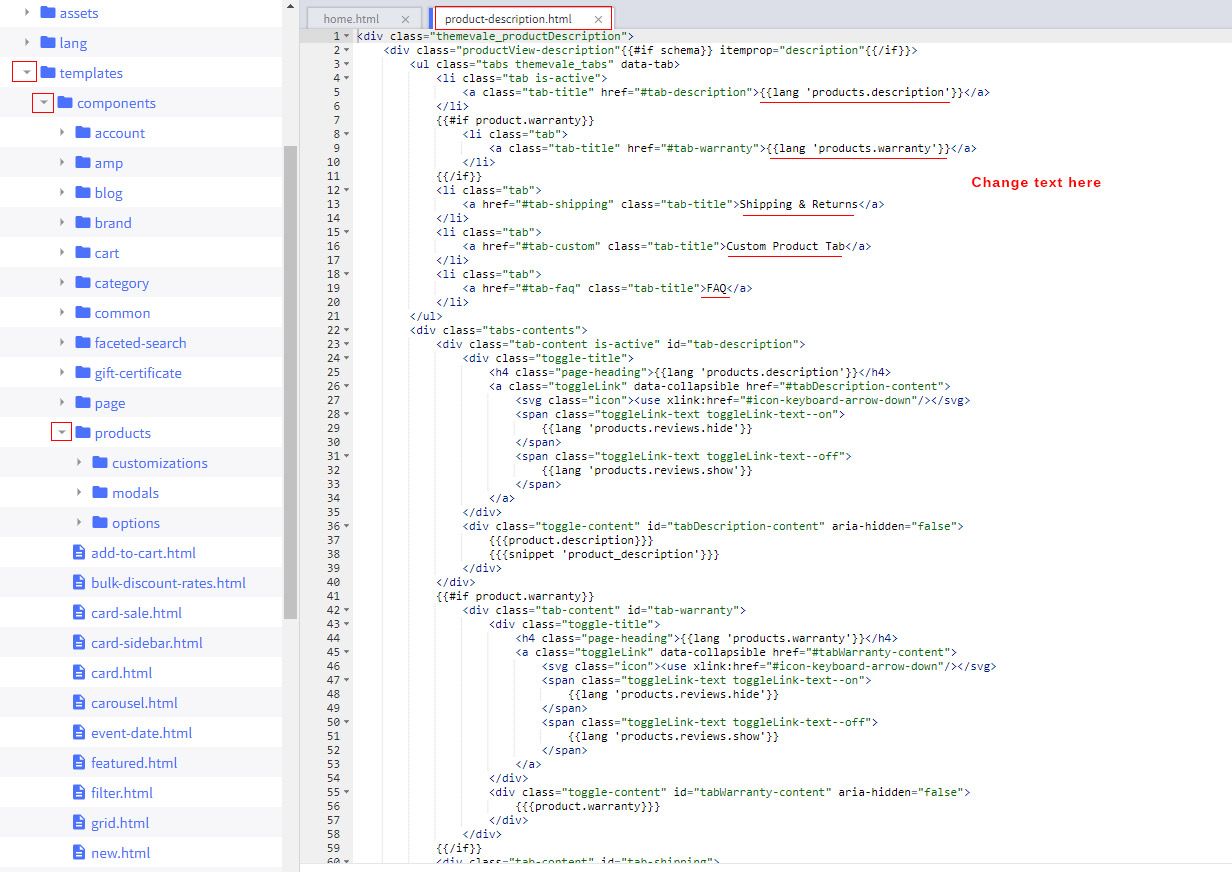
When you are happy with your changes, don't forget click Save to repackage the edited theme.
Setting Description for Product detail
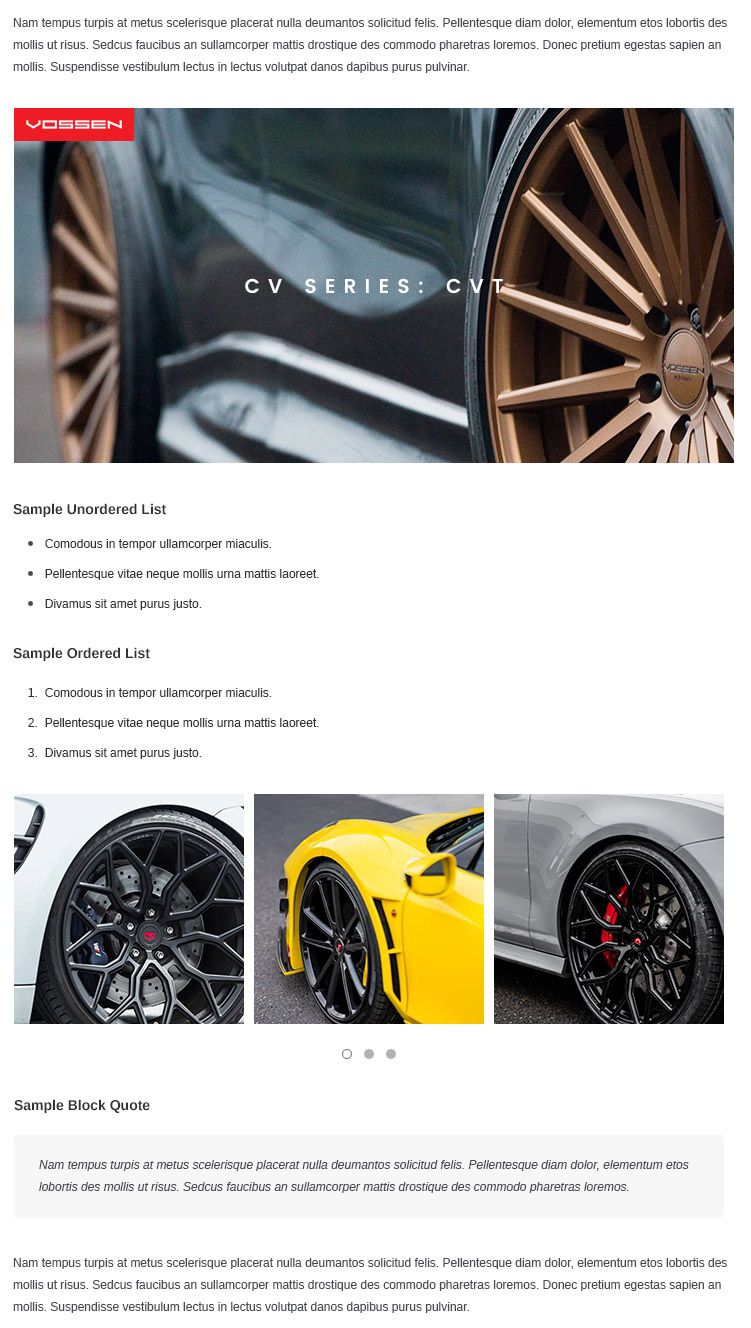
If you want to setup product description like design, please refer below html:
<p>Nam tempus turpis at metus scelerisque placerat nulla deumantos solicitud felis. Pellentesque diam dolor, elementum etos lobortis des mollis ut risus. Sedcus faucibus an sullamcorper mattis drostique des commodo pharetras loremos. Donec pretium egestas sapien an mollis. Suspendisse vestibulum lectus in lectus volutpat danos dapibus purus pulvinar.</p>
<p><img class="image" title="description.jpg" src="https://cdn8.bigcommerce.com/s-s9avbdi7u2/product_images/uploaded_images/description.jpg" alt="description.jpg" width="720" height="355" /></p>
<h6>Sample Unordered List</h6>
<ul>
	<li>Comodous in tempor ullamcorper miaculis.</li>
	<li>Pellentesque vitae neque mollis urna mattis laoreet.</li>
	<li>Divamus sit amet purus justo.</li>
</ul>
<h6>Sample Ordered List</h6>
<ul>
	<li>Comodous in tempor ullamcorper miaculis.</li>
	<li>Pellentesque vitae neque mollis urna mattis laoreet.</li>
	<li>Divamus sit amet purus justo.</li>
</ul>
<ul class="description-slider">
	<li><img class="image-item" src="https://cdn8.bigcommerce.com/s-s9avbdi7u2/product_images/uploaded_images/category-carousel-1.jpg" alt="" /></li>
	<li><img class="image-item" src="https://cdn8.bigcommerce.com/s-s9avbdi7u2/product_images/uploaded_images/category-carousel-2.jpg" alt="" /></li>
	<li><img class="image-item" src="https://cdn8.bigcommerce.com/s-s9avbdi7u2/product_images/uploaded_images/category-carousel-3.jpg" alt="" /></li>
	<li><img class="image-item" src="https://cdn8.bigcommerce.com/s-s9avbdi7u2/product_images/uploaded_images/category-carousel-4.jpg" alt="" /></li>
	<li><img class="image-item" src="https://cdn8.bigcommerce.com/s-s9avbdi7u2/product_images/uploaded_images/category-carousel-5.jpg" alt="" /></li>
</ul>
<h6>Sample Block Quote</h6>
<blockquote class="blockquote"><q>Nam tempus turpis at metus scelerisque placerat nulla deumantos solicitud felis. Pellentesque diam dolor, elementum etos lobortis des mollis ut risus. Sedcus faucibus an sullamcorper mattis drostique des commodo pharetras loremos. </q></blockquote>
<p>Nam tempus turpis at metus scelerisque placerat nulla deumantos solicitud felis. Pellentesque diam dolor, elementum etos lobortis des mollis ut risus. Sedcus faucibus an sullamcorper mattis drostique des commodo pharetras loremos. Donec pretium egestas sapien an mollis. Suspendisse vestibulum lectus in lectus volutpat danos dapibus purus pulvinar.</p>
When you are happy with your changes, don't forget click Save to repackage the edited theme.
Setting Shipping & Returns Tab

In the Stencil Theme Editor -> go to edit theme file -> templates/components/themevale/tabs/ tab-shipping.html file.
In the tab-shipping.html file, you can add/edit/remove the text.
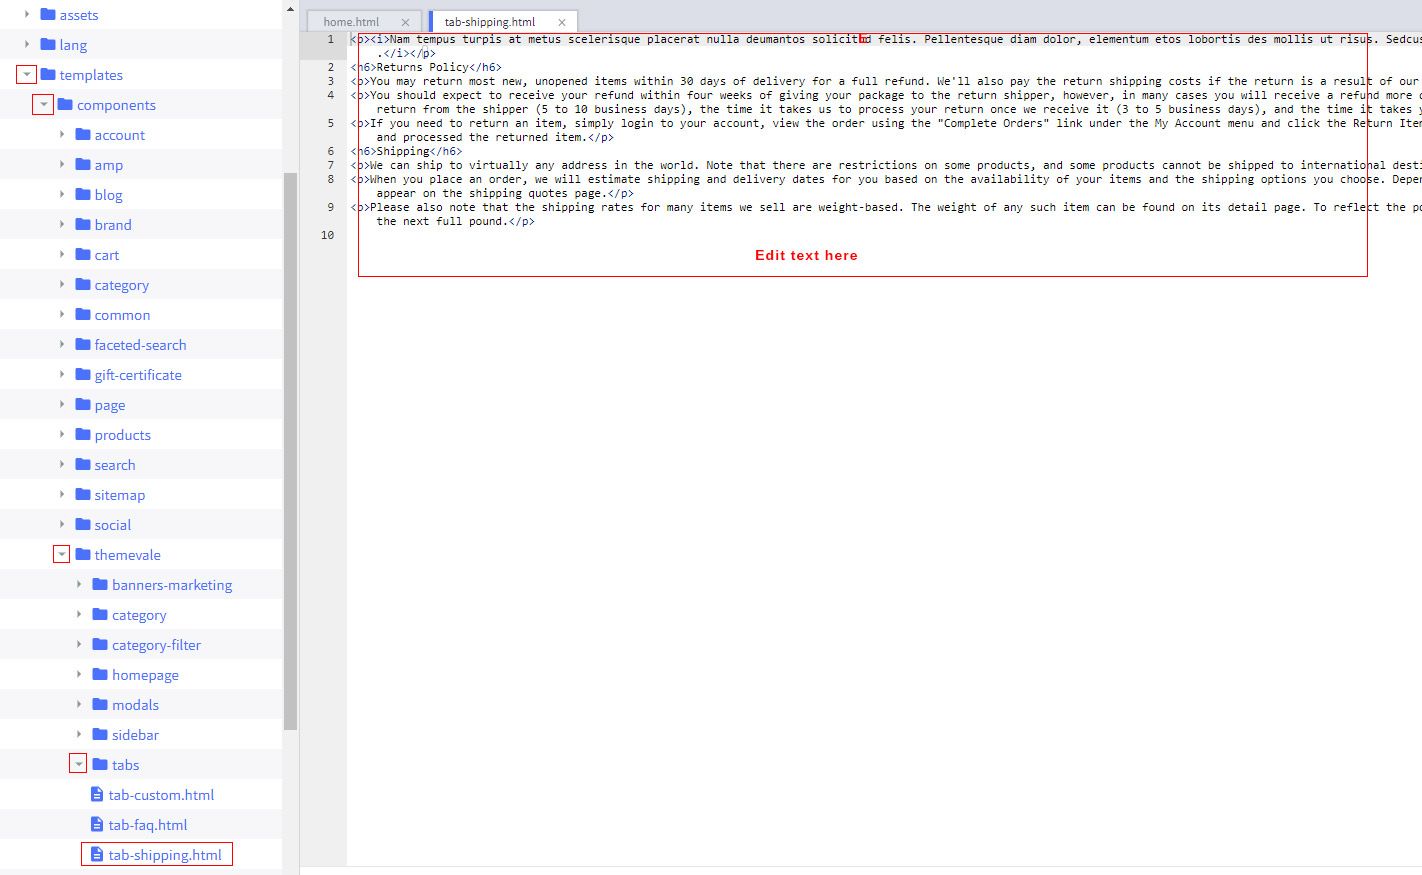
When you are happy with your changes, don't forget click Save to repackage the edited theme.
Setting Custom Product Tab
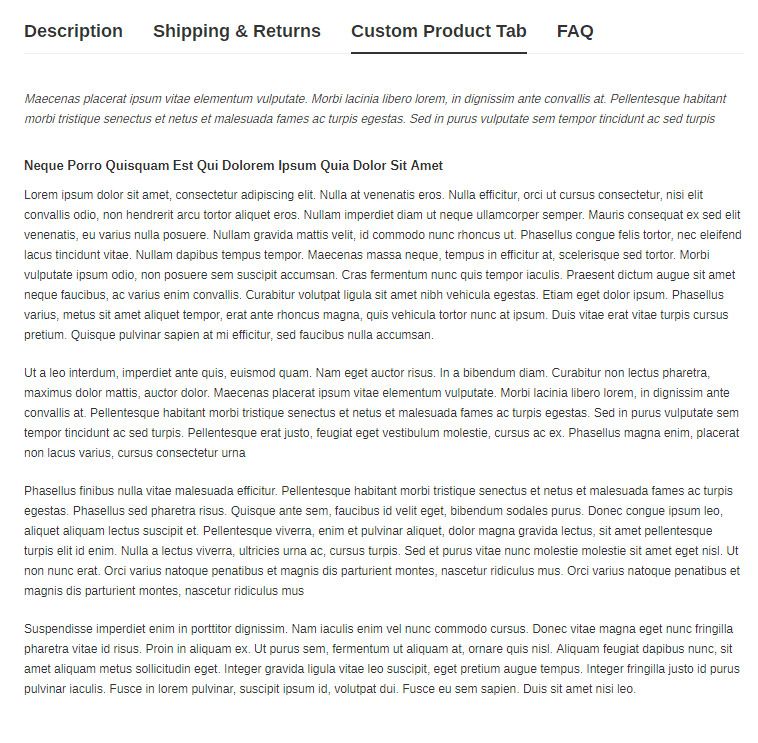
In the Stencil Theme Editor -> go to edit theme file -> templates/components/themevale/tabs/ tab-custom.html file.
In the tab-custom.html file, you can add/edit/remove the text.

When you are happy with your changes, don't forget click Save to repackage the edited theme.
Setting FAQ Tab
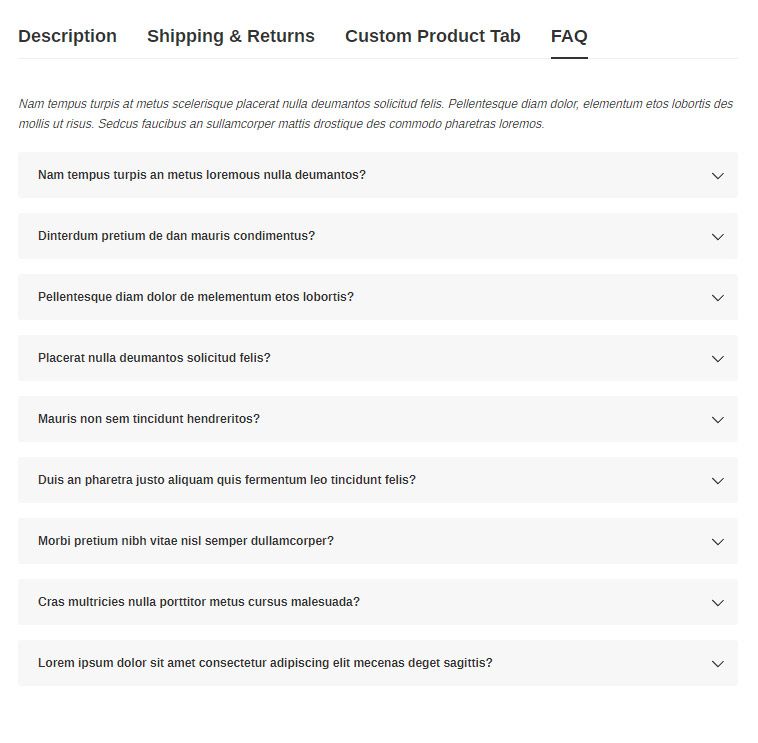
In the Stencil Theme Editor -> go to edit theme file -> templates/components/themevale/tabs/ tab-faq.html file.
In the tab-faq.html file, you can add/edit/remove the text.
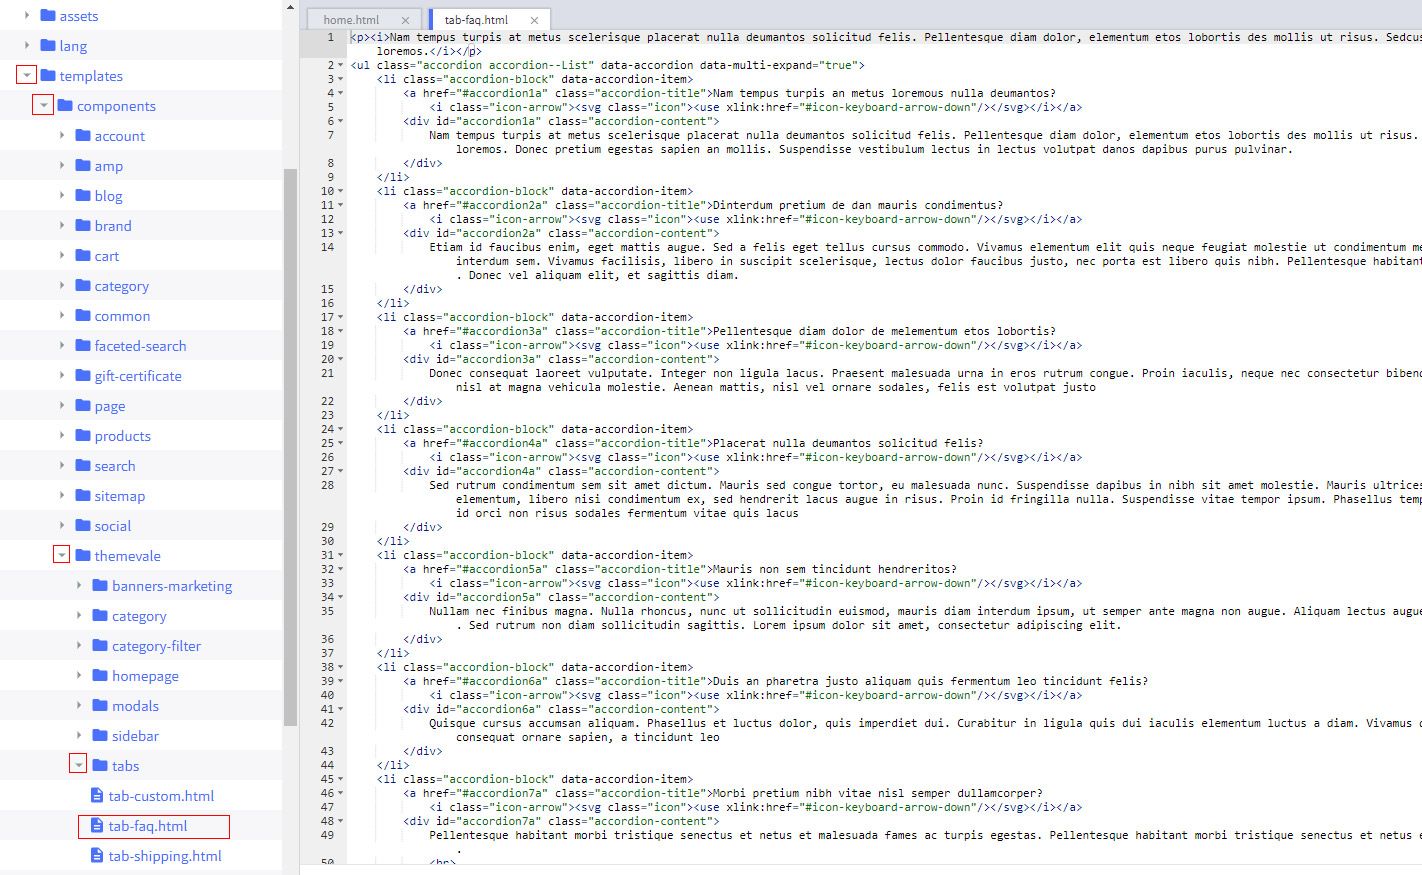
When you are happy with your changes, don't forget click Save to repackage the edited theme.
Setting ask_an_expert
http://spark-demo.mybigcommerce.com/sample-aenean-commodo-lipsum-quis-blandit-exims/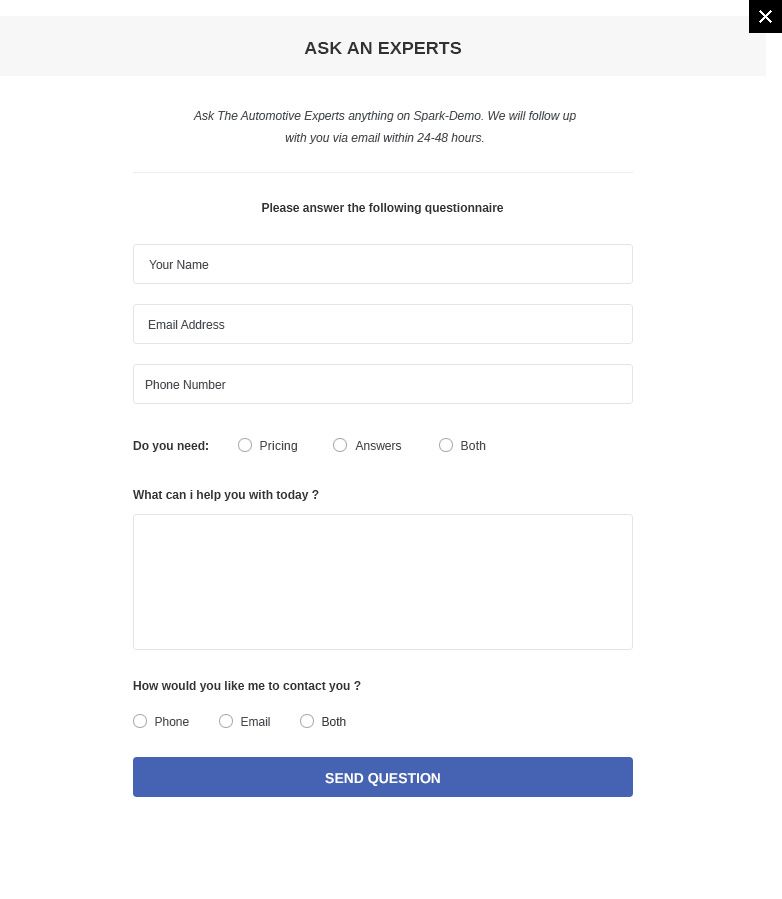
How to edit ask an expert form?
Go to Theme Editor -> Other Settings -> Ask an expert

Setting instruction & warranty
http://spark-demo.mybigcommerce.com/sample-aenean-commodo-lipsum-quis-blandit-exims/
How to enable instruction & warranty for a specific product?
In the admin panel --> go to edit a product --> go to Custom Fields tab
Then add a custom field name is instruction and then set value is a path of the instruction image. ie: /product_images/uploaded_images/instruction.jpg
Then add a custom field name is warranty and then set value is a path of the warranty image. ie: /product_images/uploaded_images/warranty.jpg
Here is a screenshot for your reference:

Don't forget click Save button to save your changes.
Frequently Bought Together Add On
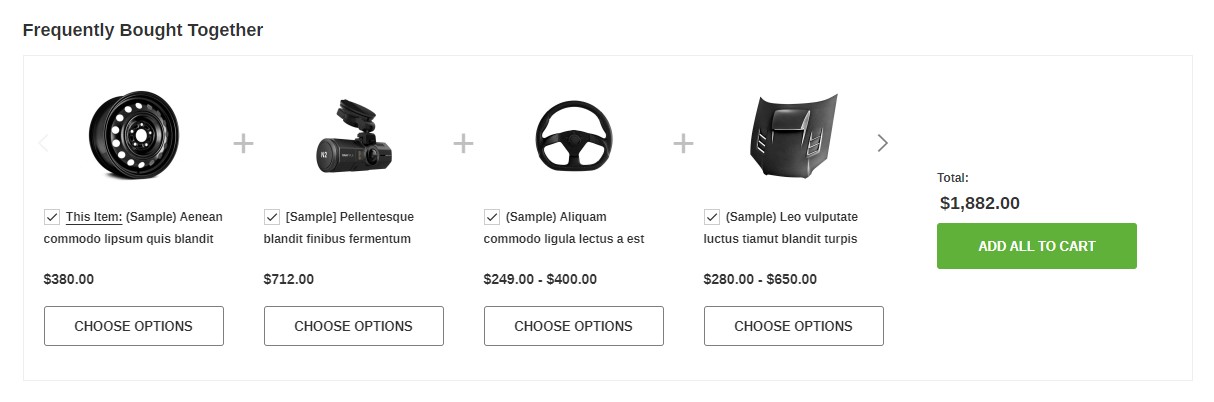
There are 2 options for you to choose which products are used in the Frequently Bought Together:
1: Using Related Product.
Please go to any Product then open the “Custom Fields” tab:
Products → View → Choose a product you want to apply Frequently Bought Together → Custom Fields
+ To pull products from your Related Products, create the following custom field:
Custom Field Name:fbt
Custom Field value:related products
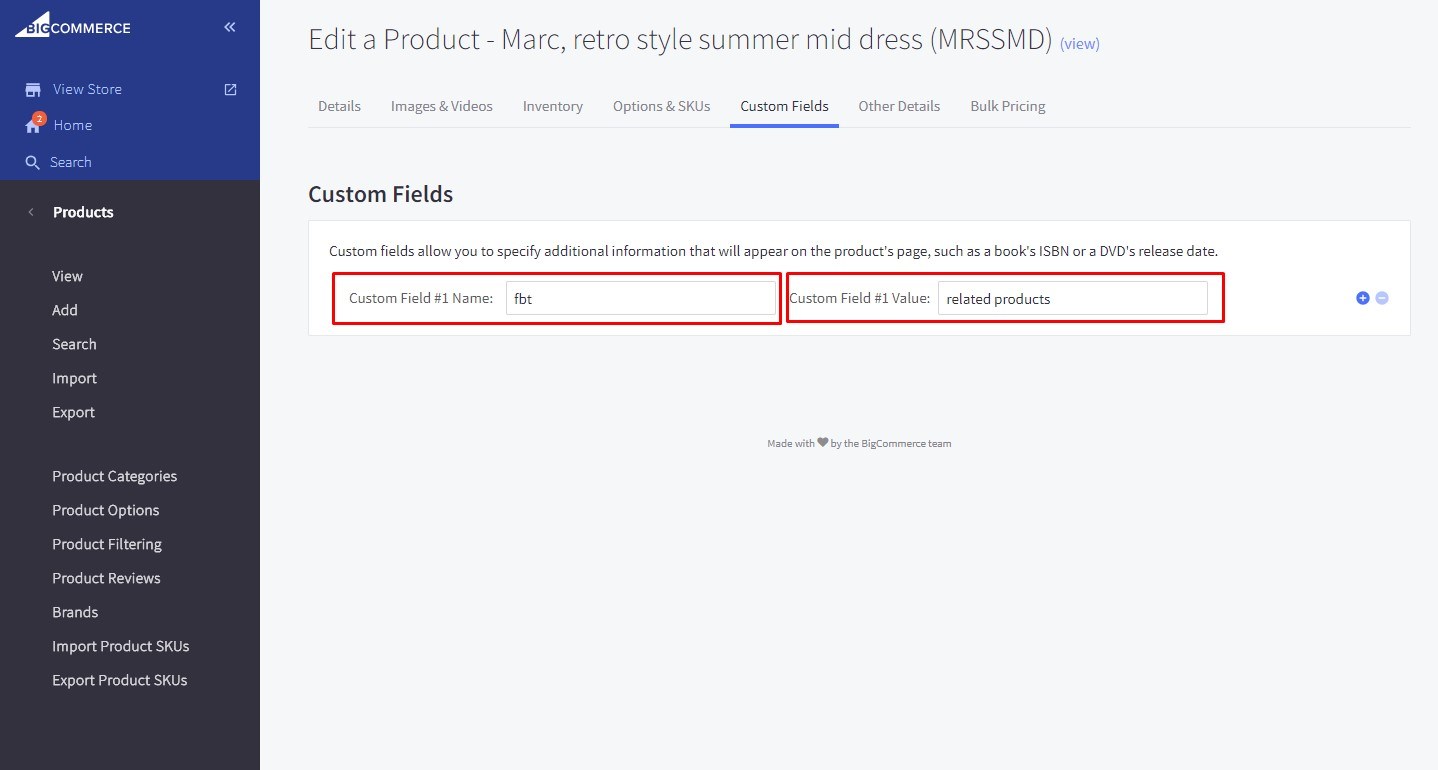
*** Note:
- The first product will always be the Product of the page you are on. The next products
will be pulled from this product’s first Related Products.
- You can either let BigCommerce select a Product’s Related Products randomly or you
can manually choose which products to display.
- Refer this link: https://support.bigcommerce.com/s/article/Setting-Up-Related-Products
for your reference about Related Products.
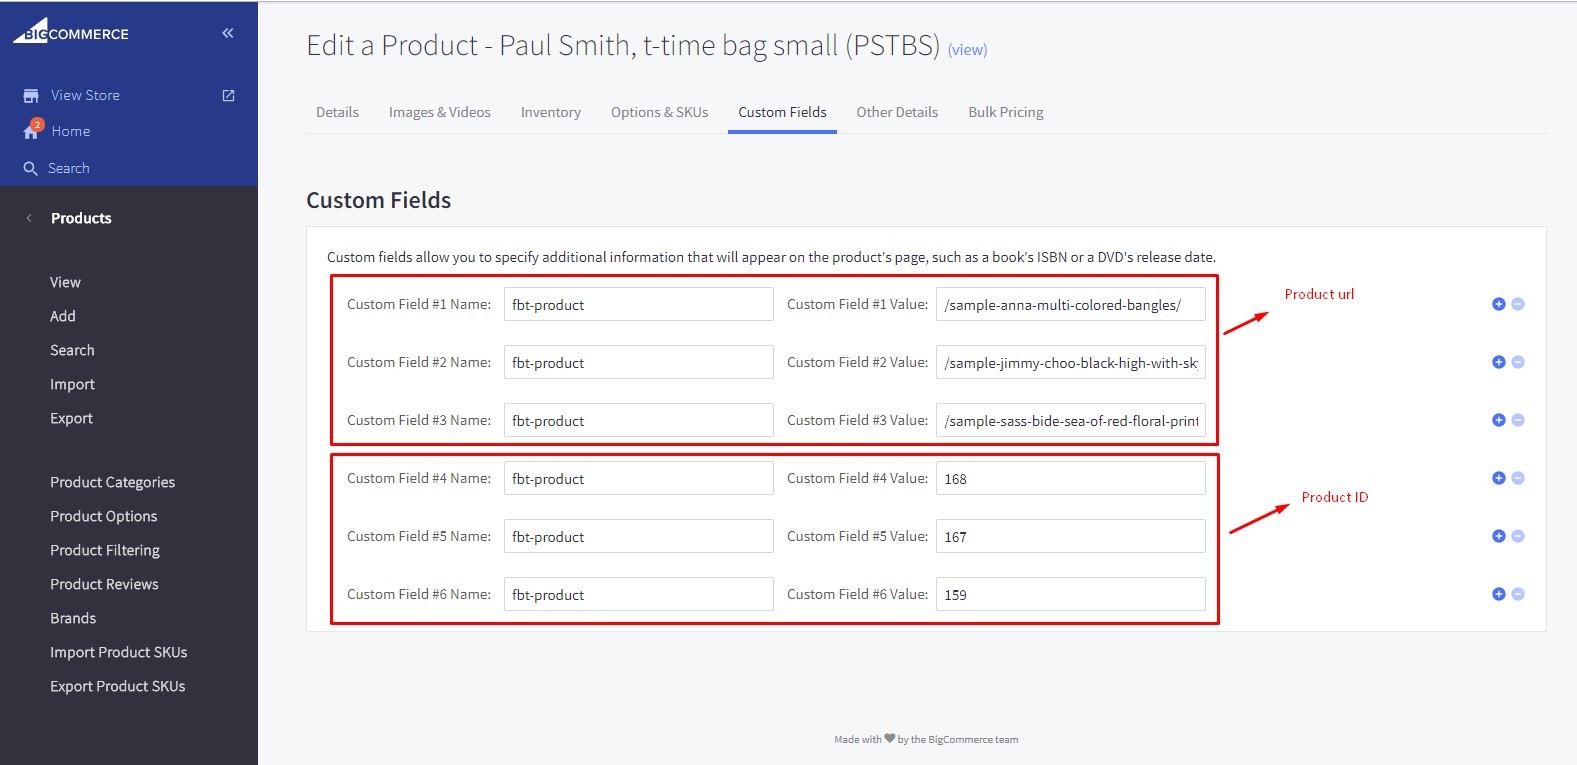
2: Using Product URL or Product ID.
+ To pull products from a Product URL or Product ID, create the following custom field:
- Product URL:
Custom Field Name:fbt-product
Custom Field value:/relative-path-to-product/
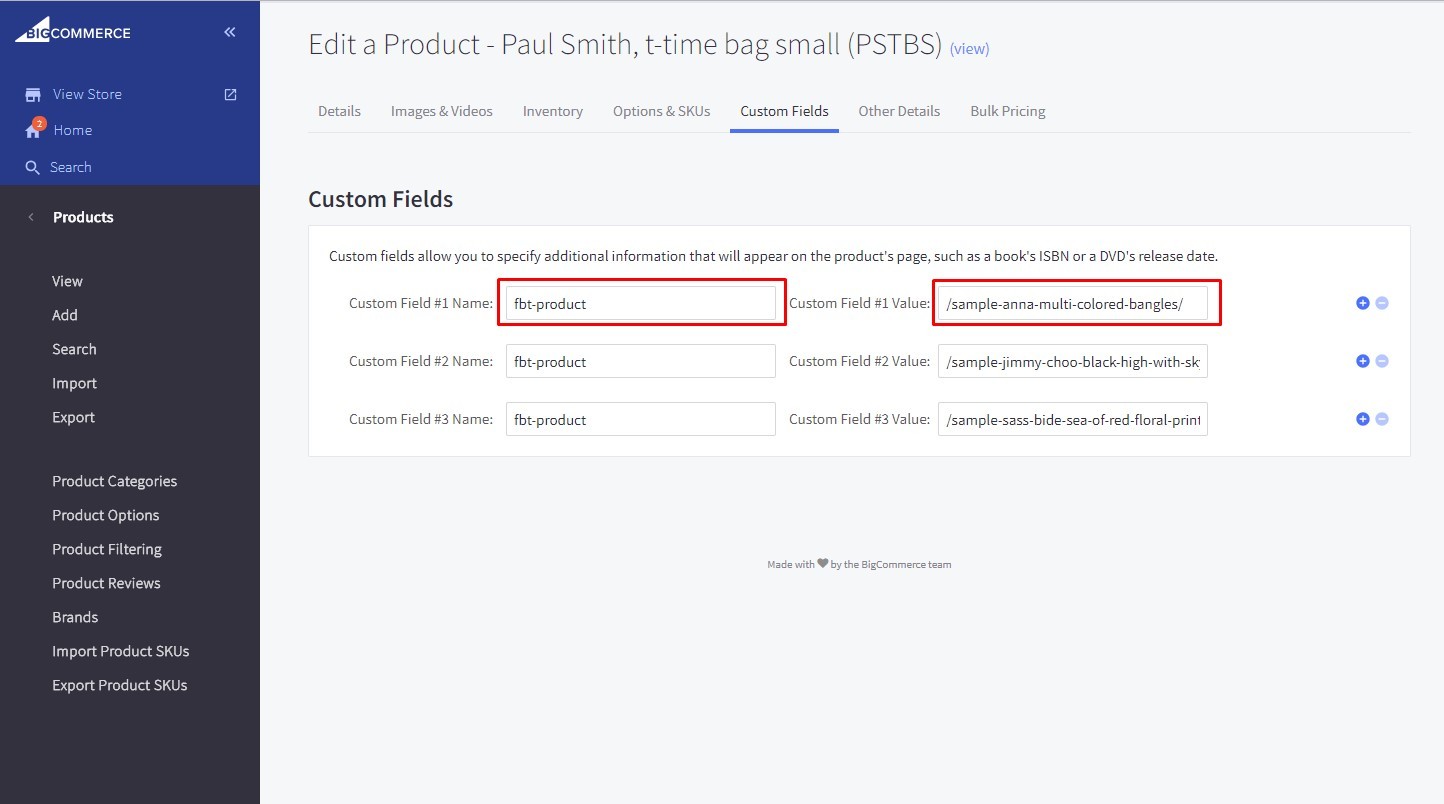
- Product ID:
Custom Field Name:fbt-product
Custom Field value:168 (this is Product ID)

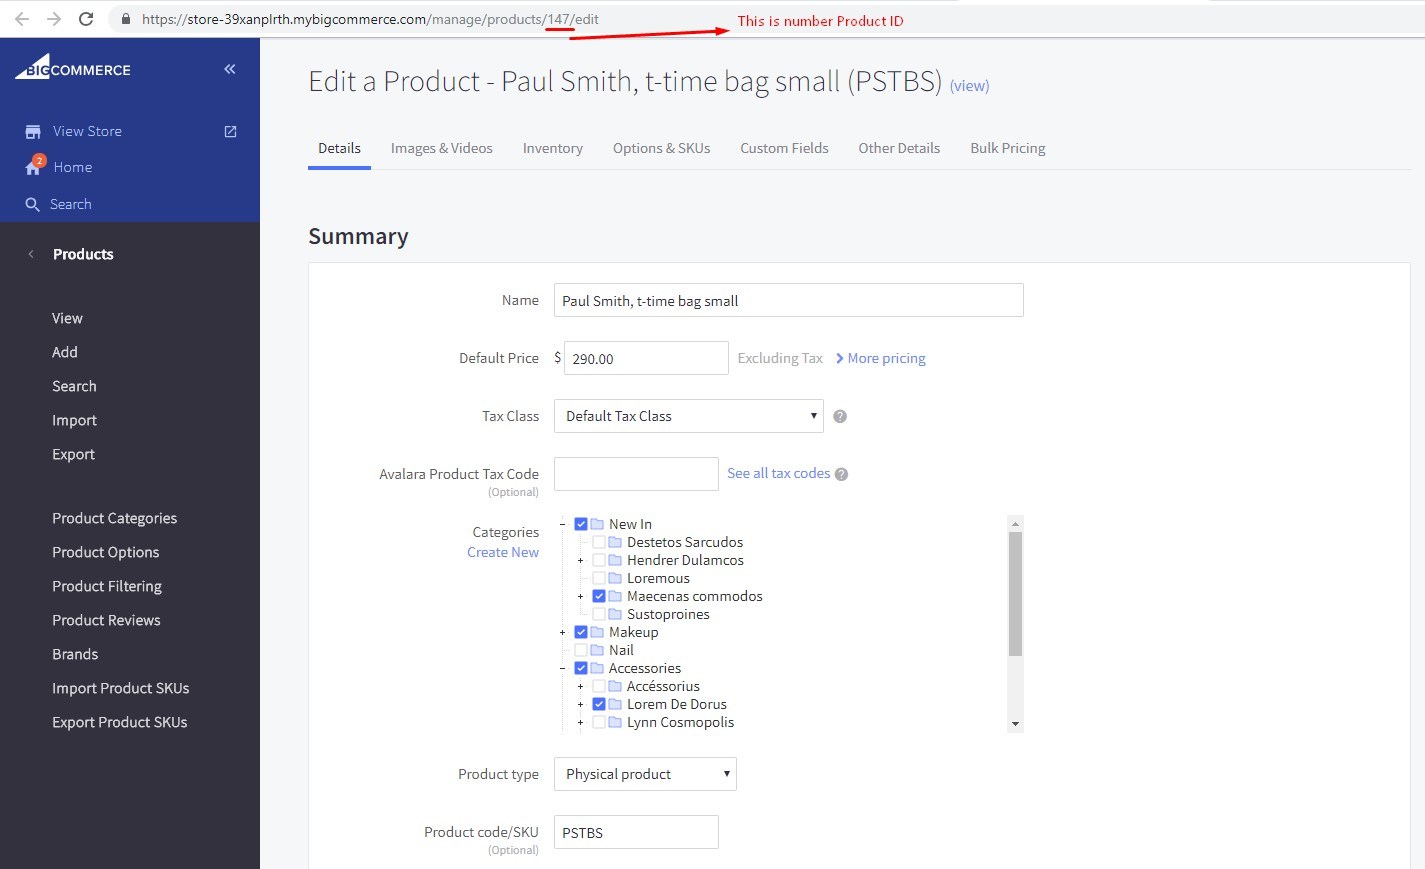
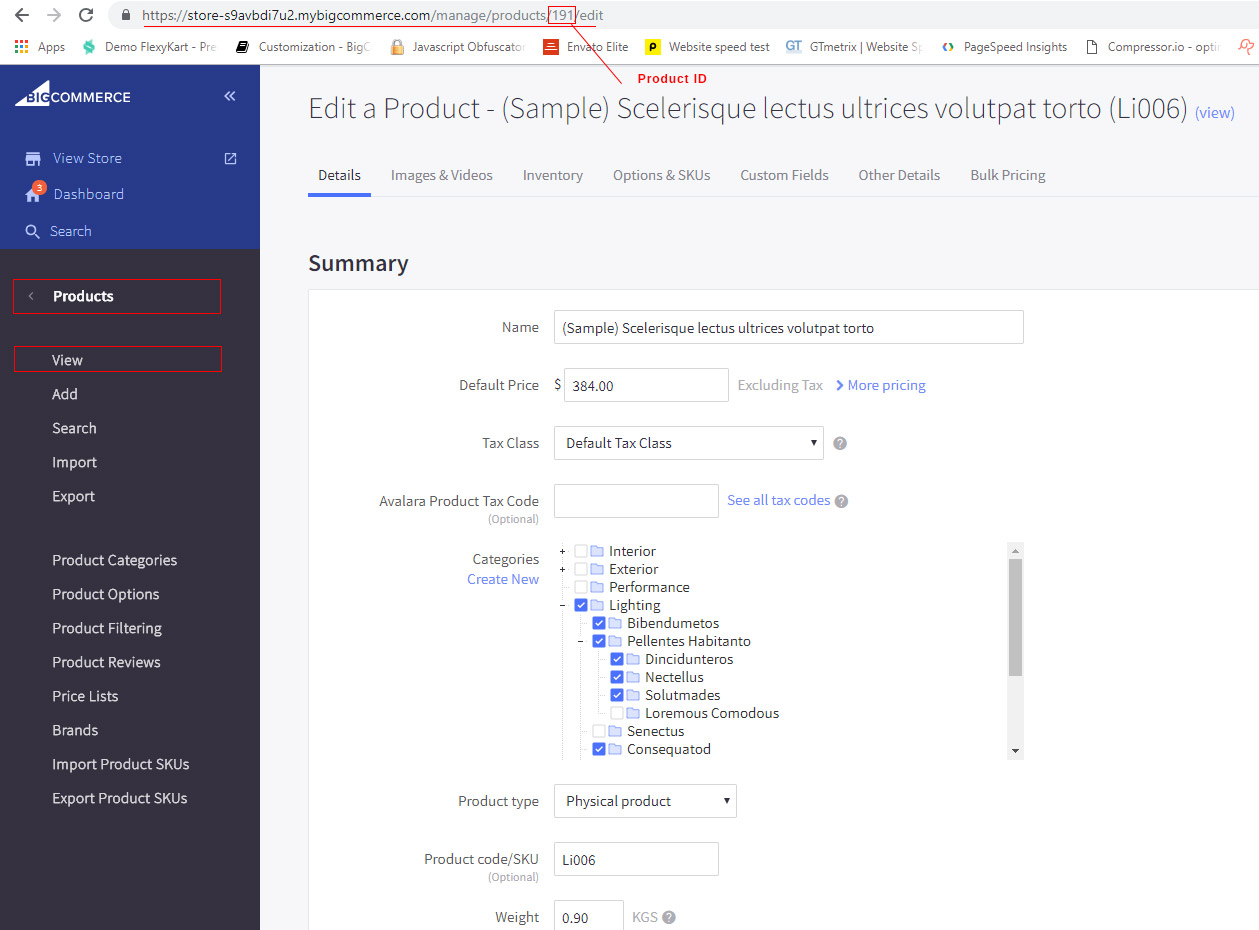
How do I get Product ID of a product?
- Please follow this instruction image:
*** Note:
- When using Product URL or Product ID, you can control which products you would
like to group together.
- Each of Custom Field will be one Product
- The first product will always be the Product of the page you are on. The next products
will be pulled from Custom Fields you create.
- You can mix and match URLs and Product IDs.
Setting Up Cart page
Upload image Carousel

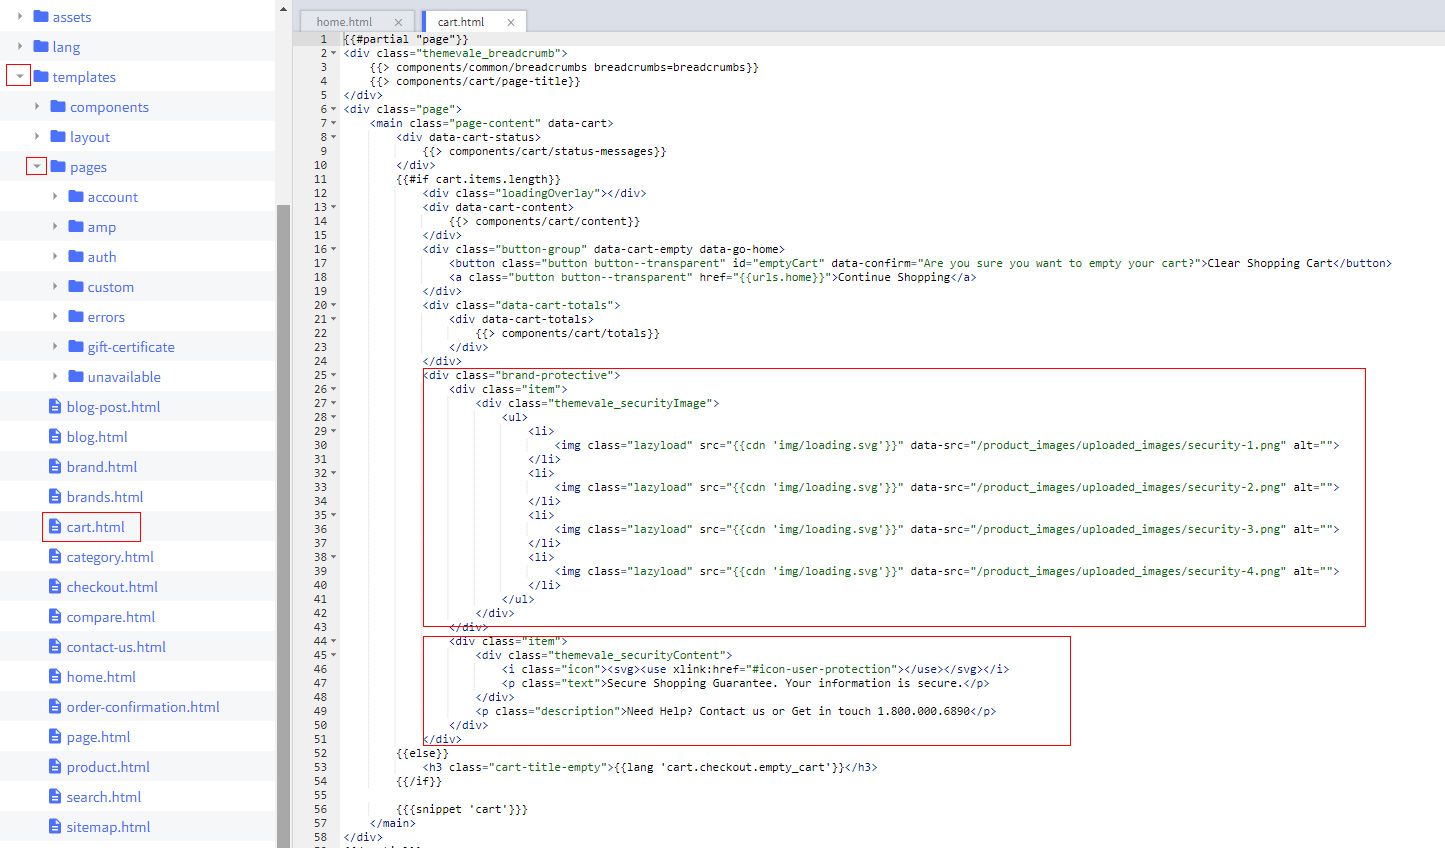
In the Stencil Theme Editor -> go to edit templates/page/ Cart.html file.
In the cart.html file, you can add/edit/remove image banner.
When you are happy with your changes, don't forget click Save to repackage the edited theme.
Setting Up Brands page
Layout Brands A to Z
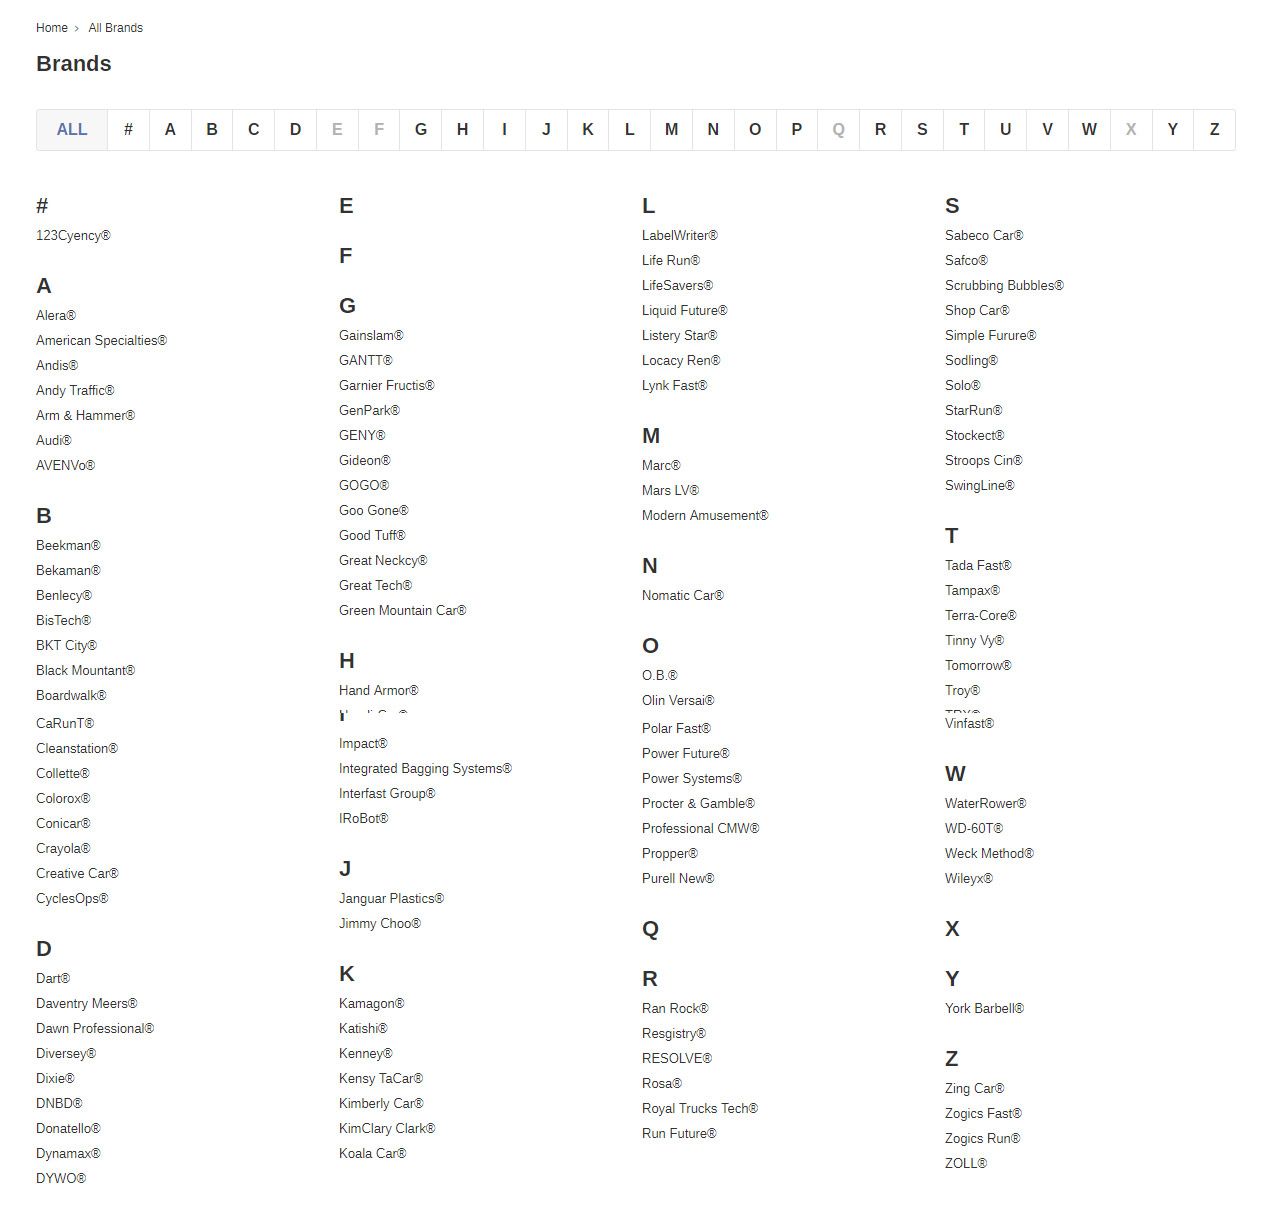
Layout Brands Grid

How to change layout brands page?
In the Stencil Theme Editor, look into the options showing on the Brands Page.
Find out selector Brands layout
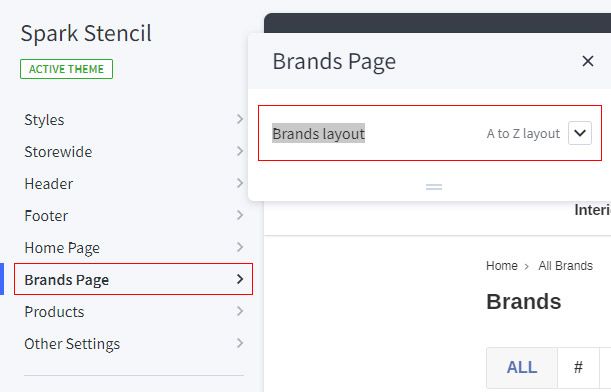
When you are happy with your changes, don't forget click Save to repackage the edited theme.
Setting Up FAQ Page
https://spark-demo.mybigcommerce.com/faq/
How to Create FAQ Page
Go to Storefront -> Web pages.
In the Web pages -> click Create a Web Page
In the Create a Web Page -> Enter name: faq, And find out the form select which has label: Template Layout File and choose layout faq

When you are happy with your changes, don't forget click Save to repackage the edited theme.
How to setup for FAQ Page?
Go to Storefront -> My Theme -> Advanced -> Edit theme files.
In the Stencil Theme Editor -> go to templates/pages/custom/page/faq.html file.

When you are happy with your changes, don't forget click Save to repackage the edited theme.
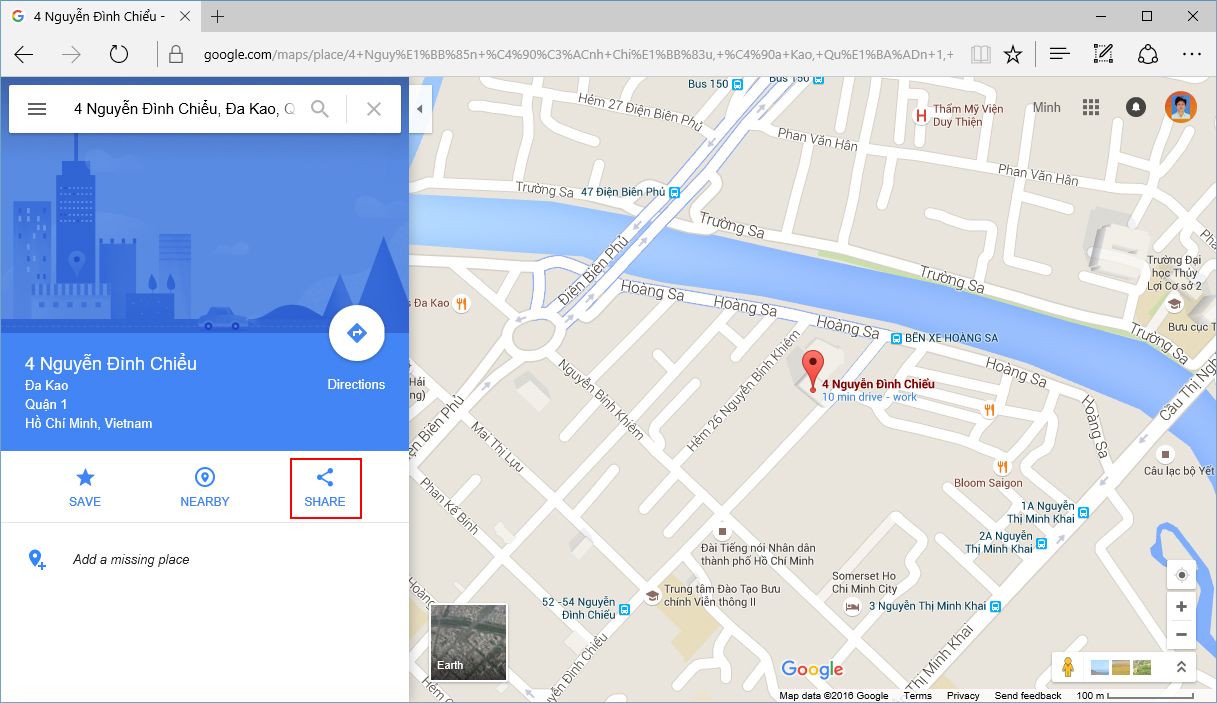
Setting Contact Page
http://spark-demo.mybigcommerce.com/contact-us/

Getting Google Map
- On your Web browser, browse to https://www.google.com/maps/
- Search to your location -> click SHARE to show share dialog:
- click Embed map and copy iframe code
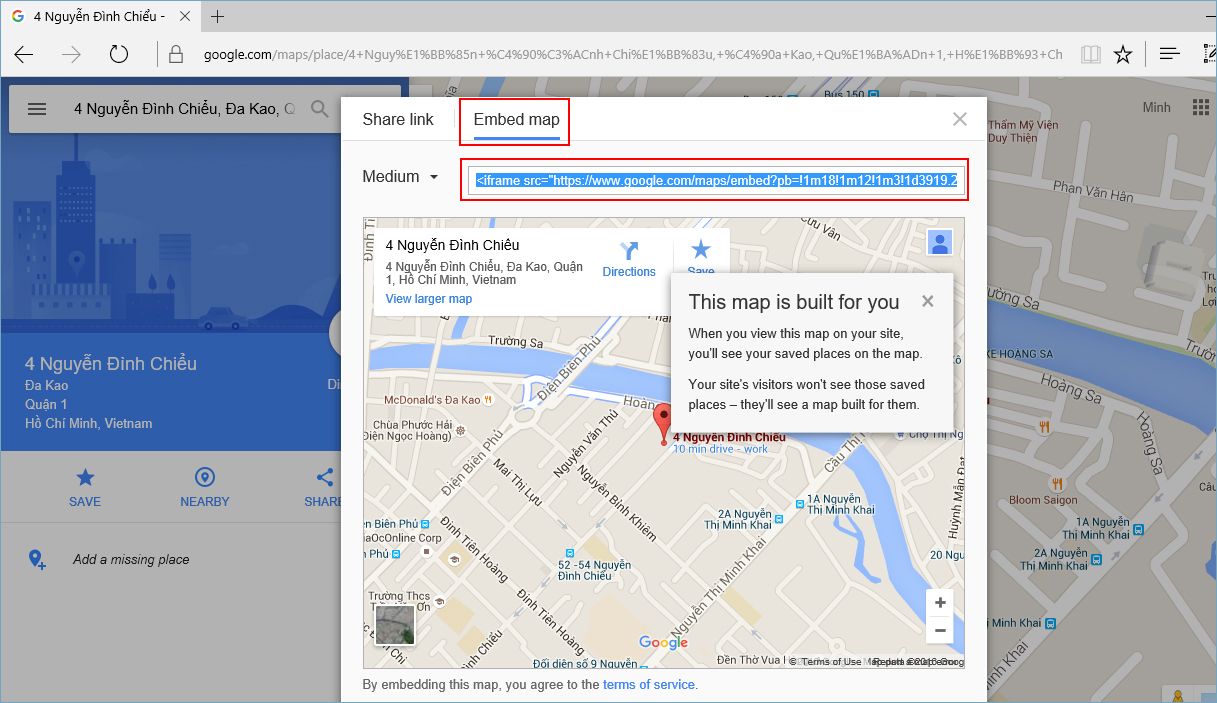
In the Stencil Theme Editor -> go to edit templates/components/themevale/ contact-us-map.html file.
In the contact-us-map.html file, you can see a google map iframe enbed code.
You just need to replace the iframe embed code -> then change width and height attribute of iframe. Set width value 100% to display fullwidth
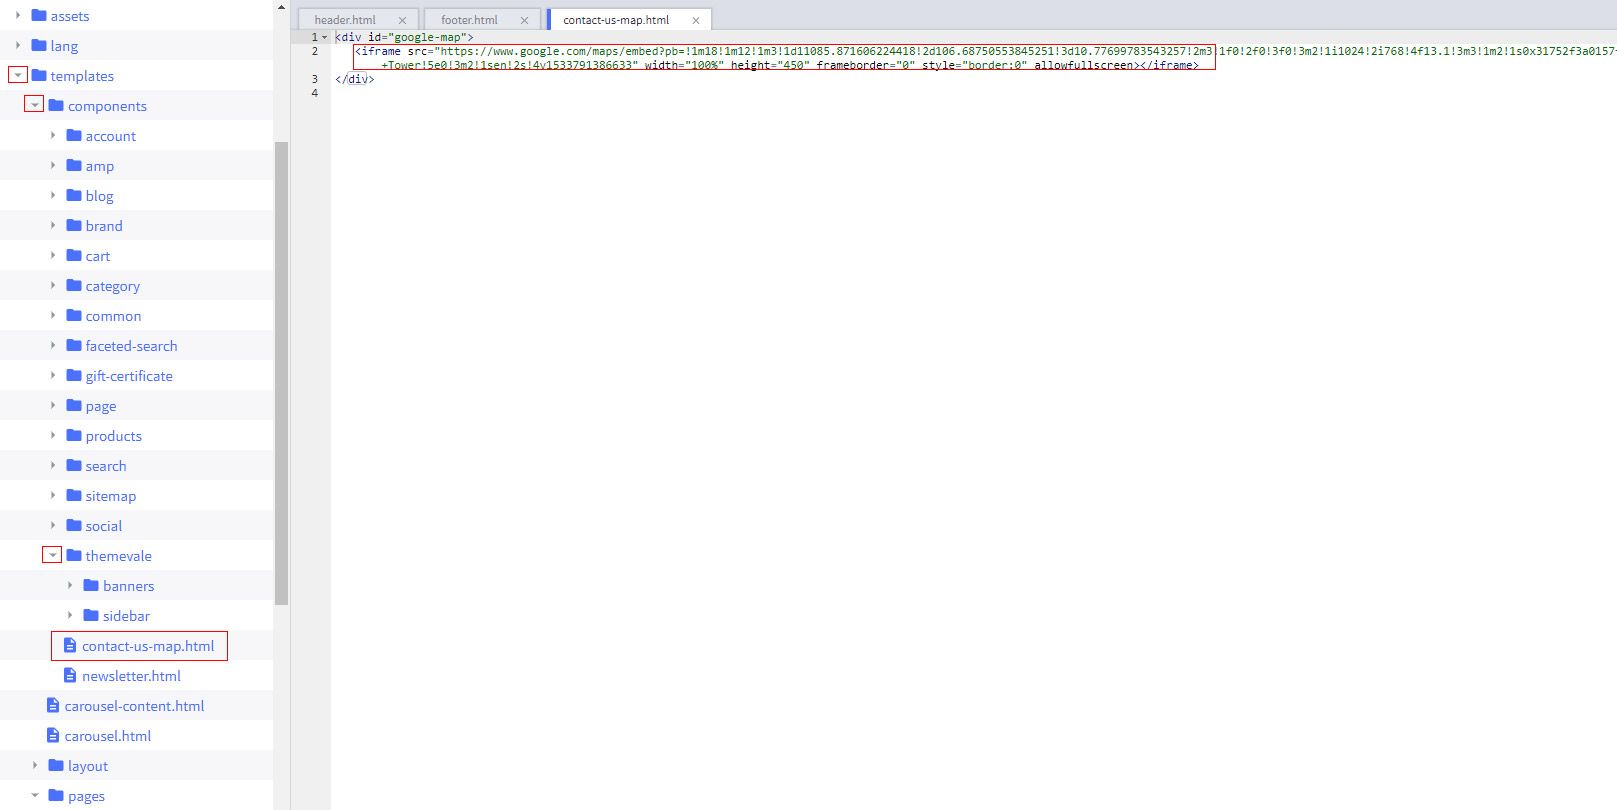
When you are happy with your changes, don't forget click Save to repackage the edited theme.
Setting location, phone, description
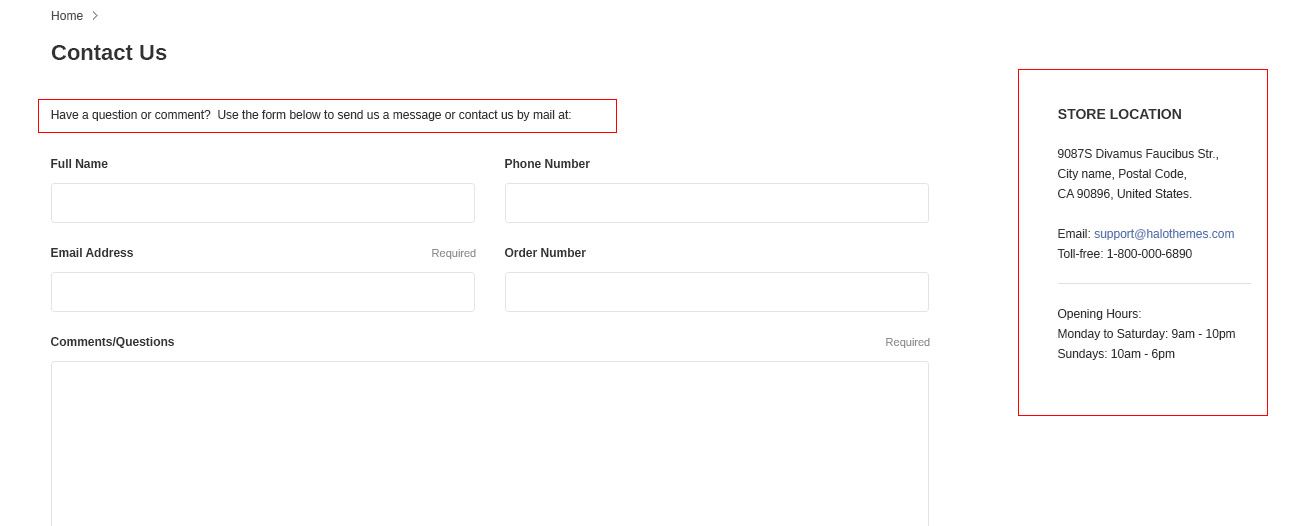
In the Stencil Theme Editor -> go to edit templates/page/ contact-us.html file.
In the contact-us.html file, you can change, edit, delete text.
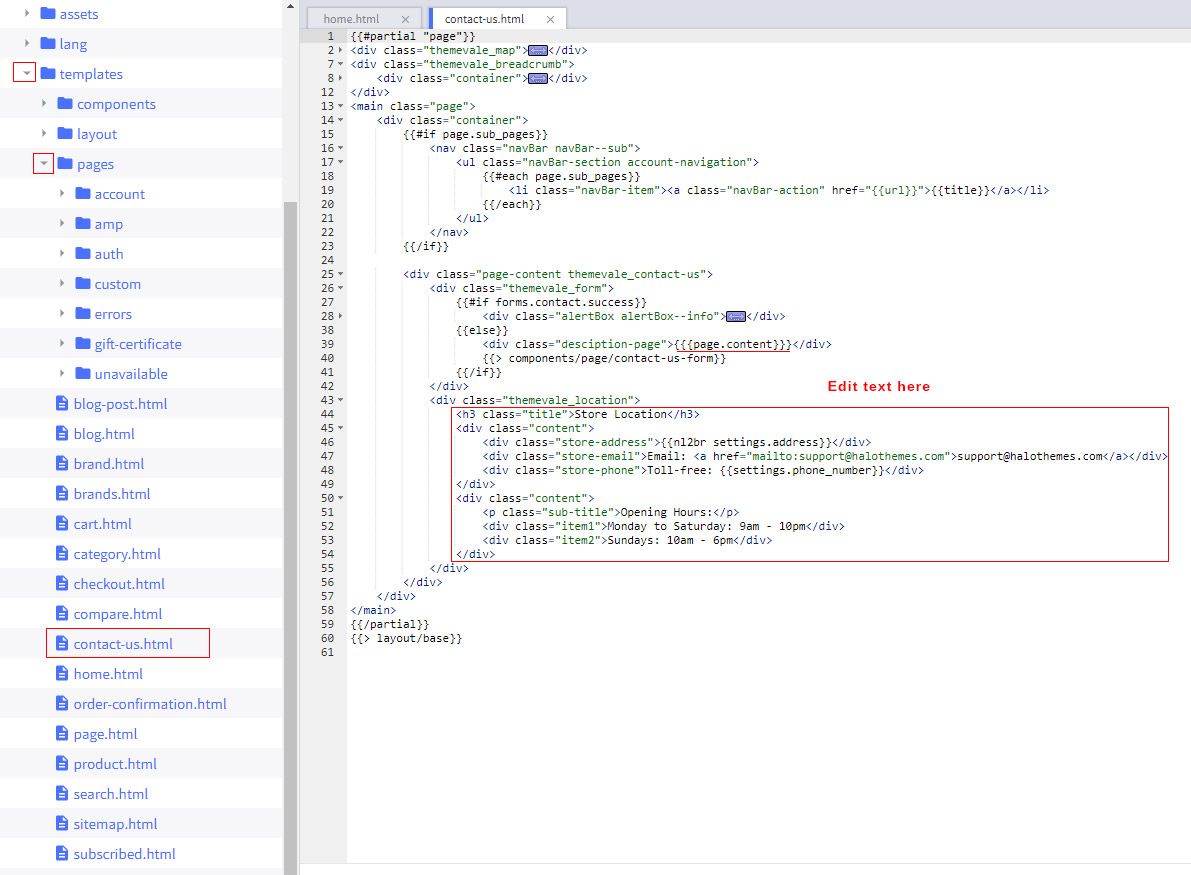
When you are happy with your changes, don't forget click Save to repackage the edited theme.
Setting Someone just bought Popup
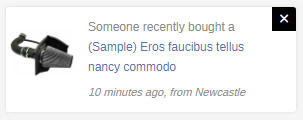
How to set up product - "Someone just bought"?
In the Stencil Theme Editor, look into the options showing on the Other Settings.
Find out selector Someone just bought Popup

When you are happy with your changes, don't forget click Save to repackage the edited theme.
How to get Products ID?
Go to Storefront -> Products -> View -> choose someone Product.
In the Product, you can see Product ID like example:
Newsletter Signup Popup
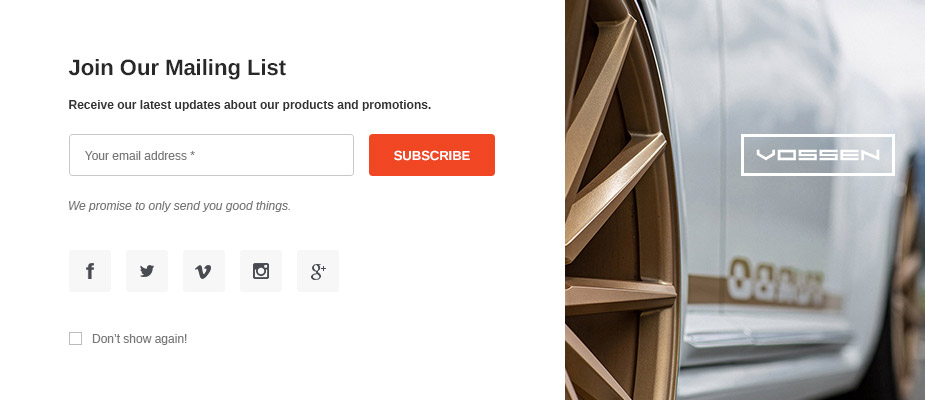
In the Stencil Theme Editor -> go to edit theme file -> templates/components/themevale/ newsletter-popup.html file.
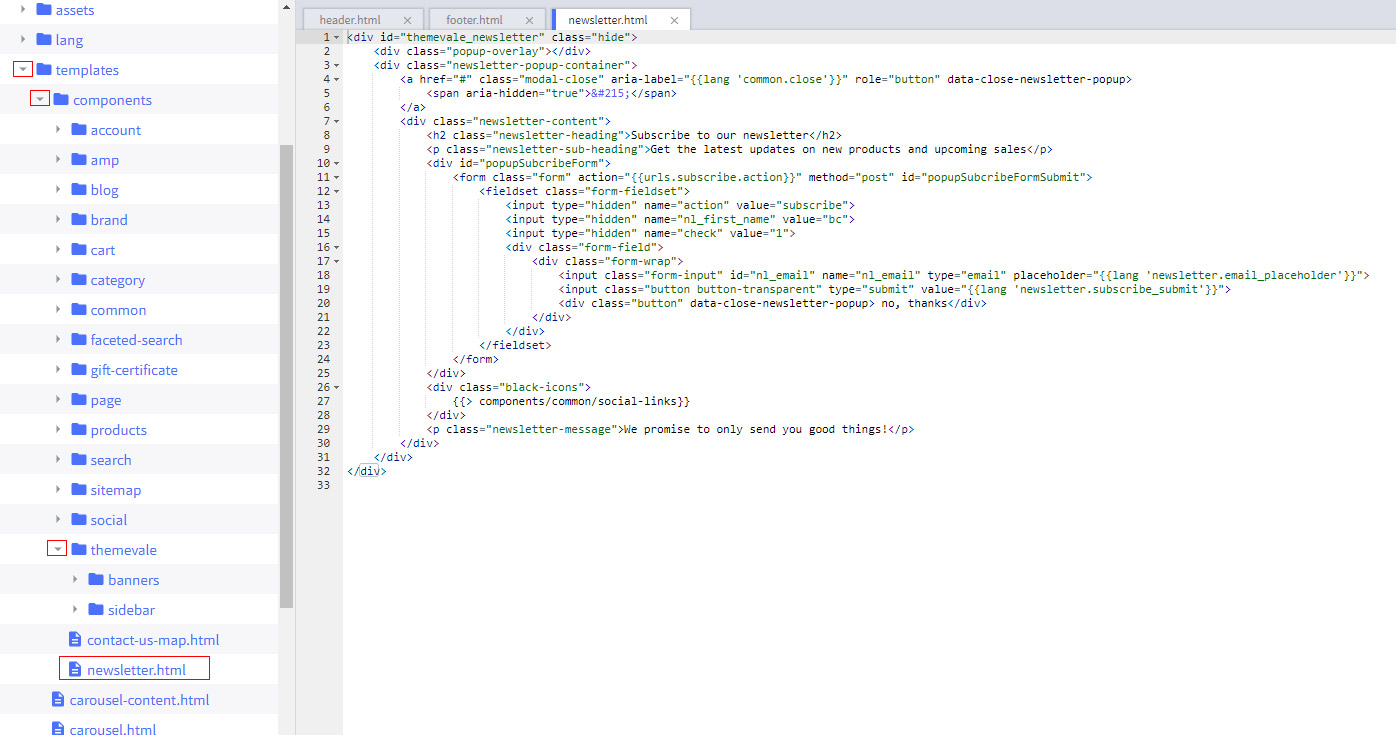
When you are happy with your changes, don't forget click Save to repackage the edited theme.
Using the Stencil Theme Editor
The BigCommerce Theme Editor allows you to change your site’s look with no coding required. Its point-and-click interface lets you to choose from multiple pre-designed styles or pick your own colors, fonts and more.
These instructions cover the basic steps to use Theme Editor on Stencil-based themes. For information about customizing Blueprint themes, see Blueprint Style Editor
Accessing the Theme Editor
1. To get started, go to Storefront › My Themes, then click Customize.
Your storefront will load in a new tab with the Style Customization panel on the left and the Preview panel on the right.
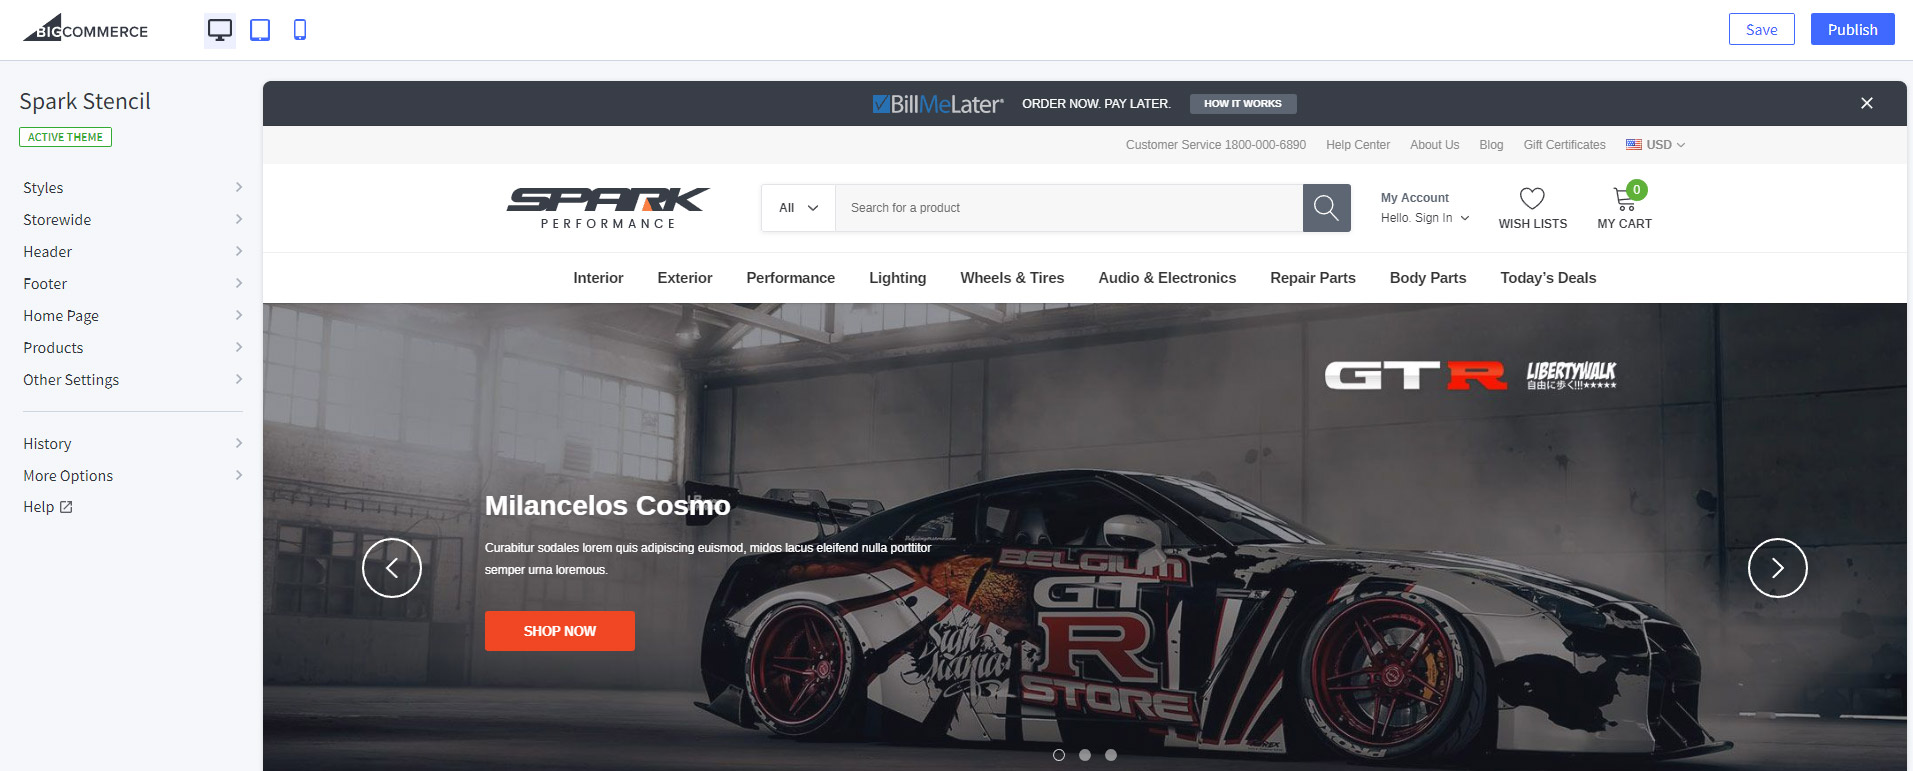
The Style customization panel contains all of the controls that allow you to modify the look and feel of your theme. For example, here you’ll be able to update your theme’s typography (fonts and font sizes) or colors. The controls that are available in this panel will vary from theme to theme.
The Preview panel allows you to immediately preview your changes across mobile, tablet, and desktop to see how your store will look to your shoppers across these devices.
Choosing a Theme Style
The Spark theme has only one style. So you can skip this step.
Theme styles allow you to completely change your store’s design at the click of a button.
1. Click the Styles menu to reveal your current theme’s available styles.

2. Click a style to load it in the preview panel.
Will this change my store? Any changes made in Theme Editor will only be visible in the preview panel. The changes do not go live on the store until you click Apply Theme.
3. To apply the style to your live storefront, click Apply Theme. Otherwise, follow the instructions below to begin customizing the style.
Customizing a Theme style
CUSTOMIZING COLORS
With Stencil Editor here, you can change colors for all elements of whole website or use other fonts you like
Colors can be customized anywhere you see a hex color value and color thumbnail below a menu item.
1. Click the color thumbnail and a color picker will display.
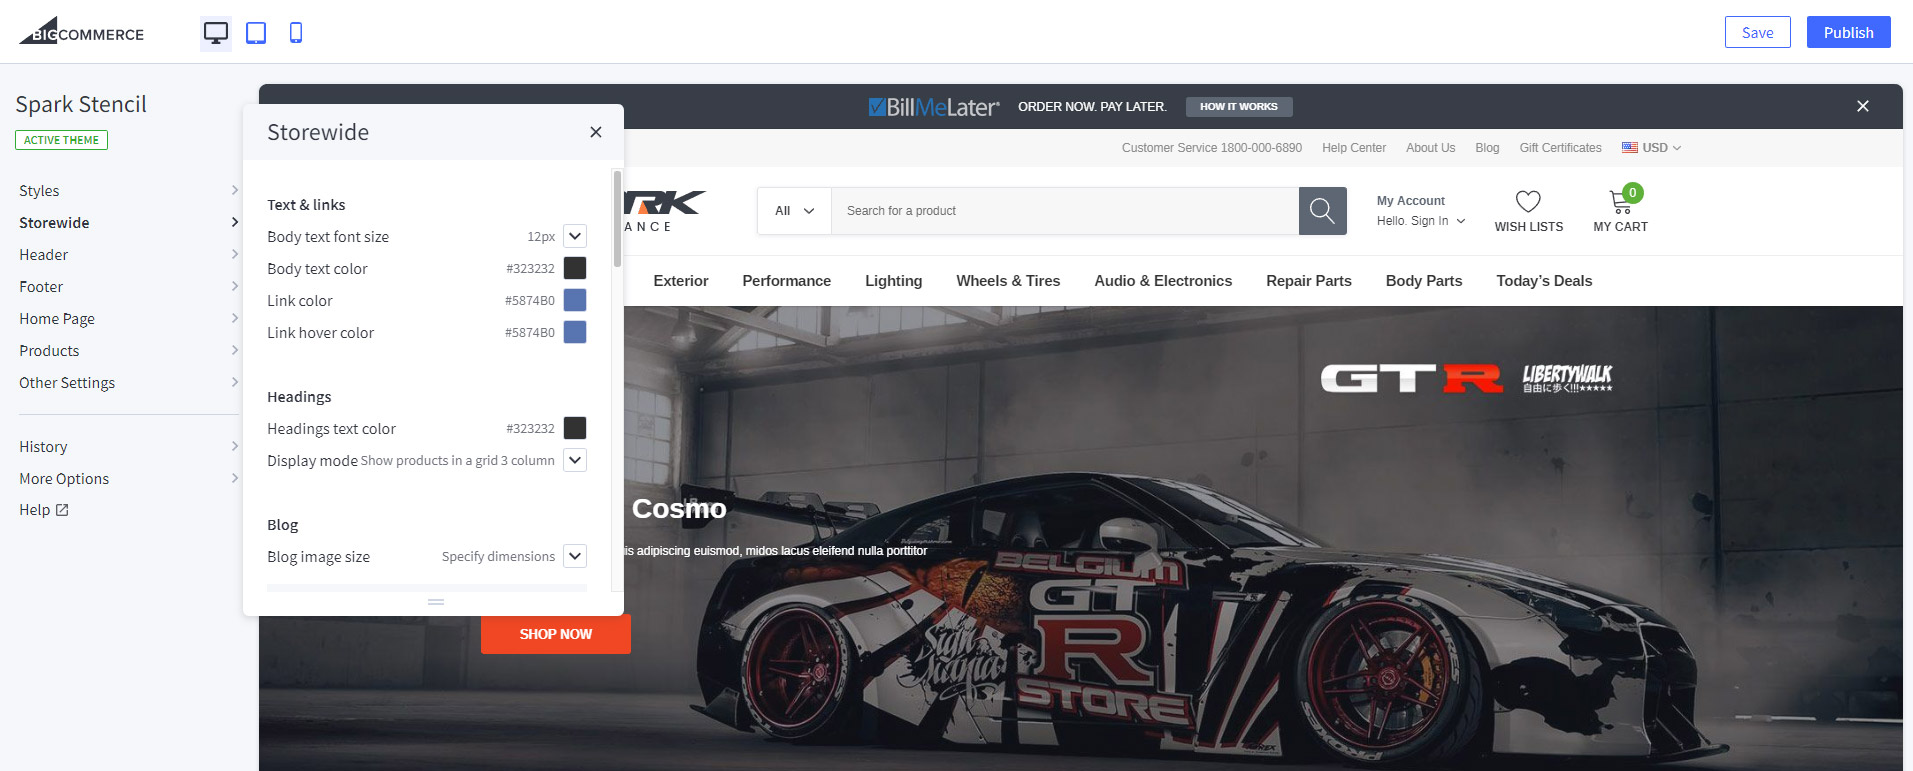
2. Select a color from the color picker and your theme will update automatically to reflect your selection.
Pro Tip! - If you know you're going to re-use colors in your theme, click the "+" button under the color picker to create a palette.
3. Click anywhere away from the color picker to close it.
SAVING AND PUBLISHING YOUR CHANGES
Once you are finished with your changes, click Apply Theme, then OK in the confirmation popup. This will publish your changes to your live storefront.
If you want to make the changes live later, click Save Changes. This will save your current changes and load them when you’re ready to customize your store again.
Clicking Clear Changes will reset your theme customizations to the most recent saved version.
Knowledgebase
Fully Documentation of BigCommerce for your reference: https://support.bigcommerce.com/documentation
Changelog
Version 1.0.0 (29/10/2018)
Theme Release
Customer Support
Please add our email: support@halothemes.com to your address book to ensure our response email isn’t marked as spam mail.
We’re also available on Skype / Yahoo Messenger from Monday – Friday 09:00 am to 08:00 pm (GMT+7), Saturday 09:00 am to 12:00 am (GMT+7), Sunday Closed
Skype ID: halo.themes / Yahoo ID: halo.themes
We will try our best to reply your emails as soon as possible. However, we will prioritise email regarding Theme features and issues.
- We will reply your email regarding Theme features and issues within 24 hours.
- Regarding emails about template customisation, we will reply you within 48 hours (but normally much sooner).

Your opinions is highly appreciated and help us built better products.
Thank you.
Themevale Team.