Manual Integration Code Editing
Before You Begin
Section titled “Before You Begin”- Make sure you have installed the Convermax app from the Shopify App Store
- For merchants with active online stores: Before making any changes to your live theme, we recommend creating a backup copy of your current theme (Duplicate)
Step 1: Site-Wide Setup
Section titled “Step 1: Site-Wide Setup”Replacing the Search Box
Section titled “Replacing the Search Box”Add My Garage
Section titled “Add My Garage”Step 2: Home Page
Section titled “Step 2: Home Page”Add Year Make Model bar
Section titled “Add Year Make Model bar”-
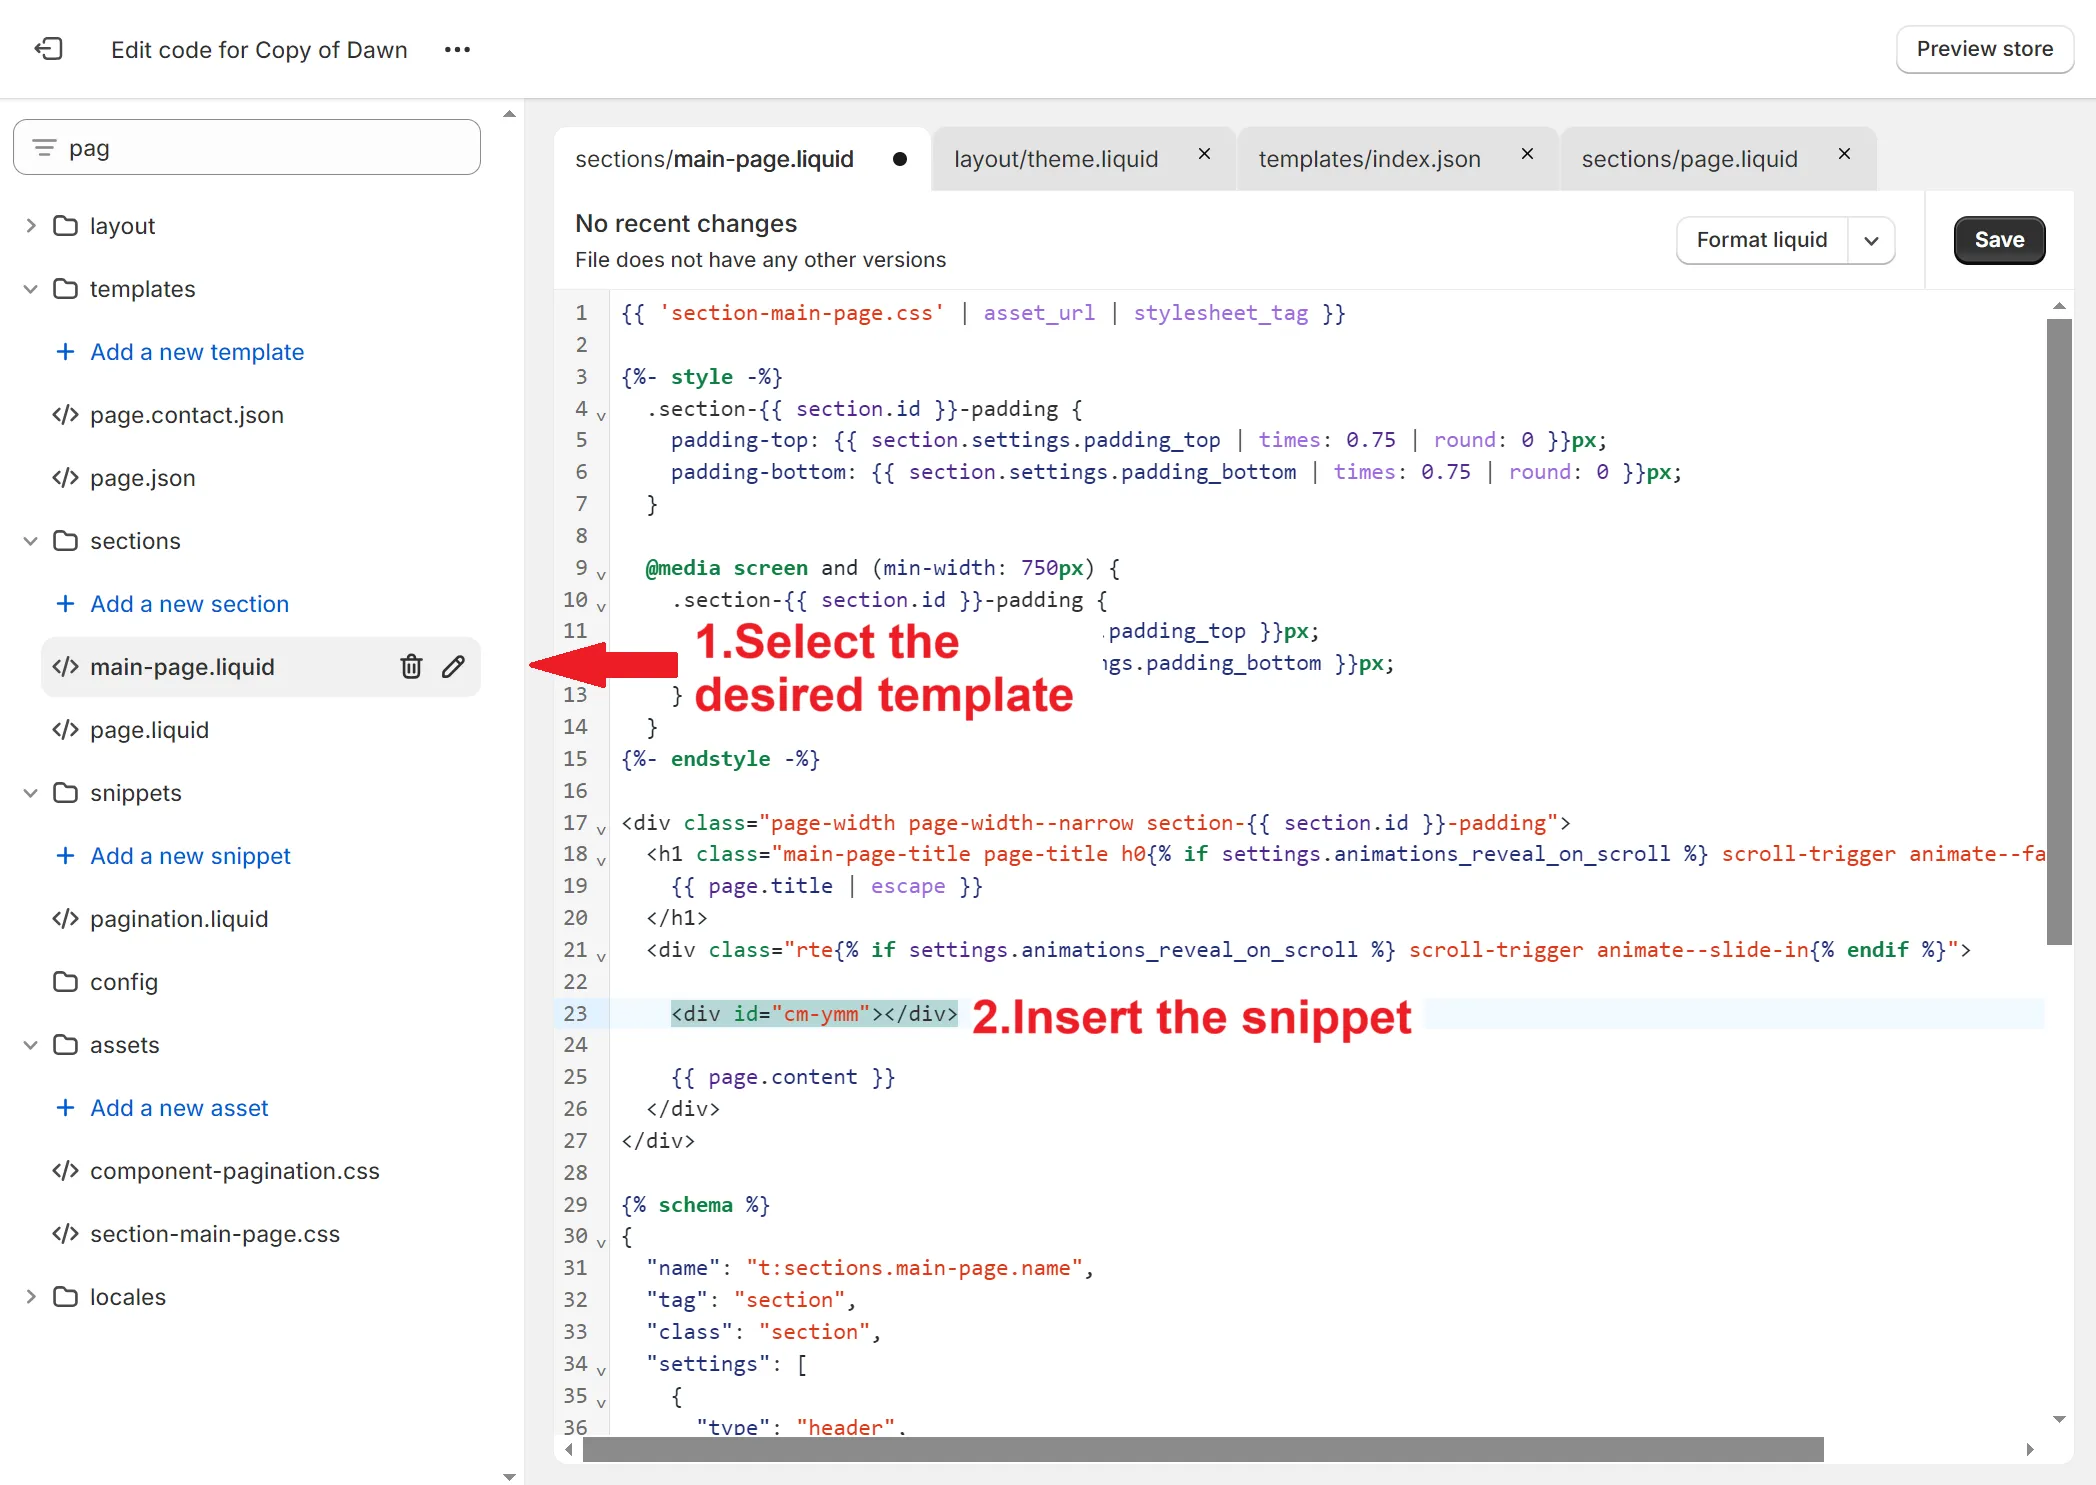
Go to your theme code editor: Admin → Sales channels → Online Store → Themes → (on the desired theme) ⋯ → Edit code
-
Select the desired template file
-
Choose the desired location of the Year Make Model Bar and paste the following code:
<div id="cm-ymm"></div>

Step 3: Product Detail Page
Section titled “Step 3: Product Detail Page”Add Verify Fitment
Section titled “Add Verify Fitment”-
Go to your theme code editor: Admin → Sales channels → Online Store → Themes → (on the desired theme) ⋯ → Edit code
-
Select the desired product template file
-
Choose the desired location of the Verify Fitment and paste the following code:
{% for collection in product.collections %}{% assign verify_hidden = collection.metafields.convermax.hide_verify %}{% if verify_hidden %}{% break %}{% endif %}{% endfor %}{% unless verify_hidden or product.metafields.convermax.hide_verify %}<div id="cm-verify-fitment"></div>{% endunless %}
Add Fitment Table
Section titled “Add Fitment Table”-
Go to your theme code editor: Admin → Sales channels → Online Store → Themes → (on the desired theme) ⋯ → Edit code
-
Select the desired product template file
-
Choose the desired location of the Fitment Table and paste the following code:
<div id="cm-fitment-table"></div>
Step 4: Collection page
Section titled “Step 4: Collection page”Update Collections List
Section titled “Update Collections List”-
Go to your theme code editor: Admin → Sales channels → Online Store → Themes → (on the desired theme) ⋯ → Edit code
-
Select the desired collection list template file
-
Remove or comment out the code responsible for rendering the content you want to replace and paste the following code instead:
<div id="cm-collection-list"></div>
Update the Collection Template
Section titled “Update the Collection Template”- Go to your theme code editor: Admin → Sales channels → Online Store → Themes → (on the desired theme) ⋯ → Edit code
- Select the desired collection template file
- Remove or comment out the code responsible for rendering the content you want to replace and paste the following code instead:
<div id="cm-collection-page" class="cm-collection-page"></div><script> {% if collection.metafields.convermax.vehicle.value != blank %} window.Convermax = window.Convermax || {}; window.Convermax.config = window.Convermax.config || {}; window.Convermax.config.isVehicleLanding = true; {% endif %}</script>Optional
Section titled “Optional”Add Related Products
Section titled “Add Related Products”-
Go to your theme code editor: Admin → Sales channels → Online Store → Themes → (on the desired theme) ⋯ → Edit code
-
Select the desired product template file
-
Choose the desired location of the Related Products and paste the following code:
<div id="cm-related-products"></div>
Add Carousel and Grid Block
Section titled “Add Carousel and Grid Block”- Go to your theme code editor: Admin → Sales channels → Online Store → Themes → (on the desired theme) ⋯ → Edit code
- Select the desired collection template file.
- Remove or comment out the code responsible for rendering the content you want to replace and paste the relevant code snippet below, depending on what you want to display:
-
If you want to show product categories in a grid:
<div id="cm-category-grid-list" class="cm_vehicle-categories__grid"></div>` -
If you want to show product categories in a carousel:
<div id="cm-category-carousel-list" class="cm_vehicle-categories__carousel"></div> -
If you want to show brands in a grid:
<div id="cm-brands-grid-list" class="cm_vehicle-categories__grid"></div> -
If you want to show brands in a carousel:
<div id="cm-brands-carousel-list" class="cm_vehicle-categories__carousel"></div> -
If you want to show collections in a grid:
<div id="cm-collections-grid-list" class="cm_vehicle-categories__grid"></div> -
If you want to show collections in a carousel:
<div id="cm-collections-carousel-list" class="cm_vehicle-categories__carousel"></div>Optional configuration:
a) Show top-level categories
What it does: displays the top-level categories instead of only subcategories
When to use:
- Only when displaying product categories (either in grid or carousel mode)
- No effect on brands or collections
Paste this script below your product categories block:
<script>window.Convermax = window.Convermax || {};window.Convermax.config = window.Convermax.config || {};window.Convermax.config.showTopLevelCategories = true;</script>b)Filter mode tiles
What it does: Makes the carousel work as a filter that updates results instantly, instead of linking to category pages
When to use:
- When displaying product categories, vendors, collections in carousel mode
- No effect in grid mode
Paste this script below your product categories carousel block:
<script>window.Convermax = window.Convermax || {};window.Convermax.config = window.Convermax.config || {};window.Convermax.config.useTilesFilterMode = true;</script>
Styling Convermax components
Section titled “Styling Convermax components”To adjust the appearance of Convermax widgets to match your store’s design, follow this guide. Styling Convermax components
Related links
Section titled “Related links”Testing Your Integration
Section titled “Testing Your Integration”- Save all changes
- Preview your store
- Test the search functionality:
- Try searching for products
- Check if filters work on collection pages
- Verify search results page displays correctly

