Where we store a customer vehicle and how to view it
Saving the Customer’s Vehicle
Section titled “Saving the Customer’s Vehicle”Saving a customer’s selected vehicle allows the store to maintain a consistent and personalized experience by recognizing and remembering their choice across sessions and interactions. When the user is logged in, this selection is automatically synced and restored on other devices, ensuring their garage remains available wherever they return.
By storing the vehicle information, you can:
- Support checkout validation – confirm that items in the cart match the saved vehicle, preventing ordering mistakes.
- Enable personalized marketing – use the stored vehicle data for recommendations, promotions, and follow-up emails.
Vehicle saving provides convenience for the customer and accuracy for the store.
Standard Options (work out of the box)
Section titled “Standard Options (work out of the box)”These options are supported natively and cover the majority of use cases:
- Klaviyo - saves the selected vehicle and garage to the customer profile, See more.
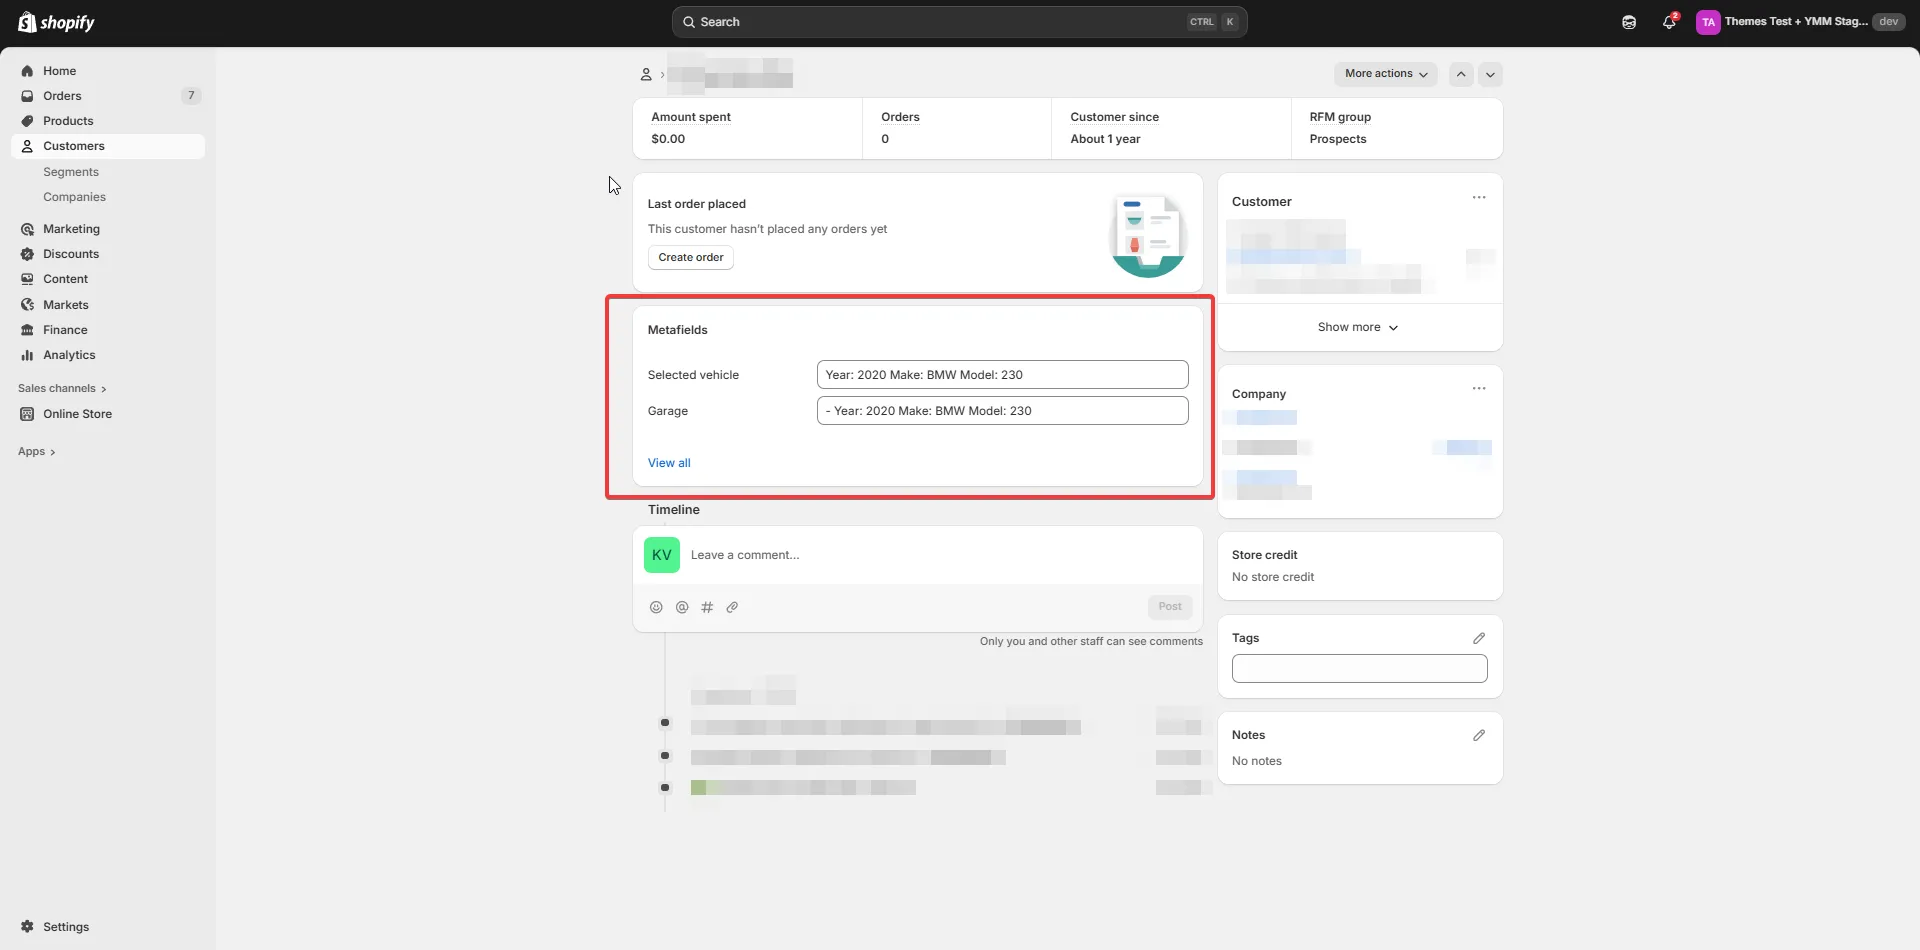
- Customer metafields – saves the selected vehicle and garage at the customer level.
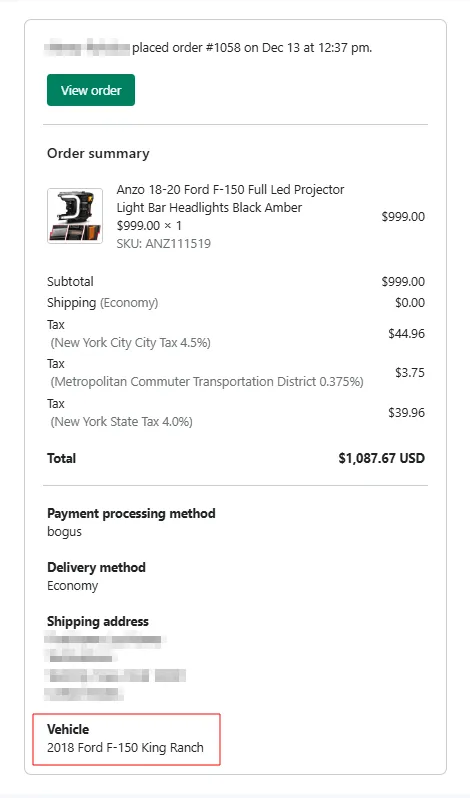
- Order attributes – the last selected vehicle is written into the order attribute
Vehicleas a plain text summary and each vehicle field as a separate attribute. This allows staff to quickly see which vehicle the customer had chosen at checkout.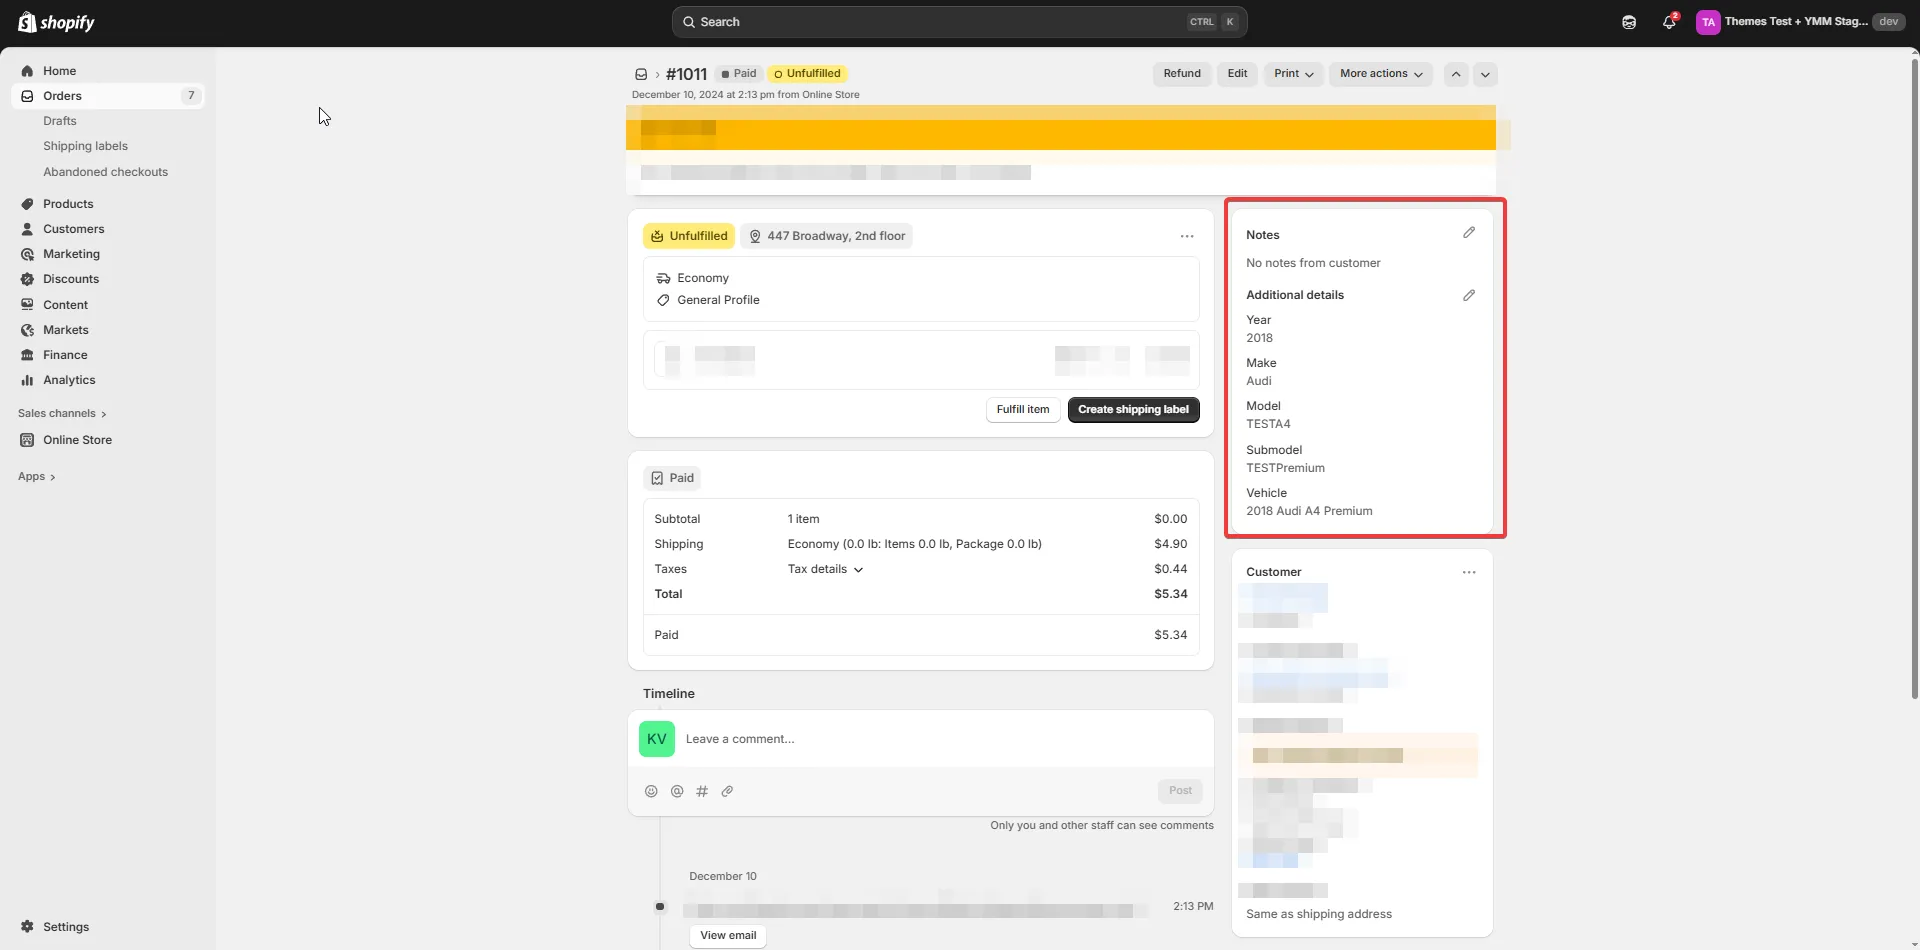
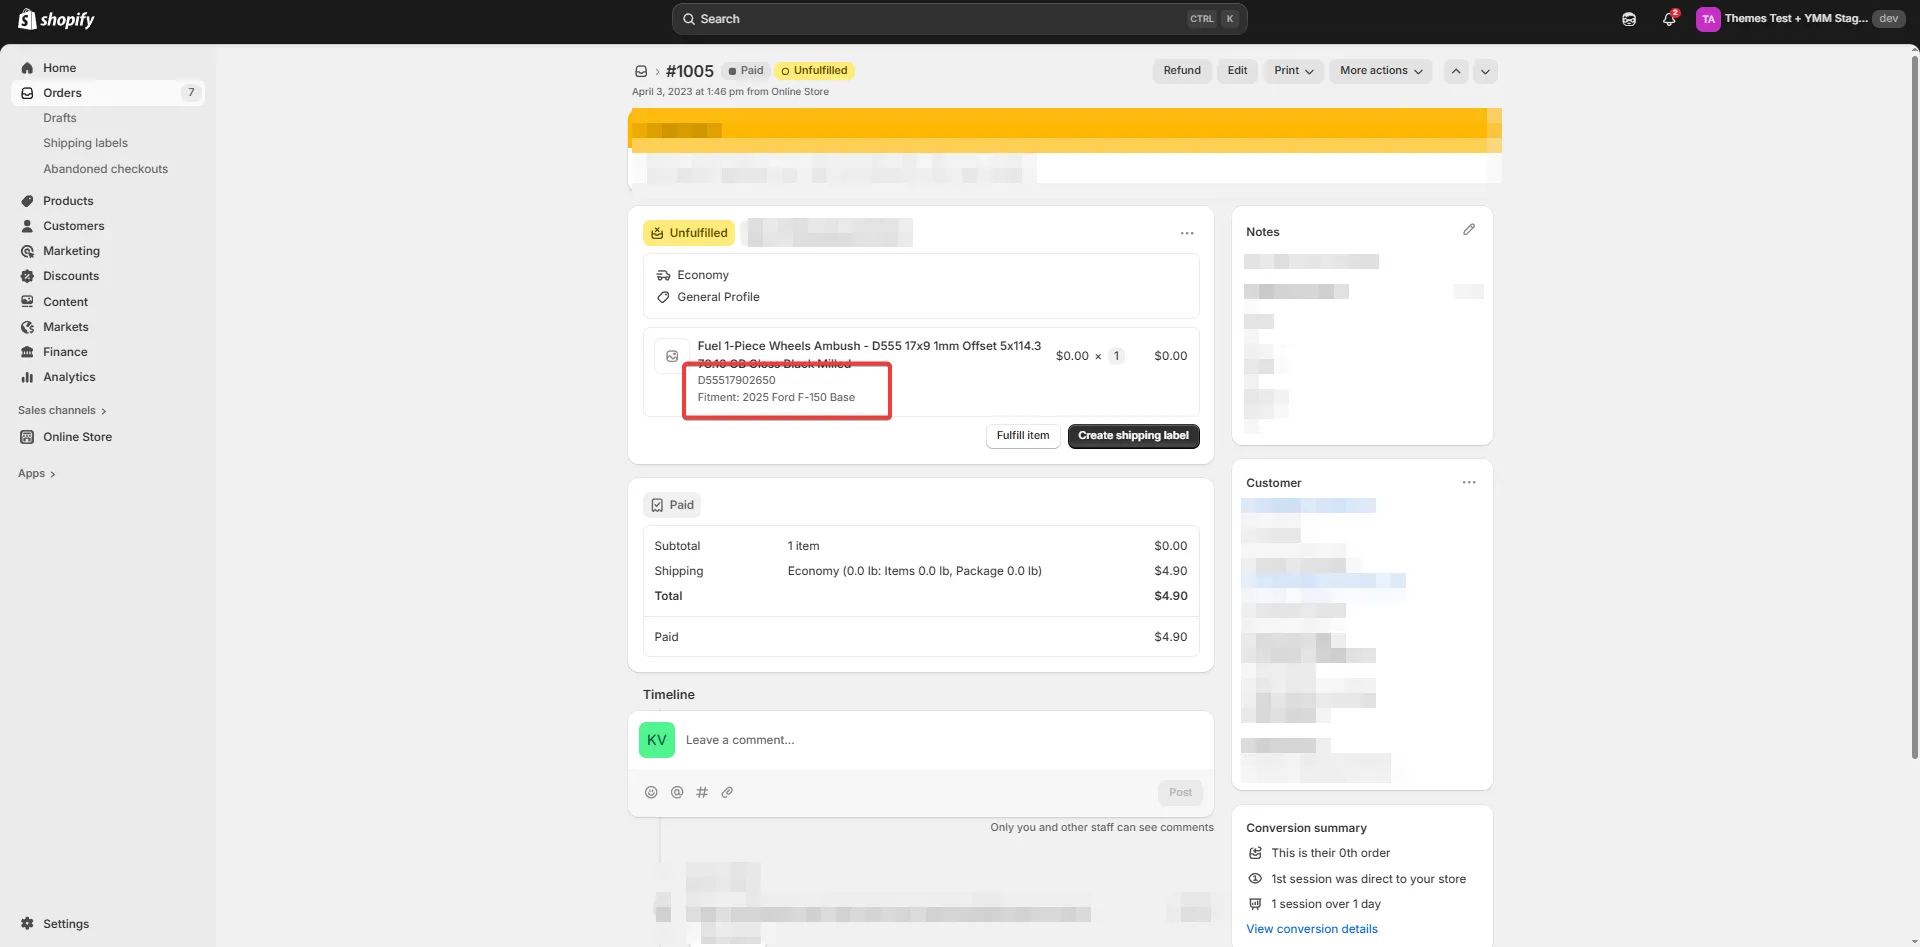
- Order line item properties – the result of fitment verification for a vehicle that was chosen when the exact line item (product) was added to cart.
Optional Saving Options
Section titled “Optional Saving Options”How to add a vehicle to an order email
Section titled “How to add a vehicle to an order email”-
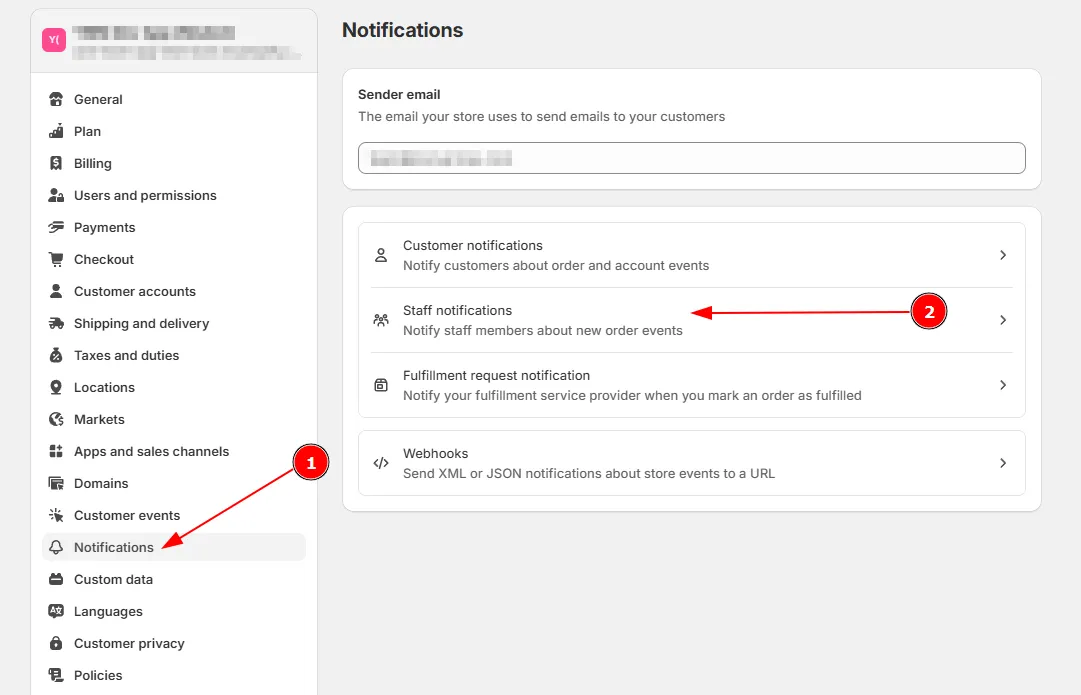
Go to Settings → Notifications → Staff notifications in the Shopify admin.
-
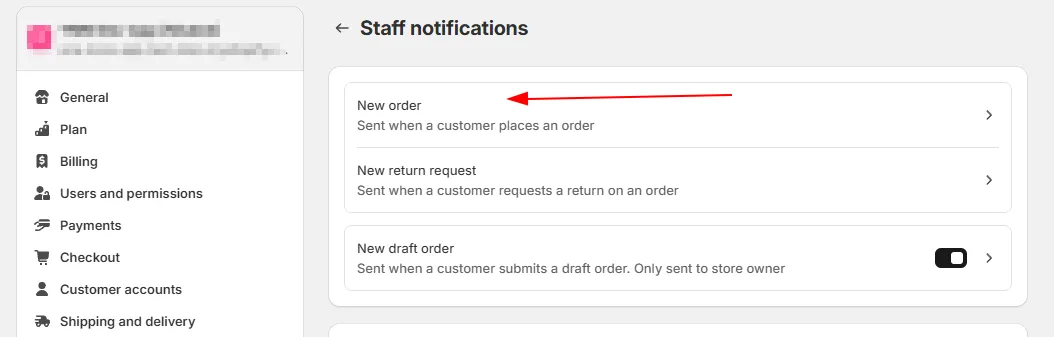
Click New order.
-
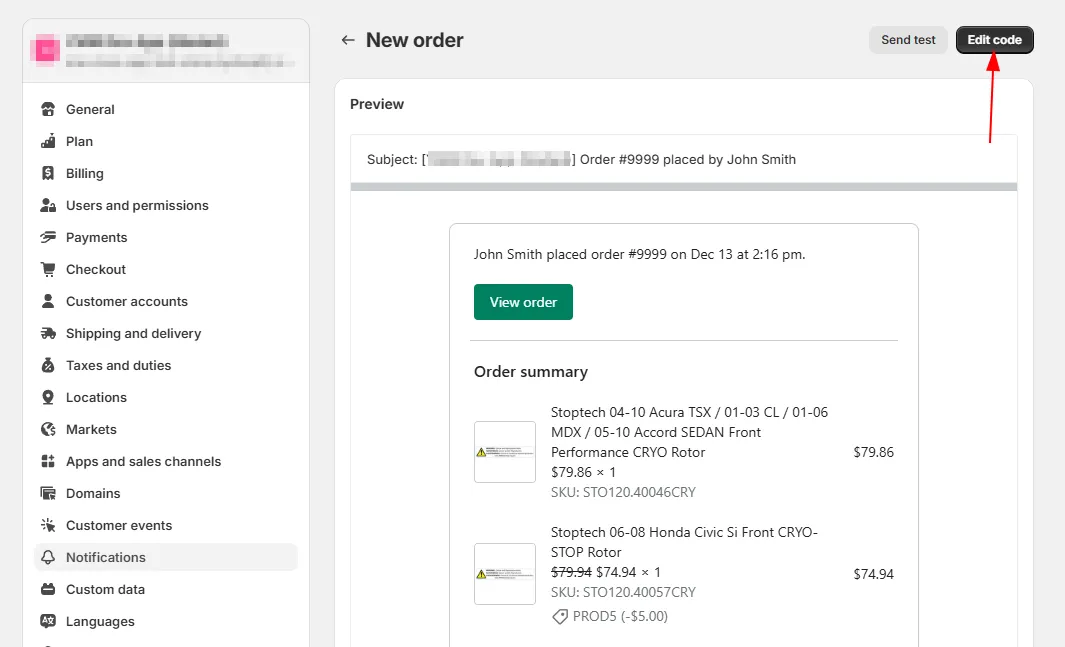
Click Edit code.
-
Add the following code to the code editor at the bottom. For example, place it after the Shipping address block.
{%- if attributes.Vehicle -%}<table class="row"><tr><td class="customer-info__item customer-info__item--last"><strong>Vehicle</strong><br /><p>{{ attributes.Vehicle }}</p></td></tr></table>{%- endif -%}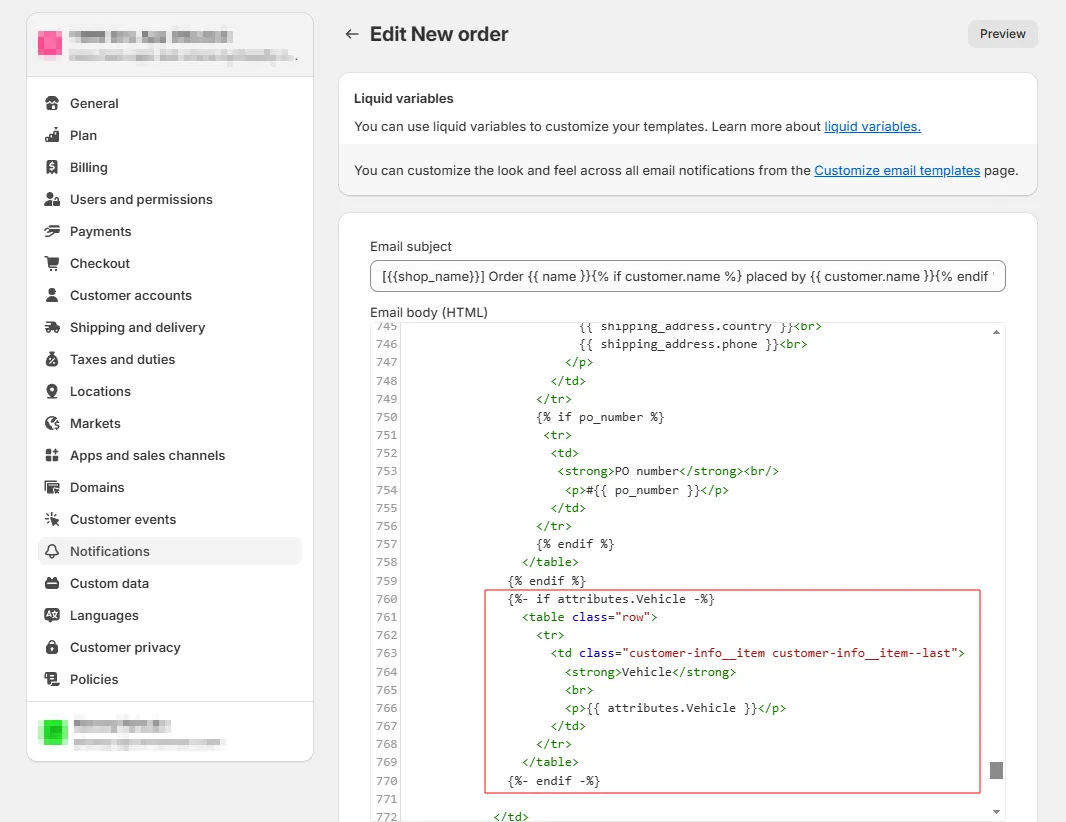
-
Click Save.
-
Now the vehicle is added to the order email.
How to add a vehicle to each product in an order email
Section titled “How to add a vehicle to each product in an order email”-
Go to Settings → Notifications → Staff notifications in the Shopify admin.
-
Click New order.
-
Click Edit code.
-
Add the following code to the code editor in the line items processing block.
{% if line.properties.Vehicle %}<div class="order-list__item-variant">Vehicle: {{ line.properties.Vehicle }}</div>{% endif %}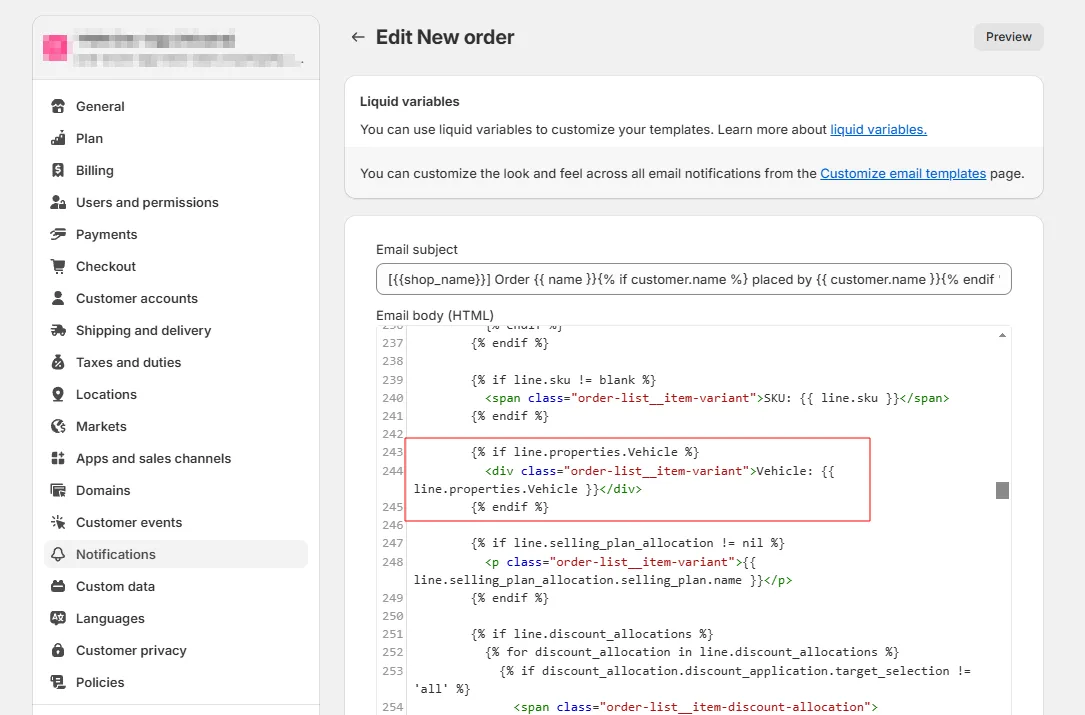
- Click Save.
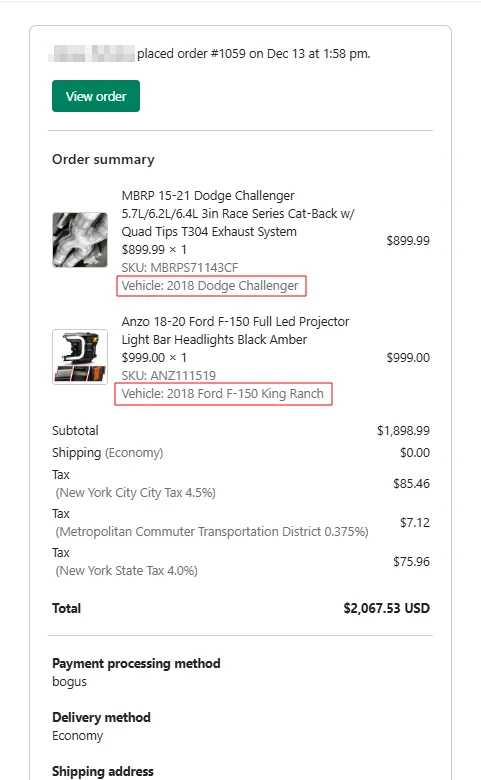
- Now customer’s vehicle appear in the order details email for each product.
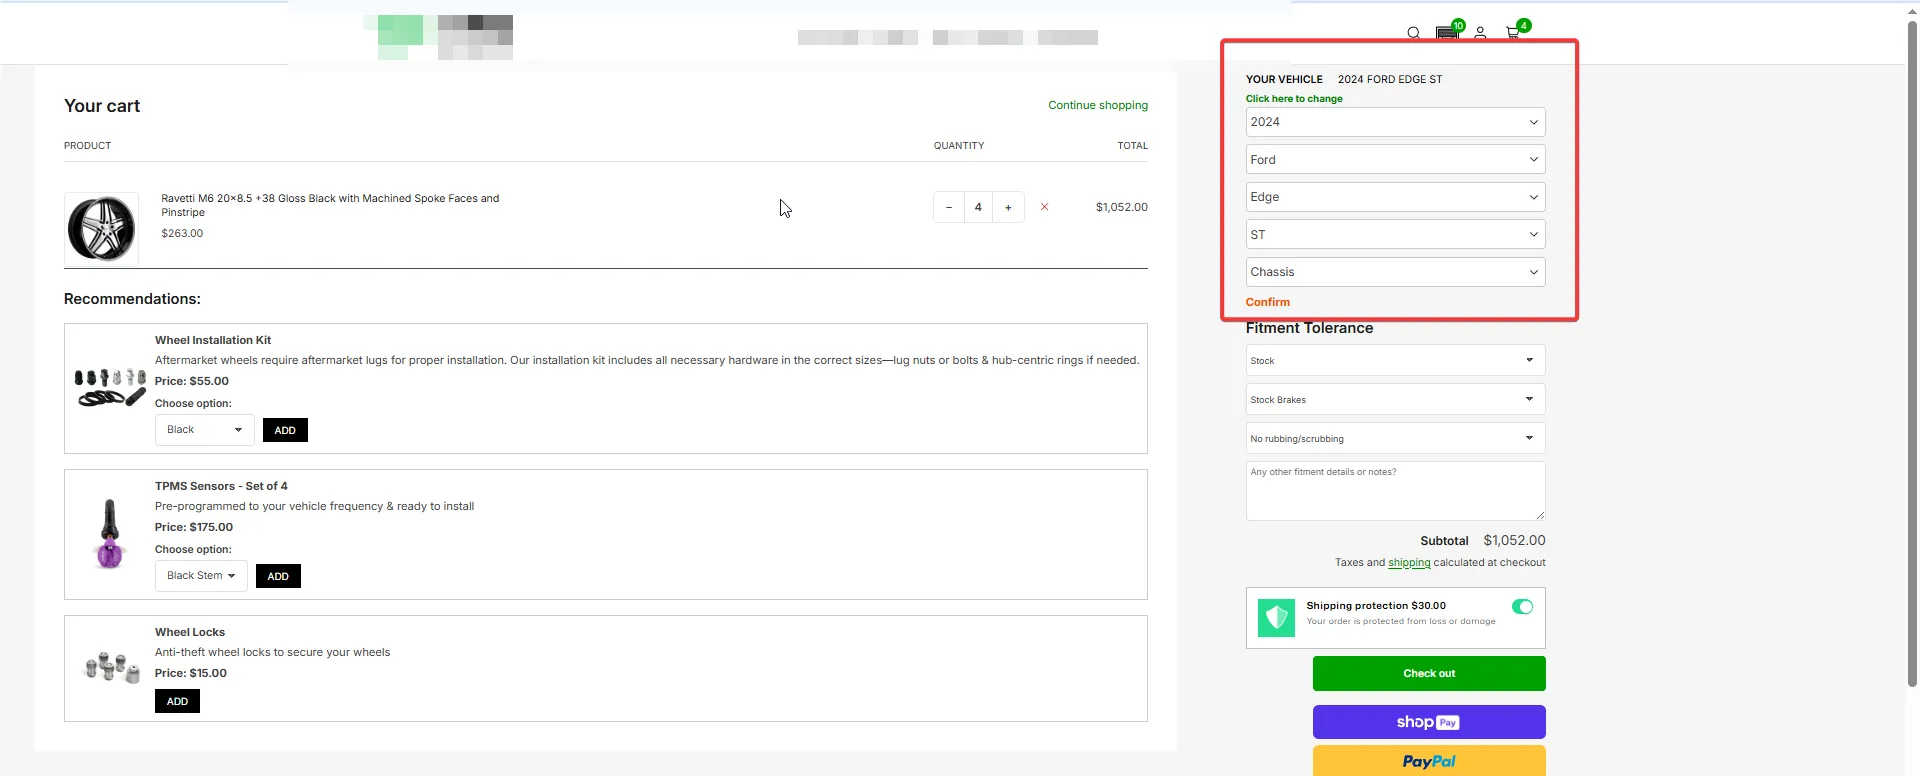
How to add a verify widget to cart page
Section titled “How to add a verify widget to cart page”- Add following code into cart liquid template:
{%- if cart != empty -%}<div id="cm-cart-ymm"></div>{%- endif -%}- Create
cartPageVerifyFitment.jsand add following code:
const isCartPage = window.document.body.classList.contains('template-cart');const cartUrls = window.Convermax.Shopify?.getCartUrls();
async function getCart() {  return fetch(`${cartUrls.root}.js`, {    method: 'GET',    headers: {      'Content-Type': 'application/json',    },  }).then((response) => {    if (!response.ok) {      throw new Error(`Failed to get cart: ${response.status}`);    }    return response.json();  });}
async function changeCartItem(key, quantity, properties) {  return fetch(`${cartUrls.change}.js`, {    method: 'POST',    headers: {      'Content-Type': 'application/json',    },
    body: JSON.stringify({      id: key,      quantity,      properties,    }),  }).then((response) => {    if (!response.ok) {      throw new Error(`Failed to change cart: ${response.status}`);    }    return response.json();  });}
const getCartProductIds = () => {  const productIds = [];  window.document    .querySelectorAll('.cart-items .cart-item')    ?.forEach((item) => productIds.push(item.getAttribute('product-id')));
  return productIds;};
const getVerifyFitmentLabelHtml = (fits, productType) => {  return `    <div class="cm_vehicle-widget cm_vehicle-widget__verify-fitment cm_vehicle-widget__verify-fitment__cart">      <div class="cm_vehicle-widget_label cm_verify-fitment cm_verify-fitment__${fits}">        <div class="cm_verify-fitment_title">          ${    fits === 'aggressive'      ? `Vehicle modifications may be required to fit your vehicle`      : `This ${productType} ${fits === 'yes' ? 'fits' : 'does not fit'} your vehicle`  }        </div>      </div>    </div>  `;};
const hideCartVerifyFitmentLabels = () => {  const productIds = getCartProductIds();
  if (productIds?.length > 0) {    productIds.forEach((productId) => {      window.document.getElementById(`cm_verify-fitment-label-container-${productId}`).style.display = 'none';    });  }};
async function updateCartVerifyFitmentLabels(vehicle) {  const vehicleString = `${Object.values(vehicle).join(' ')}`;
  if (vehicleString) {    const cart = await getCart();    if (cart?.items?.length > 0) {      for (const item of cart.items) {        try {          const fits = await window.Convermax.verifyFitmentAsync(item.product_id.toString(), vehicle);
          if (fits === 'yes' || fits === 'no' || fits === 'aggressive') {            const containerElem = window.document.getElementById(              `cm_verify-fitment-label-container-${item.product_id}`,            );
            if (containerElem) {              const productType = containerElem.getAttribute('product-type');              const verifyFitmentLabel = getVerifyFitmentLabelHtml(fits, productType);              containerElem.innerHTML = verifyFitmentLabel;              containerElem.style.display = 'block';              item.properties['Verify Message'] = `${                fits === 'aggressive'                  ? `Vehicle modifications may be required to fit your ${vehicleString}`                  : `This ${productType} ${fits === 'yes' ? 'fits' : 'does not fit'} your ${vehicleString}`              }`;            }          }        } catch {          item.properties['Verify Message'] = 'Failed verify vehicle';          hideCartVerifyFitmentLabels();        }
        item.properties.Vehicle = vehicleString;        await changeCartItem(item.key, item.quantity, item.properties);      }    }  }}
export async function onVehicleDiscarded() {  if (isCartPage) {    hideCartVerifyFitmentLabels();
    const cart = await getCart();
    if (cart?.items?.length > 0) {      for (const item of cart.items) {        item.properties.Vehicle = 'Vehicle is not selected';        item.properties['Verify Message'] = 'Failed verify vehicle';
        await changeCartItem(item.key, item.properties);      }    }  }}
export const onVehicleSelected = (vehicle) => {  if (isCartPage && Object.keys(vehicle).length > 0) {    updateCartVerifyFitmentLabels(vehicle);  }};
export const AfterInit = () => {  const vehicle = window.Convermax.getVehicle();
if (isCartPage && Object.keys(vehicle).length > 0) { updateCartVerifyFitmentLabels(vehicle); }};- Add this following code into
config.js
import {  onVehicleSelected as cartVerifyOnVehicleSelected,  onVehicleDiscarded as cartVerifyOnVehicleDiscarded,  AfterInit as cartVerifyAfterInit,} from './cartPageVerifyFitment.js';
const onVehicleSelected = (vehicle) => {  cartVerifyOnVehicleSelected(vehicle);};
const onVehicleDiscarded = () => {  cartVerifyOnVehicleDiscarded();};
const AfterInit = () => {  cartVerifyAfterInit();};
export default { includes: ['shopify-generic'], ...shopifyGenericDefaults, AfterInit, ... fitmentSearch: { ...shopifyGenericDefaults.fitmentSearch, onVehicleSelected, onVehicleDiscarded, }, ... Widgets: [ ...shopifyGenericDefaults.Widgets, { name: 'HeaderVehicleWidget_cart', type: 'VehicleWidget', location: '#cm-cart-ymm', template: 'fitmentSearch/cartVehicleWidget', isAlwaysActive: false, doNotRedirectOnVehicleSelect: true, initCollapsed: true, }, ],- Create
fitmentSearch/cartVehicleWidget.rtand add following code
<div class="cm_vehicle-widget cm_vehicle-widget__cart"> <div class="cm_vehicle-widget_title{this.isVehicleSelected ? ' selected' : ''}"> <span class="cm_vehicle-widget_title-label">Your Vehicle</span> <span rt-if="this.isVehicleSelected" class="cm_vehicle-widget_title-vehicle">{{vehicleString}}</span> </div> <div class="cm_vehicle-widget_subtitle" onClick="{{toggleCollapsed}}"> <rt-virtual rt-if="!this.isVehicleSelected"> <rt-virtual rt-if="this.collapsed">Click here to select</rt-virtual> <rt-virtual rt-if="!this.collapsed">Select</rt-virtual> your vehicle to check product compatibility </rt-virtual> <rt-virtual rt-if="this.isVehicleSelected">Click here to change</rt-virtual> </div> <div class="cm_collapsible-elem"> <div class="cm_vehicle-widget_dropdowns"> <div class="cm_vehicle-widget_body"> <cmRepeater:selects class="cm_vehicle-widget_select-container SELECTS_CONTAINER_CLASS" template="Select" /> <div class="cm_vehicle-widget_confirm" onClick="{{ selectVehicle }}" disabled="{!this.allowToSetVehicle}" > Confirm </div> </div> </div> </div></div>- Ensure that the verify widget is displayed on the shopping cart page and is functioning correctly